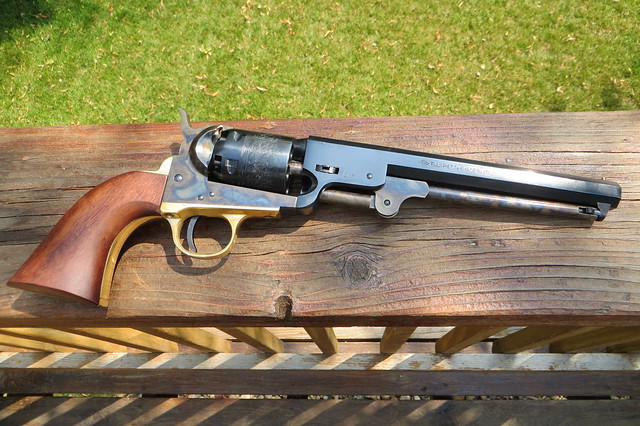
Pietta 1851 .36 Navy - anyone have one?

Muzzleloading Forum

Help Support Muzzleloading Forum:

This site may earn a commission from merchant affiliate links, including eBay, Amazon, and others.

AZbpBurner

54 Cal.
Joined
Mar 31, 2013
Messages
1,981
Reaction score
292
Location
Arizona Territories
I've found that the loading port on the right side of the frame wasn't cut out deep enough to allow access to the nipples for easy capping. It needs to be ground out to a shallower angle to be able to load cap without having to wedge it in at an angle. Does anyone else have this problem? My steel frame needs the most metal removed to make it quicker and easier to cap; the brass frame needed just the edge rounded at the end closest to the cylinder.
 
My 1851 had the same issue. I reshaped it and it was worth it. Mine is a steel frame so I had to re case color it.
 
GoodCheer said:
I just never gave it much thought.
But now it's gonna bug me every time I shoot the .36 or the .40.

If you have enough room to cap each nipple without having to wiggle each cap at an angle to seat, you're OK.
 
I picked up a steel frame 36 that had been neglected (what else?) and the frame was freckled and the case color gone. How did you manage to restore the color to yours?
 
I no longer have a Pietta Model 1851, but I never had any trouble capping the revolver. What I do know is that the loading port on both the Pietta and Uberti are smaller than the originals and will not allow the loading of combustible cartridges very well. They will take a conical bullet with a little fidgeting, but not cartridges made with the same bullet. The Pietta also has an incorrect loading plunger. It does not have the original conical recess. It is cut for round balls and will blunt the nose of an original style conical bullet. Ubertis are made correctly in this regard.
 
I bought a brass framed one as a gift for a buddy, was about 20 yrs ago. I recall it loaded just fine and it was accurate as heck. He died, I got in back, loaned it out :slap: , and got it back rusted beyond repair. Just trashed it, to have messed with it would have elongated my anger and cost a friendship. The idiot did offer to pay for it. I reminded him I very plainly and about 15 times told him CLEAN IT IMMEDIATELY when done. He shot Pyrodex and it was a year later when I went to get it as it kept "slipping his mind".

BTW I will NOT lend a gun out again if I am not there to reclaim it at days end and CLEAN IT MYSELF :cursing:
 
It's my hobby to do gun work and color case hardening is part of it.
I first strip the gun down completely then anneal it. Make any modifications and polish to correct texture. Using bone and wood char coal I pack the part and do the heat treat. Sorry there's no quick easy process for what I do. Here's how the 1851 came out. Note the sharper couture of the loading area and the refined loading lever.
2015-08-20 001 2015-08-20 001 by Oliver Sudden, on Flickr
 
Beautiful. I figured it would be an interesting process....going to have to do a bit of research. Looks like it's more than worth the effort
 
azmntman said:
I will NOT lend a gun out again

Good advice.
Wish I was smart enough to have learned that quicker.
Wish I was smart enough to change my ways :slap:


William Alexander
 
Lending guns or money to friends and family is a good way to lose one or the other. There is often not a good outcome. It is better to consider it a gift. Still I would understand the loss of the money but the damage of a good gun even if I didn't expect it back would be harder to swallow.
 
I have a recent production Pietta 1851 Navy and have the same problem. Not enough clearance to cap in the loading gate. I put hammer on half cock and use my Ted Cash snail capper through the hammer slot. It's a pain in the caboose,but works.
 
I loaded mine the same way with the capper thru the hammer slot. Works great, but I don't think Sam Colt would approve ... I bought a brass frame model 51 specifically for a .22 cal. Kirst conversion cylinder & it didn't have enough clearance to load or unload. Kirst instructions were general enough to mention using a sanding drum to reshape the loading port.

The Dremel sanding drum with first coarse, then medium, and then an abrasive-impregnated rubber drum to remove tool marks, and on to some 600 grit wet/dry paper, then finally a buffing wheel & it looked great - not anything like a "done-it-my-ownself-at-the kitchen-table" quality you'd expect using a Dremel. Of course it took 6 hours to complete, but much of that was waiting for the battery on my cordless Dremel to recharge.

I was so impressed with myself that I did a repeat on the steel frame, too. A magnet on the table makes clean-up easier ...

I finished the brass frame with some Brass Black. Over dirty metal surface, it kinda looks like case hardening, but doesn't look to be very durable. The brass black on the steel loading port gives an acceptable finish to knock down the otherwise bright mirror finish on the steel frame work.
 
rodwha said:
Sorry, life's too short to goofy around with those annoying photo hosting sites, and Photobucket can rot in hell. Take look at the 1851 and 1861 Uberti frame cutouts: I cut mine to be deeper and to taper down to not quite deep enough to touch the arbor.
 
Back
Top