• Friends, our 2nd Amendment rights are always under attack and the NRA has been a constant for decades in helping fight that fight.

    We have partnered with the NRA to offer you a discount on membership and Muzzleloading Forum gets a small percentage too of each membership, so you are supporting both the NRA and us.

    Use this link to sign up please; https://membership.nra.org/recruiters/join/XR045103

pietta 1851 timing ?

Muzzleloading Forum

Help Support Muzzleloading Forum:

This site may earn a commission from merchant affiliate links, including eBay, Amazon, and others.
One more thing, always wait a while for other opinions. Once you start filing, etc- it's irreversible. I had a 1873 Peacemaker clone that would jam on every cylinder shooting. I couldn't figure it out- I thought it was the recoil shield. Maybe the cylinder fit was too tight. Maybe my reloads had the primers backing out. This guy told me to mark the chambers and see if it always jammed in the same spot (It did). He then said to stone down the tooth on the racket- it had a burr. I saw that the tooth was a little different and that solved the problem.
In any event, messing with the mechanism is a pretty complicated thing. Slop in the hand because it is loose in its slot, that can cause troubles and people think a longer hand is needed when a wider one may be the issue.
As I said, wait for some more answers and see if you can locate a gunsmith dealing in Colt revolvers.
 
Well I took some off the nipples, before, and the caps seem to be fitting good, but it locks up
when the hammer is about 1/8th inch from the cap.

There is also some wear marks on the cylinder near the slot where the bolt goes.

That's why I think it might be a bolt & cylinder
alignment problem.
Anyway any help or knowledge on this subject I would appreciate Thanks ! Robin47
 
M.D. said:
It would take a long time to tell about the various miss-alinement problems it some of the most well know revolver makers guns. Some are more important than others but each contributes to an over all accuracy aggregate that is addressed in custom accuracy work and not expected in a production gun.
Another simple test is with a feeler gauge to check width on either side of the cylinder/ barrel gap. Most any production gun will show one side tighter than the other. This is miss- alinement generally and is because the base pin axis in not perfectly parallel with the threaded barrel hole through the frame.
Most production revolvers will also show a tight bore under the threads in the frame barrel hole. This is often from the thin shank of the barrel being torque choked when being indexed to top dead center in the frame. And the list goes on. MD

I never thought to try a feeler gauge. I could see it was off using a lazer bore sight and it always shot a little to the right. I almost just cut the rear sight so that it would make up for it. Once i figured out the arbor shim thing and i tried it that fixed both the windage issue and it also brought the shots down.

Once the arbor was sitting flat inside the pocket you could see how the frame where the 2 pins are was not square with the part of the barrel. One side of the frame was touching the othe rside had a little gap you could see in the light.

Thats why its a $150. brass frame .44 though. The $250. steel frames dont have these little issues least those i have didnt. Neither of them had timming issues nor had alignment issues. Thats why the 1851 civillian is still on my list i want a perfect 1851
 
Sorry, we have two different conversations going here- I was talking to dave61965. On Robin47's issue, it seems to me if everything cycles fine with no caps on the nipples then the problem is the caps, if the wrong size- they aren't fully seated and are binding on the recoil shield. Could be several different things- nipples too long, wrong caps, wedge driven in too tight.


To time a cap and ball it is handy to have a lathe to make a pin. One sized to fit the chamber, one to fit the barrel. Removing all the nipples first, then removing the barrel and inserting the pin into a chamber and re-install the barrel.
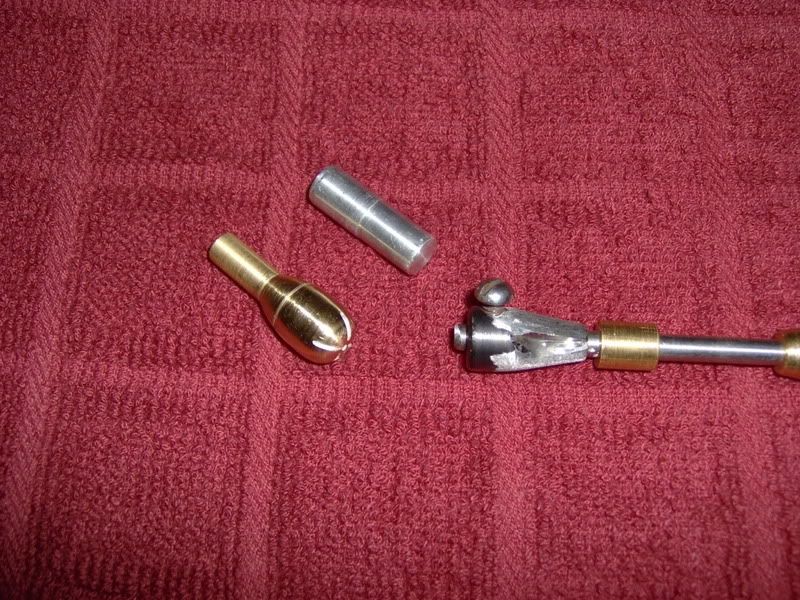
Photo of pin shown that was made for my .36 Navy.
Then the bolt may be fitted to the cylinder slot and frame to lock up the cylinder precisely when the hammer is down. You made need to start with a new bolt, but most Piettas just need reshaped and deepened into the frame/slot.
The nipples should clear the hammer by at least .010 so the hammer rests on the frame between shots. Don't worry, the cap is thick enough to still go off. Having said that, the hand should not start to rotate the cylinder because of the cap changing the hammer height. The hand should travel the cylinder into battery at full extension when the hammer is drawn to full cock. It is harder to explain than to do, but most of the replica cap and ball revolver could use some tweaking to make them better.
Opening the cylinder bores with a reamer that is .002 larger than groove size. That determines the size of plug you are going to make.
 
That's a really great idea about getting the chamber and bore in perfect allignment and then fitting the bolt. Thanks.
The photograph you posted. Could you explain what all the parts are and how you use them?
One more thing, on a later Colt 1873 Peacemaker the frame was more open on the bottom and you could see the bolt drop. You can't see it on a percussion but I slide a stiff piece of paper into the area and test to verify when the bolt is dropping.
On the hand, I think the top initially starts pushing the racket teeth and rotating but as the hand moves up it slips offf the teeth but the side of the hand keeps exerting pressure and rotating the cylinder- thus the way the hand fits into it's slot is important.
As stated the fit on some black powder guns isn't the best, but- given their price compared to other handguns- understandable.
One more thing, the bolt is supposed to lock and then just a tiny bit more movement backward on the hammer brings the hammer into full cock. On more than a few guns the hammer actually can go into full cock BEFORE the bolt locks up but most folks pull the hammer back as far as it will go- which is past the full cock notch and it is enough for the bolt to lock- they never realize there is a problem.
 
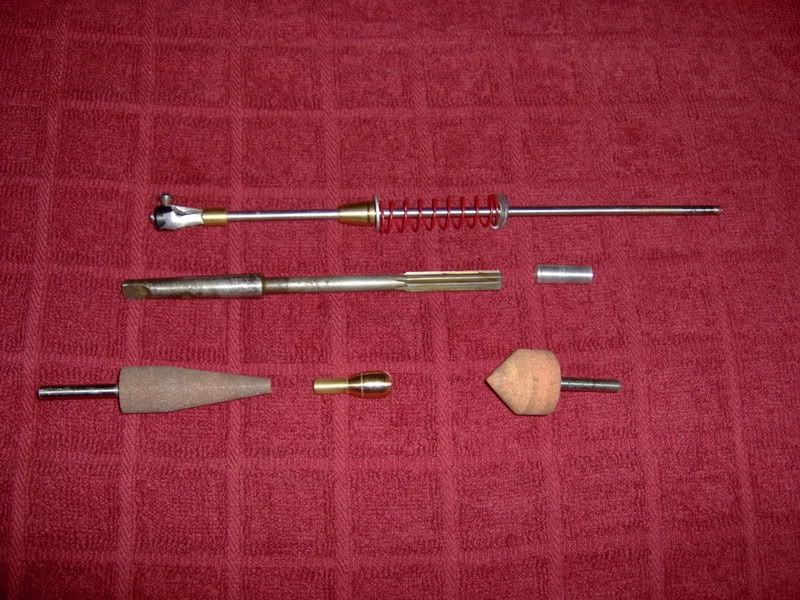
The piece in the center is the alignment pin between the barrel and cylinder.
The tool on the right is a set up I made for cutting 11 degree forcing cones in Pietta barrels, following Uberti's practice.
The brass piece on the left is a lap made for crowning the muzzle after making sure the muzzle is perpendicular to the bore.

The bolt fit can kinda be seen looking through the slot in the frame with the trigger guard removed, actually you can feel the fit better than actually seeing it. The depth of the bolt drop into the cylinder can control lock up timing as well because the bolt is not on the same centerline as the arbor. At least on a Colt this is true.

Timing a revolver is not hard when you understand how they work, you should start with the correct cylinder bore size then work from there. Anything changed on the revolver mechanism will affect how something else fits or is timed. Once it is understood how all the parts work, then you just make them all work together. :v
 
Those are some pretty cool tools. I have a crown tool but mine looks a little different then yours.

Will yours work for the chamber mouths also?

Do you fit the arbor as well? I think ide start with that then adjust the timming and stuff after the rest of the gun is square.

Do you have any tools for fixing the forcing cone on a remington? Without taking the barrel off.


These are the home made tools use for the .36 Colt, except the stones and the cylinder reamer.

I can honestly say this work made my .36 into a keeper, there was a time when it sat in the back of the gun cabinet and I pondered getting rid of it. Now it's my favorite Colt revolver and usually goes to the range every time.

When I make a new cutter to fit the .44 size, the forcing cone tool will work on the Remington also, without removing the barrel from the frame.

Not sure what to gain with the arbor as it moves some when the barrel is installed and the wedge seated properly. I have been fortunate with my Colts as the cylinders line up on the same axis as the barrel bore and in line.

For coning the barrel I use the 11 degree stone by hand and gently break the edge, then follow up with the brass lap to smooth the edge.

The reamer is a 3/8 reamer that makes the cyl bores .002 larger than the barrel grove and I use the larger .380 round balls.

The same stone used on the muzzle of the barrel can be used to chamfer the cyl bores, by hand.
I personally don't like she shaved lead ring mess and feel if the ball swages into the hole is should fit tighter and resist the moving from the recoil.
 
Good thread! I too have chamfered cylinder bores that swage the ball and eliminate the shaved ring and I've never had a chain firing. On the forcing cone- I've thought about that- did it improve accuracy? On crowning the muzzle, did that improve acuracy? I never thought about crowning a muzzle on a percussion revolver.
 
The forcing cone on a stock Pietta looks inadequate to me but made little difference to the accuracy. Each change was followed by a shooting session before changing something else. The muzzle crowning was the one thing that really improved the accuracy. Other than enlarging the cylinder bores so the ball would fit the rifling, crowning did the most improvement to the accuracy.

When crowning the muzzle it doesn't need to be turned into a funnel shape, just break the edges of the bore evenly so the gas pushing the ball as it leaves the muzzle pushes equally from all directions.
 
Good stuff, I use the crown bores and brass laps from the set I bought from Brownell's for modern revolvers to work over the cap-n-ballers I have.
One thing on forcing cones is that balls do better with a short cone and conicals do better with a 8 or 11 degree cone.
The Brownell's kit came with high speed steel cutters for both 8 and 11 degree cuts and corresponding brass laps for smoothing.
I have had to make different size brass centering bushings for the T handled drive rod. Delrin would work just as well and be easier to turn and bore on my lathe.
Also made a tool steel guide bushing that screws into the barrel frame hole in a 58 Remington to ream the chamber mouths. That helped with bore/chamber co-axis a bunch but have also done them by hand and if careful to feel the reamer cut in, a good job can also be done by hand. Mike D.
 
One reason I have not crowned a muzzle is fear of not doing it correctly. What tools are needed? Any tips on how to do the work welcomed.
 
A brass ball charged with lapping grit/compound with a spud in it to run from an electric drill motor is practically fool proof for crown dressing.
Spin at a low RPM and keep moving in an orbital movement while in the crown and it will make a perfect hemispherical crown dressing.
V shaped stones can be problematic in producing a symmetrically cut crown unless bore centered by at least two bushings and driven from the opposite end by a shaft. Mike D.
 
I wish i had those kind of tools, not for a .36 though.

Just use a magnify glass and look closely at the crown if its ok then leave it. I think when its cut at like 11° it just helps protect it from damage.

IMO you should check the crown before you start making sight adjustments. A little nick or bur can change the flight of the ball
 
The forcing cone cutters have three blades with corresponding brass hones.
The muzzle cutters are four bladed and cut perfectly flat.
The chamfering tools have one blade and cut very clean and even muzzle and forcing cone corners. Mike D.
 
That kit can be used on the remington without removing the barrel?

It looks long enough it might but just making sure.

Have you used it on a Remington so you know it works/clears the top strap?
 
Back
Top