• Friends, our 2nd Amendment rights are always under attack and the NRA has been a constant for decades in helping fight that fight.

    We have partnered with the NRA to offer you a discount on membership and Muzzleloading Forum gets a small percentage too of each membership, so you are supporting both the NRA and us.

    Use this link to sign up please; https://membership.nra.org/recruiters/join/XR045103

Questions on finishing technique on Kibler lock

Muzzleloading Forum

Help Support Muzzleloading Forum:

This site may earn a commission from merchant affiliate links, including eBay, Amazon, and others.
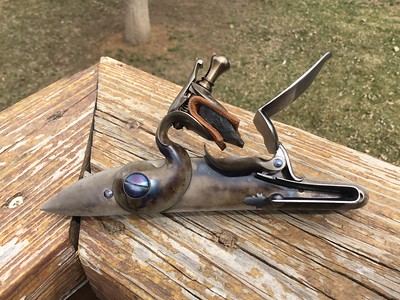
Kibler locks are machined then bead blasted, you should not touch the interior parts or the edges that touch the wood. Use hard backed abrasives to polish across the machine marks then the next finer grit at 90 degrees to that to keep the contours. I use EDM stones but the average guy will do well with sand paper with a hard backer. Use the black wet or dry paper with plenty of water to make the job easier.
AA0149F3-4E50-45BB-8CAC-B4D4D9909E96 by Oliver Sudden, on Flickr
i Am guessing the cock screw was fire blued. How was the rest done? It reminds me of case hardening..

There are instructions in the Kibler pamplet that exist because of my mistake and questions. We all muddle through this somewhat. At a certain age, each gun is a new experience and we repeat the muddling.
Jim does recommend this and the ALR forum.
‘No need to be condescending to those with questions. We all think we are smarter than everyone else, even if we can’t remember why we came into this room.
 
Sigh......

Jim Kibler himself makes the videos to help people who build his rifles. He has his own youtube channel devoted to the purpose. There is a lot to learn from the link below.

https://www.youtube.com/@kiblerjim

Scota@4570, Agree w/you 100%. Repeat from my post #11: "...I have watched every video Jim has made multiple times - watched them even before I bought the kit, and had the Woodsrunners parts 1,2,3 running on my cell phone on my bench as I was working - step by step..."
 
I really don't understand why some people have trouble putting one together. Jim makes it about as fool proof as possible. I see the staining and metal finish being slightly troublesome I'd you never done it before. But assembling the kit is easy peasy....
 
I really don't understand why some people have trouble putting one together. Jim makes it about as fool proof as possible. I see the staining and metal finish being slightly troublesome I'd you never done it before. But assembling the kit is easy peasy....

I am not inexperienced in firearms, I just have never built a muzzleloader from a kit. I got the Kibler kit assembled in the white quickly in an evening. Took longer to fiddle with the ramrod to get it to go down than to assemble the rifle. My only "issue" is lack of experience in metal finishing of brass castings and locks, hence my initial friendly (intended) plea for hints and guidance from more experienced builders before I delve in. Any idea that I did not correspond with Kibler Longrifles or watch the videos before coming in here, is entirely false. Whew; tough crowd.
 
Give yourself a break. You are doing it. You are learning. You took the initiative to seek help. . It is good. The hobby need more new people if it is to survive.

Any frustration I have is with people who give bad advice based on speculation, then argue with those who know actually know.
 
I am not inexperienced in firearms, I just have never built a muzzleloader from a kit. I got the Kibler kit assembled in the white quickly in an evening. Took longer to fiddle with the ramrod to get it to go down than to assemble the rifle. My only "issue" is lack of experience in metal finishing of brass castings and locks, hence my initial friendly (intended) plea for hints and guidance from more experienced builders before I delve in. Any idea that I did not correspond with Kibler Longrifles or watch the videos before coming in here, is entirely false. Whew; tough crowd.
yellowhammer, your on the right track and @Scota@4570 said it well. Everybody started out equal and learned along the way. Some people forget that, I try my best not too. Do your research and take it a step at the time.
I’ll be happier to share how I do my metal finishing as will others.
 
sleepingbulldog, Thanks, that's very similar to what I did in my ignorance on the trigger guard:

View attachment 227539


I'm not inexperienced with firearms, but I've never built a kit before and never polished up a rough casting.
What is wrong with that trigger guard? It looks real good. I think that you’re being too hard on yourself. Stuff back then wasn’t made all identical.

As to the lock, the outside is fine to polish, don’t mess with the innards. Take it apart (yes, it’s worth buying a spring vice) and use the black sand paper with finger grits, backing it with a file or something.

Looks good to me. Enjoy the gun, don’t stress small stuff.
 
Sorry, I disagree, I've experienced numerous examples where the manufacturer's instructions were deficient if not downright misleading. I have no experience with Kibler, so I can't say if that general experience applies in this case. But I'd suggest that the FIRST step, if the instructions don't seem clear and correct to you, to go to a forum and ASK QUESTIONS. Learn to filter the BS from the knowledge and wisdom. Don't bother calling the manufacturer support line unless you can't get an answer the first way. Most likely you'll just end up on indefinite Muzak hold, and then get some flunky that can't answer, anyway. There's people here that already know the answer, and are happy to educate. That, I think, is the better, and more general advice. My apologies to Kibler if it doesn't apply to them.
It doesn’t. Why not do some research first. His stuff, including instructions is first rate.
 
Yellowhammer didn't mean to sound negative towards you. Yes we all started somewhere. I still have my first four scratch built guns. So I can see my series of mistakes I made in building . I made a ton of them and still do...
But like I stated. Metal finishing is still tricky depending on what type of finish you want. I've got my methods that I learned the hard way. But I'm very satisfied how they turned out. Not exactly how the pros do it....lol
But in serious don't be afraid of experimenting. It's how we all learn and never give up...
 
I am not inexperienced in firearms, I just have never built a muzzleloader from a kit. I got the Kibler kit assembled in the white quickly in an evening. Took longer to fiddle with the ramrod to get it to go down than to assemble the rifle. My only "issue" is lack of experience in metal finishing of brass castings and locks, hence my initial friendly (intended) plea for hints and guidance from more experienced builders before I delve in. Any idea that I did not correspond with Kibler Longrifles or watch the videos before coming in here, is entirely false. Whew; tough crowd.
Ignore the gatekeepers.
Glad your here and just enjoying our great sport.
Any member that wants to give you a hard time needs to find the exit door
 
Got the lock parts smoothed out last night:

IMG_58.jpg


Applied Jax Black and was going to rub back to a worn patina look, but I like the way it looks as-is and I'm going to run in like this and let it develop it's own patina:

IMG_96.jpg
 
Thanks TDM and Bnewberry. Still got rubbing it back on my brain, but I keep staring at Kibler's rack of guns on his home page [ link ]and the black is appealing to me more and more.
 
Well it’s your rifle and you should make it to suit your taste. You can always rub it back more in the future. It’s easier to decide when the guns complete and you can step back and see how it all blends together.
 
Got the lock parts smoothed out last night:

View attachment 229029


Applied Jax Black and was going to rub back to a worn patina look, but I like the way it looks as-is and I'm going to run in like this and let it develop it's own patina:

View attachment 229030

I did the same thing using Brownells bluing product oxpho-blue, now after several sessions it has developed a patina I really like, I think you will as well.
 
Getting a reasonable poor-to-fair finish on the trigger guard casting for my Woodsrunner was not a good experience. It makes me approach the finishing of the lock plate, cock, and frizzen with mucho fear and trepidation. Can someone give me a Cliffs Notes quickie on what they did to smooth out the as-cast finish on their Kibler lock? I have seen several Kiblers that were just left in the as-cast condition. Although I probably can't leave it alone, I am tempted to, based on my incompetence on the trigger guard (of course the trigger guard casting was really crummy compared to the lock casting). Any help and mentoring will be GREATLY appreciated, I assure you.

edited to add: particularly worried about the tail of the lock plate where it tapers to a point. The factory inletting is superb and I dont want to mess it up.
I've only assembled one Kibler kit, and that was for a friend. Very little was done to the trigger guard or lock plate (other than browning the guard and cold bluing then knocking the color back on the lock) as my friend wanted more of a working mans SMR. The only drawback was that Kiblers idea of plain maple isn't very plain. I'd have been happy to get the stock if I'd ordered fancy maple.
 
Back
Top