I have seen that several companies offer stocks for the T/C Hawken. I really do not like the dimensions of the original, as far a LOP and drop at comb are concerned. Getting a new stock from Pecatonica River would solve those issues, according to their description of their offerings. Replacing the half stock with a half stock is one thing, but what issues would I be up against if I went with a full length replacement. Are they for a longer barrel than my stock T/C? Your advice would be appreciated.
You are using an out of date browser. It may not display this or other websites correctly.
You should upgrade or use an alternative browser.
You should upgrade or use an alternative browser.
Restocking a T/C Hawken .45
- Thread starter USMA65
- Start date

Help Support Muzzleloading Forum:
This site may earn a commission from merchant affiliate
links, including eBay, Amazon, and others.
Grizzly Adams
50 Cal.
- Joined
- Jul 21, 2014
- Messages
- 1,049
- Reaction score
- 2
I think your stock barrel will fit. You may need to cut the stock to fit.
There is no mechanical reason you couldn't restock a half stock to a full stock. BUT the TC barrels are only 28in., and it would make the rifle look a little stumpy. Any stock with the proper barrel channel would work. Also reusing the hardware will set the style of the stock. You would need a set of thimbles and a nosecap.
- Joined
- Jan 3, 2013
- Messages
- 20,091
- Reaction score
- 1,023
You'll essentially be building a new rifle..
Rather try to use a bunch of old worn out cheaply built incorrect parts.......Why not just buy the Hawken kit from Pecatonica and build a complete rifle ?
Rather try to use a bunch of old worn out cheaply built incorrect parts.......Why not just buy the Hawken kit from Pecatonica and build a complete rifle ?
- Joined
- Jun 12, 2005
- Messages
- 8,017
- Reaction score
- 1,023
I'd hesitate to go to a full stock for this project. I agree that you run the risk of having a rifle which would look 'stumpy.'
just one guy's advice : free and no doubt well worth the cost!
just one guy's advice : free and no doubt well worth the cost!
- Joined
- Aug 18, 2014
- Messages
- 455
- Reaction score
- 14
I have been thinking the same for my TC Renegade. I already have a Green Mountain barrel in it 32" long. Been thinking about doing a full stock, but a half stock would be much easier to convert using the Pecatonica River replacement. I keep running into a concern on the under lugs if I go to a full stock. I don't think I would have enough room for the additional keys, unless I could get away with less.
The Pecatonica River TC replacement stock changes the drop from the TC's 2 3/8 inches to a little over 3 inches.
This effectively lowers the comb when you shoulder the gun.
As with all of Pecatonica River's stocks, quite a lot of fitting is needed. It isn't a "drop in" stock. On the other hand, it does not require the amount of work all of the other PR stocks and gun parts need.
When I restocked my TC Hawken I chose to buy the least expensive wood. It is offered in all of the grades of wood they sell for their other stocks so if you have the money you can get pretty fancy.
While I was at it, I decided to try pouring the nosecap. That was an experience in itself but it turned out pretty good.
IMO, their #3 grade curly maple is the best wood for the money. It has more curl than the other companies offer for a modest price.

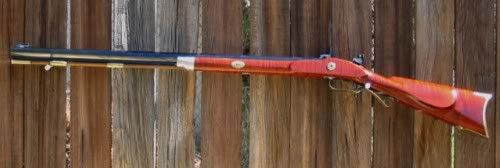
No. The camera acted up on the day I took this picture. The stock is not nearly as red as it appears. :shocked2:
This effectively lowers the comb when you shoulder the gun.
As with all of Pecatonica River's stocks, quite a lot of fitting is needed. It isn't a "drop in" stock. On the other hand, it does not require the amount of work all of the other PR stocks and gun parts need.
When I restocked my TC Hawken I chose to buy the least expensive wood. It is offered in all of the grades of wood they sell for their other stocks so if you have the money you can get pretty fancy.
While I was at it, I decided to try pouring the nosecap. That was an experience in itself but it turned out pretty good.
IMO, their #3 grade curly maple is the best wood for the money. It has more curl than the other companies offer for a modest price.


No. The camera acted up on the day I took this picture. The stock is not nearly as red as it appears. :shocked2:
That is the cheapest #1 grade wood.
This is a picture of Pecatonica Rivers typical #3 wood after a lye water treatment and several coatings of alcohol based stains.
The oil finish is Birchwood Casey Tru-Oil.
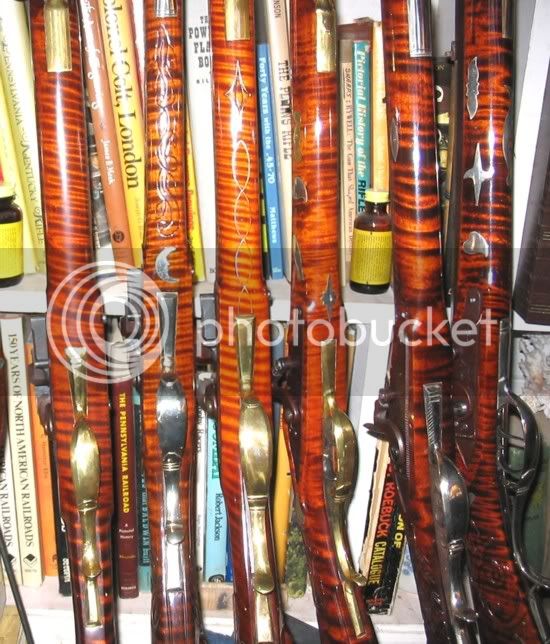
As is shown in the picture, you never know how it will come out when your done. Each piece of wood is different so each piece takes the stains differently.
This is a picture of Pecatonica Rivers typical #3 wood after a lye water treatment and several coatings of alcohol based stains.
The oil finish is Birchwood Casey Tru-Oil.

As is shown in the picture, you never know how it will come out when your done. Each piece of wood is different so each piece takes the stains differently.
Chevythunderman
40 Cal.
- Joined
- Mar 30, 2014
- Messages
- 196
- Reaction score
- 0
I'm confused on what you mean as far as room for additional keys? You would remove the under rib and install the lugs for your keys where these would go....Or you could just use pins and replace the wedges...meaning of course you would have to replace your factory underlugs with the proper ones to fit whatever way you would want to go with that (wedges, pins)
Zonie said:That is the cheapest #1 grade wood.
This is a picture of Pecatonica Rivers typical #3 wood after a lye water treatment and several coatings of alcohol based stains.
The oil finish is Birchwood Casey Tru-Oil.

As is shown in the picture, you never know how it will come out when your done. Each piece of wood is different so each piece takes the stains differently.
:shocked2:
Beautiful, absolutely beautiful.
- Joined
- Aug 18, 2014
- Messages
- 455
- Reaction score
- 14
The under rib has many screw holes on the bottom of the barrel. The existing wedge lug is screwed on, but I haven't found a matching one to add. I was thinking of using some of the holes already there but the spacing seems a bit wonky. I am thinking of doing a half stock and save myself a lot of aggravation.
OR my birthday is coming up and I have been lusting at a rifle on TOW. :hmm:
OR my birthday is coming up and I have been lusting at a rifle on TOW. :hmm:
- Joined
- Aug 18, 2014
- Messages
- 455
- Reaction score
- 14
Well I did it. I ordered a new half stock from Pecatonica River yesterday. I took Zonie's advice and specified the CM3 grade.
Having never done this type of work I am a little apprehensive about how I will do, especially around the ramrod entrance/ nose cap on the stock.
I still would like to know more about the Lye water highlighting treatment for the grain. I was thinking about that or Aqua Fortis and then Tru oil.
Having never done this type of work I am a little apprehensive about how I will do, especially around the ramrod entrance/ nose cap on the stock.
I still would like to know more about the Lye water highlighting treatment for the grain. I was thinking about that or Aqua Fortis and then Tru oil.
First, a short talk about curly wood so the explanation about lye water will make sense.
The thing that causes the wood to look striped is the way the grain grew.
Most common wood grain grows straight unless it is close to a limb.
Curly wood grain grows in waves moving back and forth.
Take a look at this drawing to get the idea.
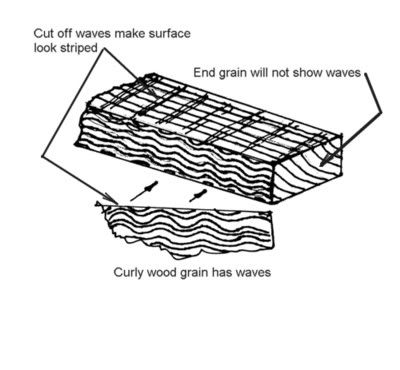
If you have a small piece of curly wood try splitting it along the grain. The result will not be a smooth flat surface. It will have dozens of little waves on it. :shocked2:
As most people who work with staining wood know, the end grain of the wood absorbs more stain and as a result, after staining, it is darker looking than the straight grain that is parallel with the surface.
When a piece of curly wood is shaped or sanded, the little waves get cut off exposing end grain on the surface. The end grain is usually, but not always, in a straight line across the board.
OK. Now for the lye water treatment and what it does.
Lye water dissolves the tannin in the wood and brings it to the surface. Tannin is what gives wood its brown color and even a blond wood like maple has it.
The end grain exposed on the surface in curly wood absorbs more lye water causing the lye to penetrate deeper. It also gives up its tannin more readily than the parallel grain does.
This allows the lye water to bring more of the tannin to the surface making the "stripes" appear darker than the wood right next to it.
Although the lye water treatment darkens the entire stock the difference is not great. The contrast between the end grain stripes and the parallel grain right next to it is however greatly increased.
How to use lye water:
Mix about a teaspoon of lye crystals into a cup of water until it dissolves.
Use a NYLON or synthetic paint brush to paint the lye water onto the wood in a very wet coating.
Allow the lye water to dry.
Using a soft rag, wet it with vinegar and wipe one wet coat on the surface of the wood to neutralize the lye.
The idea here is to nuteralize the lye, not to remove the tannen that was floated to the surface so, do not rub the wood while your doing this.
That would only wipe off the tannin you just worked so hard to bring to the surface.
Let it dry and your done. Applying lye several times will not do anything so don't bother.
DO NOT use a paint brush with natural hair bristles. The lye will instantly eat them and cause the brush to fall apart right before your eyes.
Also be aware, lye water will eat your skin, your cloths and IT WILL BLIND YOU if you get even a small speck of it in your eyes.
Although I always use rubber gloves and a long shirt when I do this treatment, I always end up getting a small speck of the solution on some part of my skin.
Within seconds, a burning sensation will start and if left untreated it will only get worse.
The answer to this is ALWAYS have a glass or cup of vinegar within arms reach.
Splash the vinegar onto the burning area as quickly as possible.
That will neutralize the lye and literately save your hide.
Acid treatments like Aqua Fortis or normal alcohol based stains are applied after the lye water treatment has been done.
As for the color you get with Aqua Fortis, it all depends on the piece of wood you are working on and the kind and strength of the Aqua Fortis.
After heating it, whatever the color results is the luck of the draw.
That's why I usually don't bother with Aqua Fortis and just use good brands of alcohol based stains on my stocks.
Oh. I need to add, if you are working with a cherry stock, the lye water will darken it A LOT.
If you are working with a walnut stock, lye water will turn the surface black, wiping out any nice stripes or curl that it may have.
I don't recommend using lye water on walnut unless your looking for something that looks like ebony.
The thing that causes the wood to look striped is the way the grain grew.
Most common wood grain grows straight unless it is close to a limb.
Curly wood grain grows in waves moving back and forth.
Take a look at this drawing to get the idea.

If you have a small piece of curly wood try splitting it along the grain. The result will not be a smooth flat surface. It will have dozens of little waves on it. :shocked2:
As most people who work with staining wood know, the end grain of the wood absorbs more stain and as a result, after staining, it is darker looking than the straight grain that is parallel with the surface.
When a piece of curly wood is shaped or sanded, the little waves get cut off exposing end grain on the surface. The end grain is usually, but not always, in a straight line across the board.
OK. Now for the lye water treatment and what it does.
Lye water dissolves the tannin in the wood and brings it to the surface. Tannin is what gives wood its brown color and even a blond wood like maple has it.
The end grain exposed on the surface in curly wood absorbs more lye water causing the lye to penetrate deeper. It also gives up its tannin more readily than the parallel grain does.
This allows the lye water to bring more of the tannin to the surface making the "stripes" appear darker than the wood right next to it.
Although the lye water treatment darkens the entire stock the difference is not great. The contrast between the end grain stripes and the parallel grain right next to it is however greatly increased.
How to use lye water:
Mix about a teaspoon of lye crystals into a cup of water until it dissolves.
Use a NYLON or synthetic paint brush to paint the lye water onto the wood in a very wet coating.
Allow the lye water to dry.
Using a soft rag, wet it with vinegar and wipe one wet coat on the surface of the wood to neutralize the lye.
The idea here is to nuteralize the lye, not to remove the tannen that was floated to the surface so, do not rub the wood while your doing this.
That would only wipe off the tannin you just worked so hard to bring to the surface.
Let it dry and your done. Applying lye several times will not do anything so don't bother.
DO NOT use a paint brush with natural hair bristles. The lye will instantly eat them and cause the brush to fall apart right before your eyes.
Also be aware, lye water will eat your skin, your cloths and IT WILL BLIND YOU if you get even a small speck of it in your eyes.
Although I always use rubber gloves and a long shirt when I do this treatment, I always end up getting a small speck of the solution on some part of my skin.
Within seconds, a burning sensation will start and if left untreated it will only get worse.
The answer to this is ALWAYS have a glass or cup of vinegar within arms reach.
Splash the vinegar onto the burning area as quickly as possible.
That will neutralize the lye and literately save your hide.
Acid treatments like Aqua Fortis or normal alcohol based stains are applied after the lye water treatment has been done.
As for the color you get with Aqua Fortis, it all depends on the piece of wood you are working on and the kind and strength of the Aqua Fortis.
After heating it, whatever the color results is the luck of the draw.
That's why I usually don't bother with Aqua Fortis and just use good brands of alcohol based stains on my stocks.
Oh. I need to add, if you are working with a cherry stock, the lye water will darken it A LOT.
If you are working with a walnut stock, lye water will turn the surface black, wiping out any nice stripes or curl that it may have.
I don't recommend using lye water on walnut unless your looking for something that looks like ebony.
- Joined
- Aug 18, 2014
- Messages
- 455
- Reaction score
- 14
Zonie, thanks for clarifying the lye process. Just to make sure I understand about neutralizing with vinegar, just give it one good wipe with a soaked soft cloth. Don't rub it in?
That's right.
Just fully wet the surface with the vinegar without rubbing. Even painting the vinegar on with a paint brush does a nice job.
Rubbing or wiping the surface with a rag will remove or redistribute the tannin. Either of these will reduce the effect that the lye process creates.
Just fully wet the surface with the vinegar without rubbing. Even painting the vinegar on with a paint brush does a nice job.
Rubbing or wiping the surface with a rag will remove or redistribute the tannin. Either of these will reduce the effect that the lye process creates.
Camera problems alright. Yer camera forgot to photograph the patch box. :shocked2: :wink:
How about telling us how you poured that nose cap. Material used, etc.
How about telling us how you poured that nose cap. Material used, etc.
As far as inletting the parts into the new stock, make sure you have good sharp chisels for any of the inletting work, and go slow, and I mean slow. The biggest mistakes I have made was when I was trying to rush something, I am having to "fix" the trigger guard inlet right now on a project because I got in a hurry. Not speaking for others, but every time I get in a rush common sense and expertise go out the window. Good luck, Stew.
I can't say I'm proud of the nose cap. It was my first attempt to cast one in place and I've never really liked the shape of it.Rifleman1776 said:...
How about telling us how you poured that nose cap. Material used, etc.

Anyway, I decided I didn't want to inlay the TC nosecap and decided to cast one.
I gave serious thought to using pewter that's available from most of the places that supply muzzleloading parts but the high temperature of the molten pewter worried me a bit.
I guess you might say I was lucky because I was able to get some Cerrobend at work for the project.
Cerrobend is about the same thing as Cerrocast that is used to make castings of rifle chambers.
It is a bismuth alloy that melts at about 170°F.
I figured, if I frinkle the casting up I could just stick the nose of the stock in a pan of boiling water and melt it off so I could try again.
To make the casting I undercut the area around the nose of the stock about 1/16" deep so the finished casting would be about 1/16" thick.
I also drilled 4 holes thru the wood, countersinking the inside end at the barrel channel so it would cast a self retaining end shaped like a flat head screw or rivet.
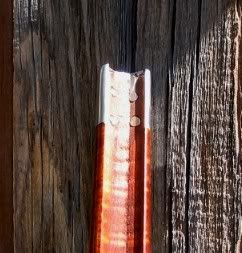
I inserted a taped up wooden dowel into the ramrod hole and built a dam out of heavy paper to form the outside of the entire cast blob. The thickness of the paper I used was about like the stuff milk cartons are made from but without the wax on it.
I installed the barrel so it would act as one wall to the casting and then used lots of masking tape to seal off any small openings between the barrel, the heavy paper and the wood.
I used an old tin can to melt the Cerrobend and a pair of Vise-Grip® pliers clamped onto the can to pick it up and pour the casting.
After it cooled, removing the barrel, paper, tape and dowel left me with a blob that I shaped with files and sandpaper.
Sense those days, I've also used the Cerrobend to cast the nose on the stock for my Schuetzen and the grip butt for my single shot pistol.

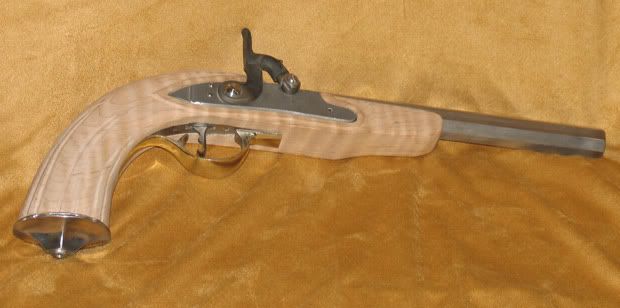
The pistol photo was taken while the gun was still being built.
Similar threads
- Replies
- 9
- Views
- 514
- Locked
- Replies
- 6
- Views
- 778
Latest posts
-
-
-
SOLD - Pending funds EXCELLENT Tryon. 54 Deluxe Maple Target Rifle
- Latest: 4-H Blackpowder
-
-
-
-
-
-


