Starting a possibles bag kit

Muzzleloading Forum

Help Support Muzzleloading Forum:

This site may earn a commission from merchant affiliate links, including eBay, Amazon, and others.
If you need a little more room in any of of these kits , now is the time to easily add a gusset between the two halves of the bag. The bigger the gusset , the more stuff you can carry. The enlarged bag is just the place for a bunch of hand made items . Think of all the experience gained from making all those custom things yourself. I smile at the rabbit hole I might have just created..........oldwood
 
Hopefully quicker to receive also. I ordered the kit 2 weeks ago all I received was an email we got your order. I ordered some other things from them 5 weeks ago and all I have so far is the same type email. They are not the only suppliers like that 2 others out 3 weeks. Patience is not something I have an abundance of when it comes to waiting. :(
I know many places are pretty backed up right now. Where did you order from?

On that note, at least, in my experience, getting into this hobby has been far easier than getting into "unmentionables" during these times.
 
TOW, Dixie, and Jedediah Starr. Before I retired a 60 hr. work week 6 days a week was normal when we got busy 7 days a week was not unheard of. The company I worked for supplied parts to the automotive industry if you were late on delivery they fined the company. let it happen to often they found a different supplier. You worked at a nice leisurely pace they told you find another job. Work under those conditions for 45+ years excuses for slow delivery don't go far.
 
TOW, Dixie, and Jedediah Starr. Before I retired a 60 hr. work week 6 days a week was normal when we got busy 7 days a week was not unheard of. The company I worked for supplied parts to the automotive industry if you were late on delivery they fined the company. let it happen to often they found a different supplier. You worked at a nice leisurely pace they told you find another job. Work under those conditions for 45+ years excuses for slow delivery don't go far.
I admire good work ethic and not making excuses, but I also sure wouldn't wish 60 hour work weeks on anyone!
 
Try telling the Ohio bureau of child support your overtime is not guaranteed and see what they say. You do what you have to do. I knew a lot of people that were in my position.
 
I admire good work ethic and not making excuses, but I also sure wouldn't wish 60 hour work weeks on anyone!
Met them when I attended the Kibler rifle workshop a few years ago... Took the short quillworking class just before. Nice couple. I like them.
 
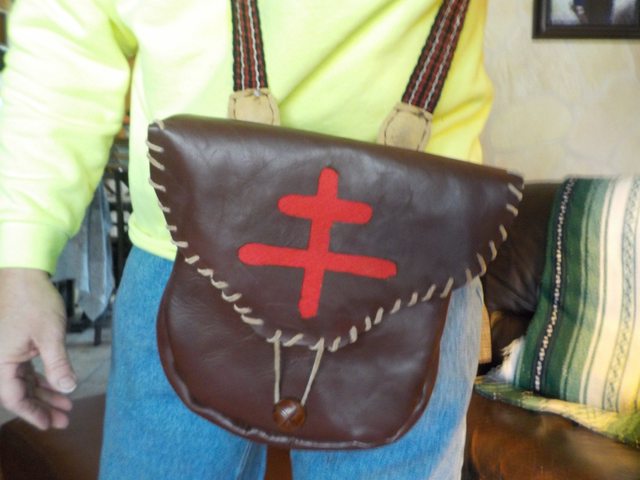
Finally had a few hours to finish this kit. For my first one (and first attempt at any leather-working at all), I'm pleased.

I ended up using the imitation sinew only for the inside pocket, just to see how it works. For the rest, I used linen thread waxed with beeswax. I don't have a vise, so to accomplish the saddle stitch, I used single lengths of thread and one needle, sewing one way and then back through the opposite way, punching two holes at a time with an awl.

My one complaint about this kit is that the instructions are unclear and contradictory at times. There are two mistakes where they refer to the wrong component (The Short Strap "E" is actually "F" in the contents list). Another place, there is a reference to "point Y," but there is no point Y on any diagram. I would also appreciate more photos and diagrams...some of them make sense only now that I'm done, haha.

Two mistakes I made: 1) I inadvertently sewed the strap with the sueded side facing out. Simple enough to redo, at some point. 2) I put the buckle on backwards. Live and learn.

bag 1.jpg

bag.jpg

bag inside.jpg
 
IMO, you did just fine, with excellent stitching...…..

You might want to consider a method of holding the flap closed (below is only one of several different ways)

GNBm4dal.jpg
 
Good job.

I'll recommend another book if you think you'll stitch more leather.
20210127_233610.jpg
A regular 2 needle saddle stitch is very doable without a pony or clamp, just slower. But, you can pull those stitches much tighter.
Weaver leather sells a great little stitching pony for around $18.95 or so.
I glued some thick leather, rough side out, inside the jaws to give it a little better grip.

If you don't want to mess with some type of button to help keep the flap closed you can imitate a flat sewn flap with one more line of stitching just below the fold. Effectively stitching the flap to the back panel like this,
20210127_234308.jpg

I think you bag came out really nice.
If you decide on an antler button, remember that these would not have been sliced into rounds and holes drilled through the middle, the middle is pithy. Properly made would have used the side of the antler as the outer surface,


20210127_235014.jpg
I doubt the bottom "stud" type button would have been made and was a royal p.i.a. to make anyway
20210127_235151.jpg
Metal, bone, wood, and cloth buttons were far more common.
 
Two mistakes I made: 1) I inadvertently sewed the strap with the sueded side facing out. Simple enough to redo, at some point. 2) I put the buckle on backwards. Live and learn.


It's really easy to get things facing the wrong way, stitch the wrong things together, etc. when doing this kind of work, unless you do it a lot. You sort of have to think inside out and backwards when doing a project like this. 🤪 😄
 
Good job.

I'll recommend another book if you think you'll stitch more leather.
View attachment 60743
A regular 2 needle saddle stitch is very doable without a pony or clamp, just slower. But, you can pull those stitches much tighter.
Weaver leather sells a great little stitching pony for around $18.95 or so.
I glued some thick leather, rough side out, inside the jaws to give it a little better grip.

If you don't want to mess with some type of button to help keep the flap closed you can imitate a flat sewn flap with one more line of stitching just below the fold. Effectively stitching the flap to the back panel like this,
View attachment 60744

I think you bag came out really nice.
If you decide on an antler button, remember that these would not have been sliced into rounds and holes drilled through the middle, the middle is pithy. Properly made would have used the side of the antler as the outer surface,


View attachment 60745
I doubt the bottom "stud" type button would have been made and was a royal p.i.a. to make anyway
View attachment 60746
Metal, bone, wood, and cloth buttons were far more common.


Excellent advice Brokennock!

I forgot to say that bag looks a WHOOOLE lot better than the first several that I did!! Very good work.
 
Finally had a few hours to finish this kit. For my first one (and first attempt at any leather-working at all), I'm pleased.

I ended up using the imitation sinew only for the inside pocket, just to see how it works. For the rest, I used linen thread waxed with beeswax. I don't have a vise, so to accomplish the saddle stitch, I used single lengths of thread and one needle, sewing one way and then back through the opposite way, punching two holes at a time with an awl.

My one complaint about this kit is that the instructions are unclear and contradictory at times. There are two mistakes where they refer to the wrong component (The Short Strap "E" is actually "F" in the contents list). Another place, there is a reference to "point Y," but there is no point Y on any diagram. I would also appreciate more photos and diagrams...some of them make sense only now that I'm done, haha.

Two mistakes I made: 1) I inadvertently sewed the strap with the sueded side facing out. Simple enough to redo, at some point. 2) I put the buckle on backwards. Live and learn.

View attachment 60670
View attachment 60672
View attachment 60673
Super workmanship! Considering it's your initial leather project, you just might be receiving orders sooner than you imagined. No two are exactly alike, & you've created a functional, attractive item that previously was non-existent. It's a special feeling every time. Stay with it; you have talent!
 

Latest posts

Back
Top