• Friends, our 2nd Amendment rights are always under attack and the NRA has been a constant for decades in helping fight that fight.

    We have partnered with the NRA to offer you a discount on membership and Muzzleloading Forum gets a small percentage too of each membership, so you are supporting both the NRA and us.

    Use this link to sign up please; https://membership.nra.org/recruiters/join/XR045103

Stock inletting questions for a bozo who's never done it

Muzzleloading Forum

Help Support Muzzleloading Forum:

This site may earn a commission from merchant affiliate links, including eBay, Amazon, and others.
Joined
Dec 1, 2023
Messages
187
Reaction score
310
Location
PA
The last two months have been a masterclass education in if you want something done right do it yourself. I got a replacement davis lock for my Navy Arms 1803
Harpers Ferry and its been nothing but a headache from the start. Hired a gunsmith to drill and tap plus fit the lock took him 8+ weeks to not do the work and tell me he didn't feel like it so it seems as though I am on my own. thankfully a user on here @brazosland provided me with some reference photos to go off of so now I have a few questions for you gents.

what tools do i need would a dremel do me well?
should i mark where im going with something?
theres an old guy on my street who does woodworking should I just go knock on his door and ask his help?

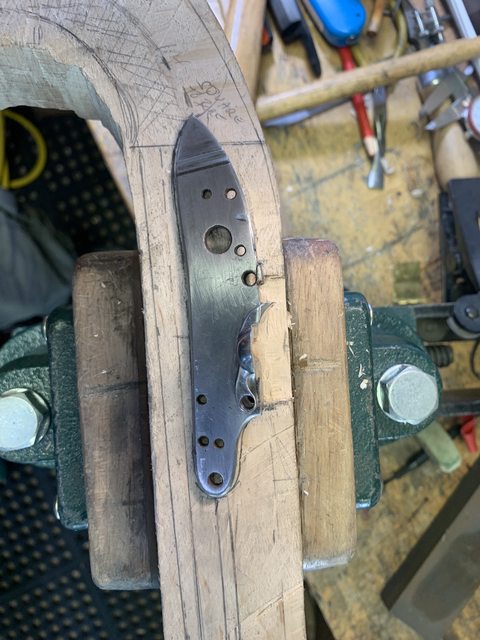
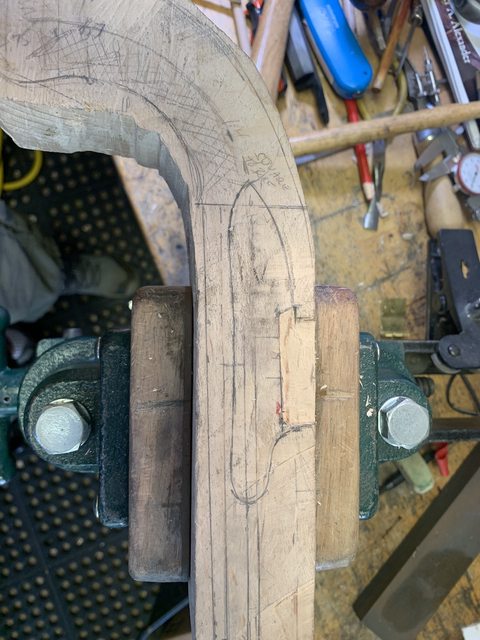
first picture is my rifle second is a modified one kindly sent to me as reference by brazos, thanks again sir!
 

Attachments

  • PXL_20240906_135616630.jpg
    PXL_20240906_135616630.jpg
    2.4 MB · Views: 6
  • 346934-f027a2f785ac096bcea5f49c87260599.jpg
    346934-f027a2f785ac096bcea5f49c87260599.jpg
    2.9 MB · Views: 0
Find someone on this forum who knows a gun builder in your area. Just take it to that person. Your local woodworker may have no experience with guns at all.
 
My two cents.
Go to Walmart and buy two or three of the cheapest table-type 10-inch candles you can find. Clean the lock area well. You'll use the candles to smoke the new lock with soot. Fit the lock and remove it. This will mark the areas on the stock that need to be chiseled ever so slightly a bit at a time, smoke, refit, and chisel over and over until the new lock fits. It's not hard, just time-consuming.

Most people will not do this. I have once, but it's probably not kosher. For a long area along the lock plate with a nice inlet, as you have from the factory, you can take a sanding block and sand the lock plate, fit, sand refit over and over a little at a time. That's an option too in which you are less likey to bugger up the wood. It all depends upon how close the replacement lock is to the original.

You will want the thinnest, sharpest, smallest, chisel you have.

IF you screw up as I have many times, you can post a question about filling in wood and get some good answers, but that is what we want to avoid.

Do NOT get impatient and plug in the Dremel. . . you'll regret it.
 
Last edited:
If it was mine. I would see how well the lock fits in the stock in let. Then see where the lock pan relates to the touch hole / vent. Third take Phil's advice to the letter about taking the lock apart. Take pictures of before and after. Lay the parts out in sequence of how you remove them. If the lock has a fly don't lose it.
Then use candle soot to show where the parts are contacting the wood.The soot works very well.. But since your stock is very dark you might have trouble seeing it well. You can use a magic marker also. Maker sure your chisels are extremely sharp. Last only remove where the soot or marker shows contact. Nothing else and have patience.
If you have more questions ask away...!
 
I spent 12 hours with pressure blue fitting the lock in one of the kits I put together. In hind sight, It would have been easier to file the plate than chisel the wood
 
Where to start.....

--Disassemble the lock
--BTW, is this new lock still in its "cast state" or has it been filed and polished? If it's in it's cast state (not shiny at all) then you have some work to do on the lock itself
--Search the net for "how to inlet a flintlock lock". Watch some videos
--BEFORE you start, make sure the lock plate has a slight draft ALL THE WAY AROUND the lock plate with the exception of the lock plate bolster. A slight draft will help you go far in a good looking fit and finish.
--I concur with the cheap candle for "smoking" the plat to make the transfer agent.
--Before you start to carve anything, make sure the pan on the new lock aligns with your flash hole. Ideally, the flash hole should be center if you drew a line from one side of the pan top to the other.
--Once you have the lock plate fitting as it should, then (as stated above) begin to add the internals (tumbler, bridle, springs last) and check that those parts have clearance to work. If not, then you need to remove some wood so the lock will work freely.
--Dremels are the gun builders worse nightmare

Also, does your new lock already have the lock bolt holes drilled and tapped? If not, that will need to be done.

Here's a good video to watch:

I'm just starting to inlet the lock plate for this pistol build
J24kEXul.jpg
BxHe52Ql.jpg
 
Last edited:
Inletting is not difficult. Tedious at times, yes, especially if you're like me and tend to want to rush things.

At minimum, you will need an X-acto knife with several #11 blades (the common type,) a sharp pencil, and some small chisel/gouges. Also a sharpening stone. I use the woodcarving set sold at craft stores.

Trace around whatever part you are inletting. Using the knife, cut into the wood just inside the pencil line, then use the carving tools to remove the wood (keep them sharp, too.) Work from the edge in. Test fit often.

The inlays below were all done this way. Tedious, but very satisfying to do.
20230715_083150.jpg
20190730_191719.jpg
 
Inletting is not difficult. Tedious at times, yes, especially if you're like me and tend to want to rush things.

At minimum, you will need an X-acto knife with several #11 blades (the common type,) a sharp pencil, and some small chisel/gouges. Also a sharpening stone. I use the woodcarving set sold at craft stores.
____________________________________________________
Great point. Do not underestimate the importance of sharpening. The cheaper the tool, the more often you must sharpen. It is impossible to get a tool too sharp. Heck, I sharpen Xacto blades! Make sure you flatten the back and then polish the back of bench chisels. I like a hollow grind to speed up sharpening. Google "Scary Sharp" if on a budget.
 
Your point of "scary sharp" is well taken. I keep a sharpening stone on the bench when I'm carving. A squirt of oil on the stone and after a number of cuts I hit the stone with the chisel.

You know your chisel's are not sharp enough if you're tearing the wood instead of shaving it clean.
 
Some good advise so far. I'll add you will probably need to do some work on the trigger to sear alignment. Once the fully assembled lock is inlet mark where the sear lines up in the mortise. You might need to remove and re-pin the trigger if it contacts the sear too low or high, or remove some metal from the top of the trigger blade if it's too high.
 
Get a book on building the long rifle and then practice inletting on a scrap piece of maple BEFORE you try it on the real thing. Don't use that Dremel. If you use a #11 Exacto blade first break off that tip because that little pointy tip WILL break off in the wood. You can reshape/sharpen the broken off area.
 
Back
Top