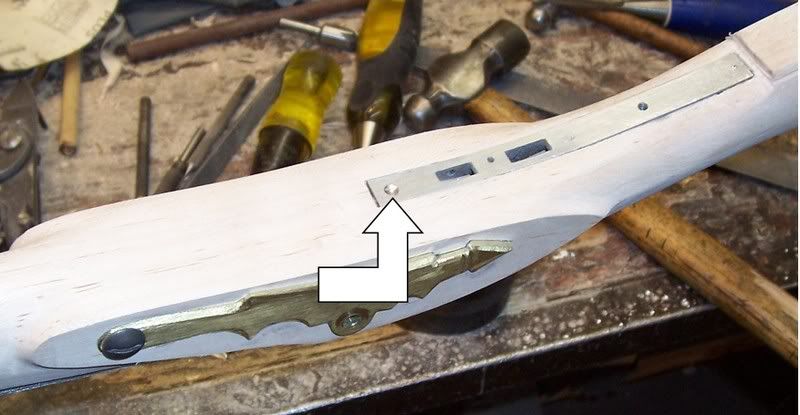
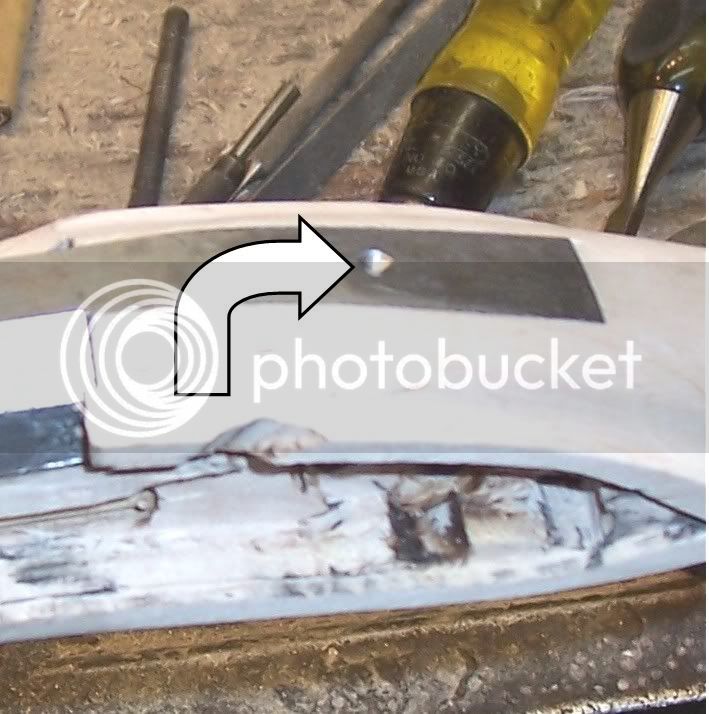
My questions are.How do I go about drilling a tang wood screw hole to accept the through bolt to the trigger of some newer TC's(front scew I think?).I have 3 Hawken 50's and none have this bolt only wood screws.Is this only found in the bigger bore guns? Also can I drill and tap my trigger assemblies to work.I was on Cains site and see they have the tang bolt any idea what thread size they are 10/32 ? I remember reading a trick to line the hole up to get an exact straight hole but couldn't find it in the search.Is the tang bolt something most guys put in or leave as is.I'm hoping to get a .54 flint barrel from GM if they come available and think this may be a good idea to strengthen up the stock..All and any help will be appreciated...Ray
You are using an out of date browser. It may not display this or other websites correctly.
You should upgrade or use an alternative browser.
You should upgrade or use an alternative browser.
TC tang bolt drilling help
- Thread starter Fishhog
- Start date

Help Support Muzzleloading Forum:
This site may earn a commission from merchant affiliate
links, including eBay, Amazon, and others.
You can buy 8/32 tang bolts from TOW.
You need a numbered drill #29 if I am not mistaken.
An 8/32 tap and a countersink.
Is there enough room in the front of the trigger assembly for the hole?
The bolt should be reasonably straight.
I never liked wood screws as a tang bolt.
You need a numbered drill #29 if I am not mistaken.
An 8/32 tap and a countersink.
Is there enough room in the front of the trigger assembly for the hole?
The bolt should be reasonably straight.
I never liked wood screws as a tang bolt.
MikeChapin
58 Cal.
- Joined
- Apr 5, 2005
- Messages
- 2,183
- Reaction score
- 6
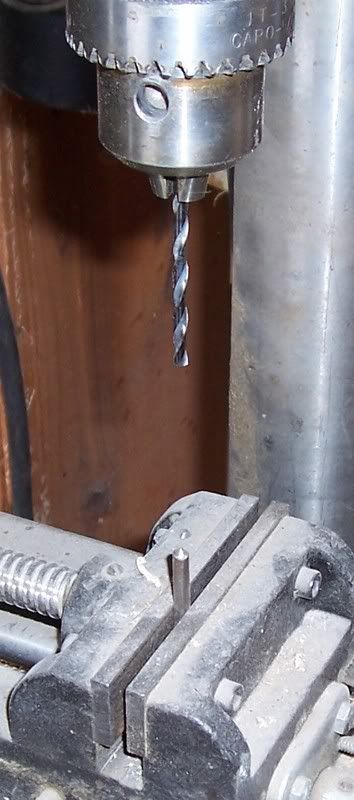
There are a couple of ways to line up ends of the hole. If you are using a drill press, many people use a nail perpendicular in a metal plate. The plate goes in the vice and you line up the bit to in line with the nail tip. To drill the hole, put the nail at one end of the hole and drill the other end. The holes will line up.
I usually use a hand drill. For that I use a drill jig I got from Cain's. It is basically a C clamp with a sharp marker at one end and a drill bushing at the other. Just line up the holes with the sharp end and the drill bit and you are ready to go.
I usually use a hand drill. For that I use a drill jig I got from Cain's. It is basically a C clamp with a sharp marker at one end and a drill bushing at the other. Just line up the holes with the sharp end and the drill bit and you are ready to go.
Guest
Drill a dimple were you want the hole to come out at on the trigger plate, then drill a dimple for the location on the tang. Put a pin or nail in a drill press vise, and set the dimple in the trigger on this pin, then drill half way through from the tang side, flip the rifle over and put the pin in the tang hole and drill the other half way from the trigger side. This gives you a point to point hole that should be pretty straight if you hold the rifle square when drilling from both directions.


Hope that helps
C


Hope that helps
C
Goldhunter
54 Cal.
- Joined
- Mar 27, 2006
- Messages
- 1,596
- Reaction score
- 6
Do you have the new style trigger plate? I think you need the new one to do this. The old has a spring in the way. Search for posts from roundball (i think), he gave some ordering info on this last year. I'd post it but it's at home and I'm not.
I think this is the old style.Do I need to go into the brass guard or the set trigger assembly? RayGoldhunter said:Do you have the new style trigger plate? I think you need the new one to do this. The old has a spring in the way. Search for posts from roundball (i think), he gave some ordering info on this last year. I'd post it but it's at home and I'm not.
Goldhunter
54 Cal.
- Joined
- Mar 27, 2006
- Messages
- 1,596
- Reaction score
- 6
I pulled both triggers assemblies from my two hawkens.Both have the spring that is in the way of a tang bolt hole.Can my style be used at all by modifying or are new plates needed.Also are these parts still availablefrom TC or who may have them.I was looking around on a few sites and only saw complete trigger assemblies..Roundball,if you see this do you still have the numbers of the parts I need.I was on the TC web sight and can't come up with anything..Ray
For those who want to know.I finally got a a hold of TC yesterday.2 tang bolts,2 front trigger springs 2 new style trigger plates to convert my old triggers into,$15.55 for each plate,nominal amounts for the bolts and springs,$6.95 for shipping $43.55 to my door.The conversion seems pretty straight forward with the info I have received so far from this thread :bow: .Thanks again for everyones help.Ray
ricklandes
40 Cal.
- Joined
- Dec 6, 2006
- Messages
- 391
- Reaction score
- 0
I do the same thing but I use a Starett spring loaded center punch to mark my starter holes.
As a side note...and maybe a tip for some...
I am just not able to put a drill point mark down by taking a center punch to a piece of material on a fairly perpendicular angle so I bring my cp to the mark nearly parallel to the pieces surface and place the tip on the "dot", I then roll the punch up to a approx. 90 degree angle and place the drill point cp mark.
I use a similar method: I drilled and tapped a 3/4" cube of steel to 1/4-20, then threaded a 1/4" rod to 1/4-20, cut it off about 3/4"-1" long and ground a "pencil point" on the unthreaded end, thread that into the steel cube. This goes in your drill press vice. Then I ground another piece of the 1/4" rod to a "pencil point, cut it off so it is about 3"-4" long or what ever works. This goes in the drill chuck. Line up the points so they are a match, clamp /bolt securely in place, put the center punched/dimpled area on the bottom point, replace the top point with your drill bit and drill through. If you come up short on drill length, just reverse the stock and drill from the other side. Hope this makes sense. The 2 points make it just a bit easier to get things lined up good, IMHO.CowboyCS said:Drill a dimple were you want the hole to come out at on the trigger plate, then drill a dimple for the location on the tang. Put a pin or nail in a drill press vise, and set the dimple in the trigger on this pin

Hope that helps
C
One other handy piece of equipment that makes drilling the long stock, etc. easier is a rest. I made mine from scrap 2X4 pieces. Start with one about 12"-14" long for the bottom piece and cut another piece 3" shorter, screw this to the bottom one, lining up one end, so it looks like a stair. Do this successively for however high you want the rest to be, makes it easier to manage holding the stock in place on the drill press table and operating the quill.
Sorry...I rarely ever stop by the builder's section but tonight I happened to, saw this thread...looks like you're on the right track.Fishhog said:Roundball,if you see this do you still have the numbers of the parts I need.I was on the TC web sight and can't come up with anything..Ray
A couple comments:
1) The tang bold hole in not a "straight down" hole...it angles slightly forward towards the front of the trigger guard...I use the hole in the new style trigger plate as a guide to mark the drilling point there...then simply lay the edge of a piece of masking tape on the side of the stock to establish "the line" (and angle) between the two hole locations as all I have is a hand drill.
I first drill with a long 1/8" bit to get a pilot hole started and the smaller bit allows me a little leeway if I'm off an eyelash at first, then progressively use a couple larger bits from each end to finally get the through hole properly centered, etc.
The trigger guard can be very tricky so measure it very carefully...you only get one chance to drill and tap the hole at the correct angle.
If you have to redrill at a different angle, you end up with a hole to large to tap it correctly for the tang bolt...I did that once...was lucky to have a spare trigger guard on hand from some parts trade or something over the years.
Roundball,I take it a 1/4 bit will be okay once it is counterbored straight?Also do I drill the front tang bolt hole larger in the tang itself or is the hole big enough.Lastly,what size tap will I need to tap the pad of the brass trigger guard.I have the parts coming ,haven't received them as of today so I will see if I need any additional tap/drills I may need..I would have PMed you but you have helped me enough with my TC's already.Thanks.Ray
Ray, drill FIRST with the tap drill size bit through the tang, stock, and through the trigger guard. Then drill the tang with a bit just big enough to let the screw pass through, all the way to just before the trigger guard, (you could pull the trigger guard off and drill through the stock). This way your tap will line up with the screw hole and let the screw go into the TG. You MIGHT have to use a slightly larger bit through the stock if the shank of the tap is too big to allow it to go through to the TG. When this is done, then you can countersink the tang for the screw head. Size of the tang screw is up to you; I prefer either 8-32 or 10-32.Fishhog said:Roundball,I take it a 1/4 bit will be okay once it is counterbored straight?Also do I drill the front tang bolt hole larger in the tang itself or is the hole big enough.Lastly,what size tap will I need to tap the pad of the brass trigger guard.I have the parts coming ,haven't received them as of today so I will see if I need any additional tap/drills I may need. Thanks.Ray
FYI...the existing tang is already drilled, holes are counter sunk, all blued, held in place by two wood screws, etc. The new tang bolt comes blued from TC, made to a precise length to replace the existing front wood screw, using the front hole location on the existing tang, utilizing its existing counter sink, etc, so it'll properly reach and thread into a matching 10/32" drilled & tapped hole yet to be made in the TG.
All this discussion is about wrist strengthening activity by adding / replacing a few parts made by TC for this purpose.
The difficulty is getting the hole drilled through the stock in the precise direction, at the precise angle, etc, etc...can't just put a bit into the front tang hole and drill...it has to go down through the stock at a slightly forward angle and exit at a specific spot...exactly where the hole in the front end of the redesigned trigger plate is located.
There's nothing to guide it and have the drill bit come out exactly where its needed so it takes a little back and forth from each end to get a pilot hole on line, then a larger bit to connect, clean up, and straighten the pilot holes from each end into a single 1/4" tang bolt hole.
By the time all that is done, to then have to drop back down to a smaller size bit and try to keep it centered down through the 1/4" through-hole to drill the matching hole in the trigger guard...I'd think would be very difficult if not impossible...at least with my skill level it would.
I've got 2-3 more to do...the bolt hole is actually pretty easy to do consistently every time...the challenge is the TG...I need to contact TC and ask them if they do the drilling and tapping of the TG there at the plant...if so I'd just as soon mail a few TGs to them and let them do it.
Goldhunter
54 Cal.
- Joined
- Mar 27, 2006
- Messages
- 1,596
- Reaction score
- 6
Can't you just tap the trigger plate, cut off the extra tang bolt, and not drill and tap the trigger guard? I haven't looked at recent TC rifles, I didn't realize that they had threaded the trigger guard. My TG is held on by a screw at the front and back. Are the new ones just held on my a screw at the back and the tang bolt in the front??
Goldhunter said:My TG is held on by a screw at the front and back.
Are the new ones just held on my a screw at the back and the tang bolt in the front??
Yes...and the reason for attaching the new style tang bolt to the trigger guard is the get a very strong 'purchase' on a large component to signifigcantly tighten up that whole area to eliminate flexing which sometimes causes that classic 'crack' to appear just above the lock bolt hole on the left side (off side) from the lock...costs TC a lot of $$ to replace an entire stock assembly under lifetime warranty.
All the inletting for the trigger mortise, lock mortise, tang, and barrel bed makes that region very, very weak because so much wood has been removed...these new parts clamp everything together tighter.
The old style trigger plate has the end of a trigger spring mounted in a crimped block right where the bolt would come to...and is only 1/8" to 3/16" thick...wouldn't provide much depth for threads, and is much smaller than the trigger guard in terms of taking a load, spreading out the load...the new threaded hole location is in the strong front part of the actual trigger guard itself...in front of the front trigger.
Last edited by a moderator:
Similar threads
- Replies
- 22
- Views
- 878
- Replies
- 3
- Views
- 417
Latest posts
-
-
-
-
-
-
-
-
FOR SALE “Plains Rifle .50 cal” $525 free shipping
- Latest: AnotherHawkenGuy
-
Building a Tradition's Tennessee from a Kentucky Kit?
- Latest: Frontstuffer070


