Tight 1860

Muzzleloading Forum

Help Support Muzzleloading Forum:

This site may earn a commission from merchant affiliate links, including eBay, Amazon, and others.
My oldest opentop would be my .36 navy and I've shot it quite a lot over the past 25 years. My 1860 Army gets a lot of use now with .45 Colt smokeless powder loads. I've never seen any indication of excessive wear or damage on either revolver. I've only shot the cartridge conversion about a year now but it saw extensive use as percussion for about 20 years.
The wedge will affect point of impact if the arbor does not bottom out in its hole. I used to set the gap with a feeler gauge every time I reassembled the revolver but bottoming out the arbor is a better solution.
 
Sorry sometimes when I try to explain something it comes out clear as mud.
I'll use my Uberti 3rd dragoon as an example. Measuring the diameter of the arbor in the frame that the cylinder rides on. At the tip of the arbor the diameter is .505 at a point just in front of the cyliner the diameter is .530, at the point on the arbor directly above where the frame meets the barrel the diameter is .525. In the arbor hole below the barrel the maximum diameter at the face of the hole is .525. This is the same diameter as the point on the arbor directly above where the frame meets the barrel.
That is as far as the taper will allow the assembly to go without force. If a new shooter, believing that he can adjust his barrel cylinder gap by smacking the wedge does so he ends up sticking the tapers together requiring considerable force to take them apart.
In the machine trades we used the morse taper system to attach tools to the spindle of the machine socking them into place where they stayed until a wedge was run through the spindle behind the tool taper and smacked with a hammer to drive them out.
With the less expensive replicas that use a constant diameter arbor the problems are different as previously stated.
I've seen some new in the box replicas have as much as a .015 barrel cylinder gap. A new shooter, believing that he can adjust this gap down to say .006 with the wedge can do some serious damage to the gun when simply returning it for one better fit or having a machinist shave .009 off the barrel flat at the frame junction would cure it.
It is with these straight arbor guns that it is most important to have the arbor bottom out in the arbor hole in the barrel assembly.
I hope that is a little clearer.
 
Good deal. Pietta has been getting it right more often than wrong lately. Their quality has gone light years ahead the last couple of years. These newer guns are really nice. Not quite up to Uberti yet but getting real close and a real bargain for the money particularly when Cabela's runs a sale.
 
Yep. I polished up the trigger and hammer notch so the pull is smooth. Some of the detents on the cylinder were no good. If you pulled the hammer hard enough, the cylinder would rotate too far. I did a little filing on the bolt as well as on the problem causing detents and now the problem is gone. The brass backstrap and trigger guard do not quite fit each other well though and are under tension. That's not a major problem, so I'll fix it later. The grips do not fit flush with the metal but at least the wood looks nice.

I got it last Friday for $180 plus $17 shipping from Cabelas. I was pissed when I got online yesterday and saw that shipping is now a flat $5. Oh well.
 
I fixed the problem with a #6 flat steel washer and a wee bit of work with a stone. Not much work at all, I still need to check the gap, you can see a thin crack of daylight thru it.
 
I assume the crack you are referring to is at the frame barrel assembly juncture. You can see a crack of light through as little as .0001. That's one ten thousandth of an inch. Check it with a .001 feeler guage and if it is proof to that call it a done deal. Never let the perfect be the enemy of the good.
 
I have got to get a feeler gauge set to check things. Working on these shooters is as fun as shooting them!! I need to get a manual for the 1860 & my 1858 just to see how thing go together.
 
Both revolvers are straightforward in disassembly. Just start removing screws and do not force anything out. Remember how they came out. That's how I learn to disassemble guns.
 
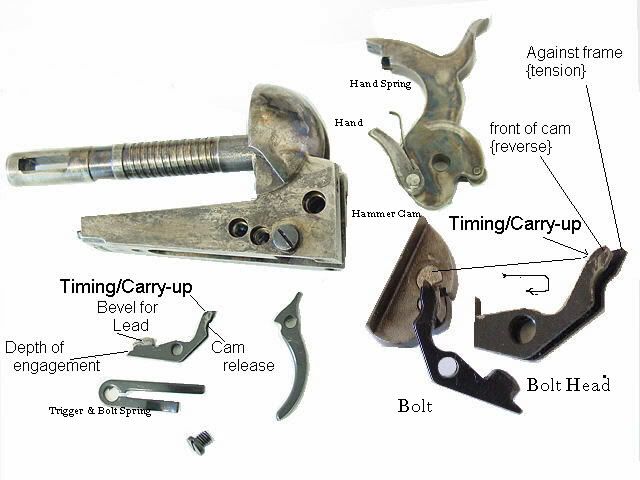
This is not a manual but it may help.
61apart2.jpg


This is a good read.
http://www.theopenrange.net/articles/Tuning_the_Pietta_Part_One.pdf
http://www.theopenrange.net/articles/Tuning_the_Pietta_Part_Two.pdf
 
Last edited by a moderator:
Back
Top