Traditions .32 cal Crockett kit build

Muzzleloading Forum

Help Support Muzzleloading Forum:

This site may earn a commission from merchant affiliate links, including eBay, Amazon, and others.
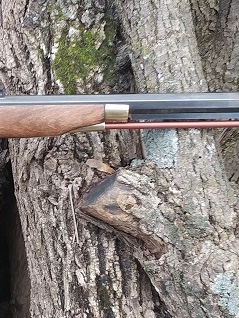
Maybe it’s the photo, or maybe it’s not permanently in place, but to me it looks like the nose cap is drooping? Shouldn’t the top line of the nose cap be in line with the top edge of the stock?
09291-C11-332-E-413-B-BDF0-2303-B77-DC450.jpg

You are correct sir!
Good eye.
I have been working on that this morning actually.
The biggest problem is that the rifle was sent with the nose cap already fitted, by I am sure someone on an assembly line at the factory, and there is not a whole lot of wood left in that area to work with as far as leveling it out!

When I get back from the vet (no, not for me, but one of our cats.... heheh) I will post a picture of that area without the end cap.
I have a couple Crockett’s, but I bought them 2nd hand. I’ve been thinking about building one from a kit so I’ve been following along with your thread. I appreciate that you are posting this so I have an idea what to expect. You will enjoy shooting it when you get finished, they’re fun little rifles.
 
I have a couple Crockett’s, but I bought them 2nd hand. I’ve been thinking about building one from a kit so I’ve been following along with your thread. I appreciate that you are posting this so I have an idea what to expect. You will enjoy shooting it when you get finished, they’re fun little rifles.

I am glad I am helping someone out with this build being documented by me.

Here are a couple of shots of the area that is giving me the most fits.... literally and figuratively....Heheh.

First is a end shot of the mounting wood.
As you can see, I have removed almost too much wood for the last screw to still be of any value, and it still does not align properly with the stock.

endcap mount 1.jpg


Next are a couple of side shots for that area.
From the factory it was cut at a different angle from the stock itself.

endcap mount 2.jpg

endcap mount 3.jpg

And here is one of what is left of the mount for the end cap.
I just may have to live with a slightly angled endcap at this point!

endcap mount 4.jpg
 
Oh crap..... Heheh….
I just realized that the brass end cap is actually manufactured / cast that way to taper down from the stock!

Now..... do I get a new stock and endcap and start over, or live with it?

Time to contact traditions for a new stock, and end cap?

(I have learned so much here with everyone's help, that my 58+ hours of work on this one, will make the next one even better whatever it may be, and there will be another!)

After all, who can live with only 3 kit built muzzleloaders eh?

Anyone wanting to see another build, chime in with suggestions, but I think I will stick with Traditions for now until I can afford (skill wise) a really good one.
 
I think I would live with it if there isn't an easy fix. One thought, is the end cap thick enough where some of the material on the inside bottom could be removed to get it to angle up to a more straight angle? If you do that you will also have to remove some material from the cap on the back to change the angle where it meets the wood of the forend so it is straight. I'm by no means an expert, but just throwing this out there.
 
I think I would live with it if there isn't an easy fix. One thought, is the end cap thick enough where some of the material on the inside bottom could be removed to get it to angle up to a more straight angle? If you do that you will also have to remove some material from the cap on the back to change the angle where it meets the wood of the forend so it is straight. I'm by no means an expert, but just throwing this out there.

Always appreciate another set of eyes on this one!
I will have to remove the endcap (for the bazzillionth time, heheh) and look into that for sure.

Here is a picture from an ad for a Traditions Crockett below.
From my perspective, it looks like it is supposed to be that way, but not quite so bad?

traditions crockett ad.jpg
 
Thanks, Railshot, for making this thread and taking the time to post so many pictures. And thanks to the other folks for offering advice. I'm giving my son and daughter (they're in their 30s) the Traditions KY and Mountain flintlock kits for Christmas. We will build them together this winter. I built and rebuilt my GPR several years ago, but your thread will help me immensely. Great job!
 
Thanks, Railshot, for making this thread and taking the time to post so many pictures. And thanks to the other folks for offering advice. I'm giving my son and daughter (they're in their 30s) the Traditions KY and Mountain flintlock kits for Christmas. We will build them together this winter. I built and rebuilt my GPR several years ago, but your thread will help me immensely. Great job!

Outstanding!
I could use another kit too..... here is my mailing address...… Hehehe (yes, that is the way I really laugh).

And this is the whole purpose and why I started posting here to begin with.
I love inspiring others to try something they may not have thought of, and showing the foibles and victories along the way....
you would chuckle at my 32 hour alternator change on another forum....

There cannot be enough black powder shooters that are informed and educated in the ways and whys as far as I am concerned.

I would love to be historically accurate, build a very accurate reproduction, but I am not even close to being at that level..... yet!
I will hopefully get there.
We all start at a certain level, and then improve with time if we try.

I have built the Kentucky myself starting back in September, then moved on to a Hawken, then the Crockett.

I am going to be purchasing a Mountain next to build as I see it resembles my CVA Mountain almost 100%, and my "mean Uncle Mel" lol, will not sell it back to me.
Once I get the Mountain, I may start another build thread if anyone is interested?

As far as the Kentucky goes, I have several things to say about it, not all bad, and if you wish, I can post them here on the forum in another post as I am going to revisit that one soon.

I thank you my friend, and I feel good about what I have done here!

(I am going to ask Traditions for a percentage pretty soon...… Heheh)
 
Interesting thread my 32 is due tomorrow from Midway USA.

Kit or finished?
The reason I ask is that I think for the extra few $$, if you have not built a kit before, a finished one would be the way to go for a novice black powder shooter.

My kit was sharp in places it should not be as far as the stock, did not fit me comfortably until...……. I went and made it mine.

If it is a kit, truly make it yours as far as fit, finish, etc.
There is really nothing historically accurate about any kit I have found (except a Traditions Battle of NO that they only made 100 of.... and want one badly... google it hehehe).

I have been "happy as a puppy with a new ball" building this one, besides all the little things I found, and with all of the good to fantastic input from some very seasoned traditional veterans here on the forum, have made it mine!.... and that is what it really boils down to.... it is mine!
 
You could always cast a nose cap right on the stock. I've done that. I think I'd use 50/50 solder. It stays bright. I used Babbitt metal because that's what I had, and it looks more like a dull pewter. Old guns frequently had silver nosecaps and brass fittings.

I don't remember the brand, and I'm not going to dig the rifle out to look, but I have an exact copy of the T/C, but without a patch box, and with a bright silver nose cap. It also has an incredible stock. It's a mighty fine looking gun. I only bought it because it looks so good, seems to be unfired and it was priced right.

Hadn't thought of this earlier, but researching Ohio rifles, not Vincent's but all the others, might give you ideas for all your projects. To my mind all the so called Hawkins from the T/C to all its copies have more in common with Ohio rifles than they have to genuine Hawkins. Look at pictures and you will see why.
 
If it were me..... square off the fore stock shoulder and pour a nose cap. The two screw countersinks will act as pour through points and you can drill some "small holes in the side and rear of the nose cap area (stock) to "grip" the pour.

Attached is a pic of a poured cap that a friend did on an orig. Mountain Rifle and yes, it still has some down turn. He did not get it as lined up with the under rib as he could have but none the less it looks pretty good for that gun
Marilyn 4.JPG
:

As you can see he did not get the front edge of the stock square to start with and that's why it seems to drop at the front.
 
Last edited:
Railshot, I have shot my Crockett several times this morning and it seems to be dependable. One thing you sure taught me and it was never suggested by anyone else ... that screw directly across from the hammer certainly needs to be set correctly. Too tight and the hammer won’t even fall. It must be loose enough for the hammer to fall hard. I also used a file just a bit on the stop so I’m not sure which helped the most. But anyone with that problem should try loosening that screw first thing! It’s the easiest fix and simple to try, yet it took you to pass on knowledge about that screw. THANKS!
 

Attachments

  • 9438C34A-653A-4C0A-9670-4121D8945D86.jpeg
    9438C34A-653A-4C0A-9670-4121D8945D86.jpeg
    387.6 KB
Railshot, I have shot my Crockett several times this morning and it seems to be dependable. One thing you sure taught me and it was never suggested by anyone else ... that screw directly across from the hammer certainly needs to be set correctly. Too tight and the hammer won’t even fall. It must be loose enough for the hammer to fall hard. I also used a file just a bit on the stop so I’m not sure which helped the most. But anyone with that problem should try loosening that screw first thing! It’s the easiest fix and simple to try, yet it took you to pass on knowledge about that screw. THANKS!

Outstanding news Gowacky!
I am glad to have contributed to your future enjoyment and hopefully, if anyone else may run into this issue, this will help them.
Good job Gowacky, now keep enjoying that Crockett!
 
Ditto on what Hanshi says. As far as the staining goes, the guy at Ace Hardware told me that maple doesn't take stain very well, so I bought some wood dye instead for a rifle I was reworking. Looks like yours worked out alright though.

Aqua Fortis is you answer for any sugar tree curl, AKA maple. However know that traditions uses a type of beech, not maple.
 
As far as the Kentucky goes, I have several things to say about it, not all bad, and if you wish, I can post them here on the forum in another post as I am going to revisit that one soon.
That would be great! I'd love to know any problems you ran into on the the original build, and now that you have more experience, what you plan to change. Thank you, friend.
 
That would be great! I'd love to know any problems you ran into on the the original build, and now that you have more experience, what you plan to change. Thank you, friend.

More than glad to give you my impressions of the Kentucky, and the Hawken.

Nothing really bad about either of them other than there was a lot, and I do mean a lot of extra wood around the butt plate and endcap....
Heheh, I even sent a couple of pictures of this to Traditions, and they were equally surprised.

Now don't get me wrong, a little extra wood is good, but mine was rather significant to me with the equipment I had on hand!
Almost 1/4" extra on the Kentucky, and I really did not have the hand tools / file set, to quickly and easily do the job at that time, so I hand sanded everything to fit!

My timing on contacting Traditions about this was quite good, as the manufacturer from Spain was in their building for a visit.
They used my photos and comments to communicate what I had found, and they are making improvements in their manufacturing based on my input.

I am going to revisit the Kentucky, as I do not like the color that the stain came out, and when I was pinning the barrel to the stock I hit the stock lightly a couple of times and you can see the dents that were left, so time to sand / file it all down again, and re-stain.

Also, keep in mind on the Kentucky, it does not have wedges that hold the barrel to the stock.
You will be required to measure carefully from the end of the barrel, and drill two #32 holes through the stock and barrel tangs to keep it in place.
I have the equipment to do that, but I would not try doing it by hand.
A drill press will do so much better for you in that area.
Even with what I had to work with, it was a little on the scary side, and I have done this type of stuff when I was working for over 40 years.

The Hawken came to me raw out of the box, with a chip in the stock.... picture below, but this picture is after I sanded and stained it.
They did offer to replace the stock, but because I had chosen already to make it old, used but loved looking, I declined.

Stock chip.jpg


Here is the end cap on the Hawken in the raw.
Not as much extra wood as was on the Kentucky, but it will give you an idea of what I had to do to blend it into the endcap.... 99% by sand paper, heheh, I now have a woodworking file set that is going to save me, my hands and fingers quite a bit on my next build..... once I learn to control them.

End cap Hawken.jpg


Also, the sights on the Hawken were plastic!
One cracked when I leaned the rifle against my rack in the corner gently, but c'mon, plastic has it's place (that is what I worked in proudly for 40 years) but not on a rifle such as these.
They did send me an upgrade metal pair of sights for free, (I offered to actually buy them, but they said no) so if you have an issue down the road, contacting them politely with pictures really makes a difference.

They have treated me quite well so far, which is why my next build will be from Traditions.... then a Lyman is on the scope!

I am more than glad to answer more questions you may have, and if I think of anything else I will continue to post it here for you to see even though this post is about my Crockett, it is finished as far as I am concerned for the moment....
I really do not want to start another post on the forum about something I have already done, and make it seem like an only negative post about Traditions, because I truly enjoy their kits and building them.

The end cap on the Crockett is going to have to stay the way it is for now, I finally narrowed it down to the fact it came from the factory with the two screw holes in the stock already countersunk for the mounting screws in the endcap, and they are off a good .050" or more causing a gap and an angle.

I will later try to move the countersinks enough to make me, Phil Coffins, Huntschool, along with all the rest, smile..... Heheh

You are all good and helpful people, so I have to say again "appreciated", and if I have the knowledge or answer for sure, I will be around!

Next build will be here early next week, so stay tuned to that one also, I will go into details as I build it of issues, and once again ask for input.
 
I am going to revisit the Kentucky, as I do not like the color that the stain came out, and when I was pinning the barrel to the stock I hit the stock lightly a couple of times and you can see the dents that were left, so time to sand / file it all down again, and re-stain.
Before you get carried away with the sanding, borrow your wife's iron and a cotton rag. Dampen the rag and fold it so you have a couple of layers. Place it over the dents, then hit it with the iron. The heat will force steam into the wood and raise the dents, so very little sanding will be required. Since you used a linseed oil finish, you may not need to pre-sand the area to get the dents to raise. I've had mixed results. Sometimes you need to break through the finish, but this way you remove very little of the surrounding wood. Instead of sanding down to the bottom of the dents, you raise the dents up to the surrounding wood then sand it smooth.
 
Before you get carried away with the sanding, borrow your wife's iron and a cotton rag. Dampen the rag and fold it so you have a couple of layers. Place it over the dents, then hit it with the iron. The heat will force steam into the wood and raise the dents, so very little sanding will be required. Since you used a linseed oil finish, you may not need to pre-sand the area to get the dents to raise. I've had mixed results. Sometimes you need to break through the finish, but this way you remove very little of the surrounding wood. Instead of sanding down to the bottom of the dents, you raise the dents up to the surrounding wood then sand it smooth.

Thanks 30coupe,
Good advice, and that thought had crossed my mind to steam that area a bit.

But after looking at the way the work was done, and the shape of the stock, I think I will be doing a reshaping of the stock anyway, so more than likely I will be stripping the whole rifle and starting over.
It turned out quite red, and I am not a big fan of that.
 
Back
Top