• Friends, our 2nd Amendment rights are always under attack and the NRA has been a constant for decades in helping fight that fight.

    We have partnered with the NRA to offer you a discount on membership and Muzzleloading Forum gets a small percentage too of each membership, so you are supporting both the NRA and us.

    Use this link to sign up please; https://membership.nra.org/recruiters/join/XR045103

Trigger question.

Muzzleloading Forum

Help Support Muzzleloading Forum:

This site may earn a commission from merchant affiliate links, including eBay, Amazon, and others.
Joined
May 25, 2012
Messages
11
Reaction score
0
So I messed around and got bit by the bug and have wound up with 4 muzzle loaders that I can talk about on here. One of em is a Pedersoli 10 gauge. The triggers are very difficult to pull and I was wondering if there is a way to make them easier to pull? Thanks in advance.
 
Remove the lock(s) and with the hammer down, try to move the sear arm. It is the part with the finger sticking out directly away from the lockplate towards the inside of the gun.

It is spring loaded and it should move freely.

If it doesn't, try loosening the screw that is holding it in place.

Often, people thinking "tight is good, tighter is better" will overtighten this screw making the sear almost impossible to move.

Because the sear is moved by the trigger, any resistance to movement will be felt as a heavy trigger pull.

There are a lot of other people who never lubricate their locks. Sometimes a few drops of oil will greatly improve things.
 
A few yrs ago, I bought a Navy Arms 12 ga. double that had the same problem...hard trigger pulls. Sent it back for that reason and a few others.
While the triggers were being pulled, the hammer would rotate rearward because of faulty mating of the tumbler notch and sear nose. This caused the sear to actually "fight" the mainspring and the evidence of this was the rearward rotation of the hammer and the resultant hard trigger pulls. Didn't want to "fiddle" w/ the tumbler notch/sear nose engagement because of the warranty......Fred
 
I also have found many locks with the tumbler notch cut so that you have to fight the main spring. It can be fixed with a good stone and a lot of patience. You have to be careful and not "over stone ". You want the tumbler notch and sear to meet at exactly ninety degrees. Less than ninety and you have to fight the main spring, greater than 90 and the sear wants to "push off" rather than hold. Which can be dangerous. :idunno:
 
Well I appreciate all the good advice, but I am afraid that it was all over my head. I have never removed a lock, or tinkered with a gun that has one before. I have a good set of tools and have worked on my unmentionable guns before removing screws, pins, and springs of various descriptions. The locks are under tension from a spring,the left one has quite a bit more tension than the right.......... I'm not exactly sure where to start...........
Thanks again.
 
My lack of confidence is only from a complete lack of knowledge about these guns and the locks on them.
I am gonna do a search to learn more now.
Thanks.
 
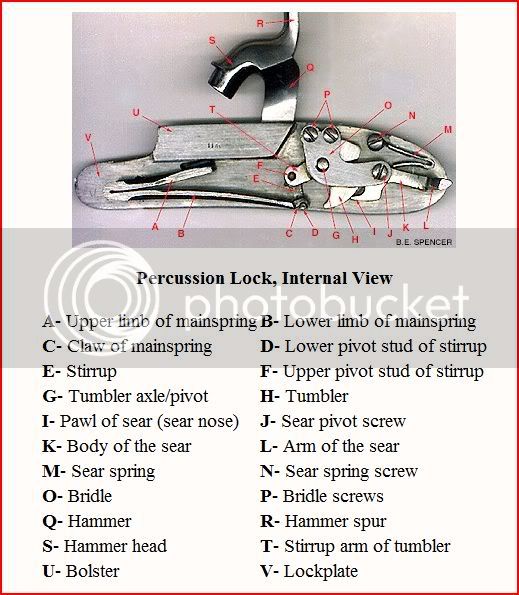
Here's a start, :wink:

PrecussionLock2.jpg


They really are a simple,,Timeless design,
(well they do have a time period)

And [strike]a feller[/strike](sorry Cyndi) folks should at least take the lock out of the stock from time to time. Oil gets old and hard, they need basic cleaning and fresh lube.
A fouled lock can have all kinds of trouble
 
As you can see in the photo necchi posted, removing the lock(s) won't release any hidden springs.

The most important thing in removing locks is to have a screw driver that fits the screw heads.

On a single barrel rifle/pistol the lock screws go thru the stock from the side opposite the lock.

With a double barrel, the lock screw heads are usually on one side of the gun and the screws screw into the lock on the other side.

The screws should not be too tight but occasionally they might be and you don't want to use an undersized screw driver that will mess up the screw heads.

With some guns, the trigger will move back once the lock is removed.
This makes reassembling the lock difficult because the trigger's blade ( its top surface) will be in the way of the sear arm.

It is easily dealt with by simply pushing the trigger forward and then installing the lock.

The recommendation that you check the freedom of the sear arm ("L" in the picture) and loosen the screw ("J" in the picture) slightly does not require taking the lock apart.

Of course, lubricating the moving parts doesn't require further disassemble either. :)
 
If you want to learn about how your shotgun works I would highly recommend that you read Recreating The Double Barrel Muzzle Loading Shotgun by William R. Brockway. Contains step-by-step instructions for building both percussion and flint locks from scratch with a bit of theory on lock function and construction. Lots of good illustrations as well. I just got a copy and am about 2/3 of the way through it. Already feel like I have a better understanding of muzzle loader design and construction!

Regards-HW
 
Well thanks to you fellas I done it! I got the locks out, cleaned and oiled em, they were pretty clean but real dry. Workin much better. Thank you folks. Now what pray tell is the name of the fancy spring squeezer that takes out the main spring? I believe I could do a little work with a stone on the right lock and make it a lot smoother. I will be careful, I promise.
 
If you do decide to buy a Mainspring vise, here are a few more offered by TOTW.
http://www.trackofthewolf.com/List/Item.aspx/1038/1

Also, unless your installing a brand new mainspring, these vises are best used more as a "clamp" than a vise.

Typically with the lock removed you place it into the "full cock" position.

Then the vise is placed with the fixed jaw on the upper part of the mainspring and the lower swivel jaw is lightly clamped against the lower leaf.

Once this is done, the locks sear is released allowing the hammer/cock to move forward which removes all tension from the tumbler.

With the mainspring still restrained, it is a simple matter to remove it from the lockplate.

Reassembly is just the reverse.
With the hammer/cock down, install the spring onto the lock plate.

Cock the hammer/cock to full cock.

Remove the vise.
 
Last edited by a moderator:
I can't recommend the mainspring vise from R.E. Davis enough. I had one of the cheaper thumb screw types from Track and too often I had to use small vise grips on the thumb screw tab to turn it to tighten it to compress main springs.

I picked up one of these at Dixon's and have disassembled several locks with it and haven't had to use the vise grips. It is beefier and with the cross bar, instead of the thumb screw, it is much easier to turn.
http://www.redaviscompany.com/0320.

Sure it cost more, but this is one of the cases where you do get what you pay for.

Enjoy, J.D.
 
Last edited by a moderator:
My vise from Track started to split at the end post. It still works, but is better used for the frizzen springs.

I got the Davis vise and won't buy another. It's good for life! :grin:

John
 
Back
Top