Tutorials on File Work

Muzzleloading Forum

Help Support Muzzleloading Forum:

This site may earn a commission from merchant affiliate links, including eBay, Amazon, and others.
Joined
Sep 10, 2011
Messages
20
Reaction score
0
Hello Fellows!

I have several 'hawks awaiting me at home. The tiger stripe maple blanks are also waiting for me. New files, paper, and stones are there, but what I would like is some ideas on file work to embellish the 'hawks with.

Any tutorials out there that you all might recommend?

Best Regards,
Albert A Rasch
The Rasch Outdoor Chroniclesâ„¢
 
I'd be interested in something like that too.

Best I can think of is to look here in the back pages at others work that has been presented in photo's,(it'll take some time digging)

Most folks I know that do some really nice work are pretty tight lipped about the "Hows an Why's" of their techniques.
They ain't trying to be rude, it's just an Artisan's skill that is simply unique too that individual, :idunno:
 
I think it's pretty straightforward and there are no secrets. Draw the design to be suitable for the files you have, and go at it. I would use machinists layout blue and scribe the design in. One trick I use whenever I file facets on anything is to ink the surface that is being filed (the bright surface) with a black felt marker and this helps me see exactly where I am actually filing. This really helps when filing flats on ramrod thimbles.
 
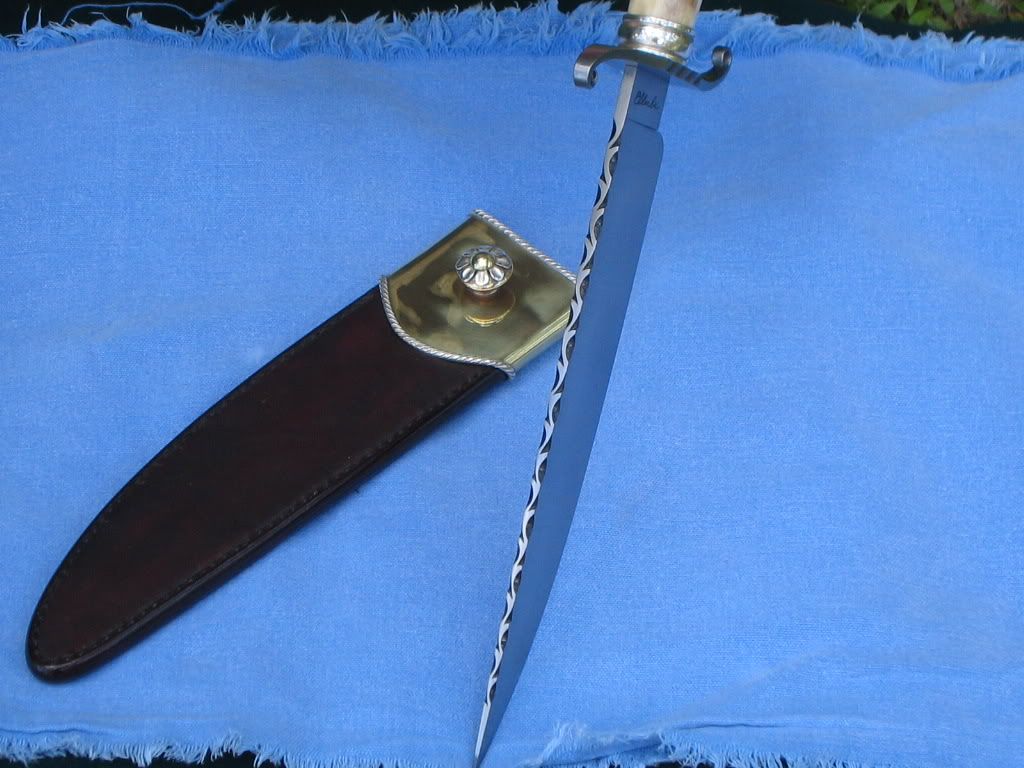
A tutorial would have to be photo rich, or in video, in order to really get much out of it. Here is a pattern I use often. To most, it looks difficult, but it is really one of the easiest, once you understand and see how it is done. I had Lonehunter going well with it after showing him, and after he gave it a few tries. This is often called the climbing vine. This one requires at least two sizes of half round files, and a good tri-corner. The half round cuts are done first, with each going about half way across the spine, and the next cut starts where the previous ends. Takes a little judging by eye to achieve that, and I never do layouts for these because the blade has a taper. One all those cuts are made, you come back with the tri corn file and make the other cut, slightly angled,and make it flow into the half round it is near to. Try it on a piece of scrap. It is quite easy. This pattern always looks best when the vine appears to grow from the point, and if you go backwards with it on a knife blade, the little points will hinder blade penetration.

IMG_0333.jpg
 
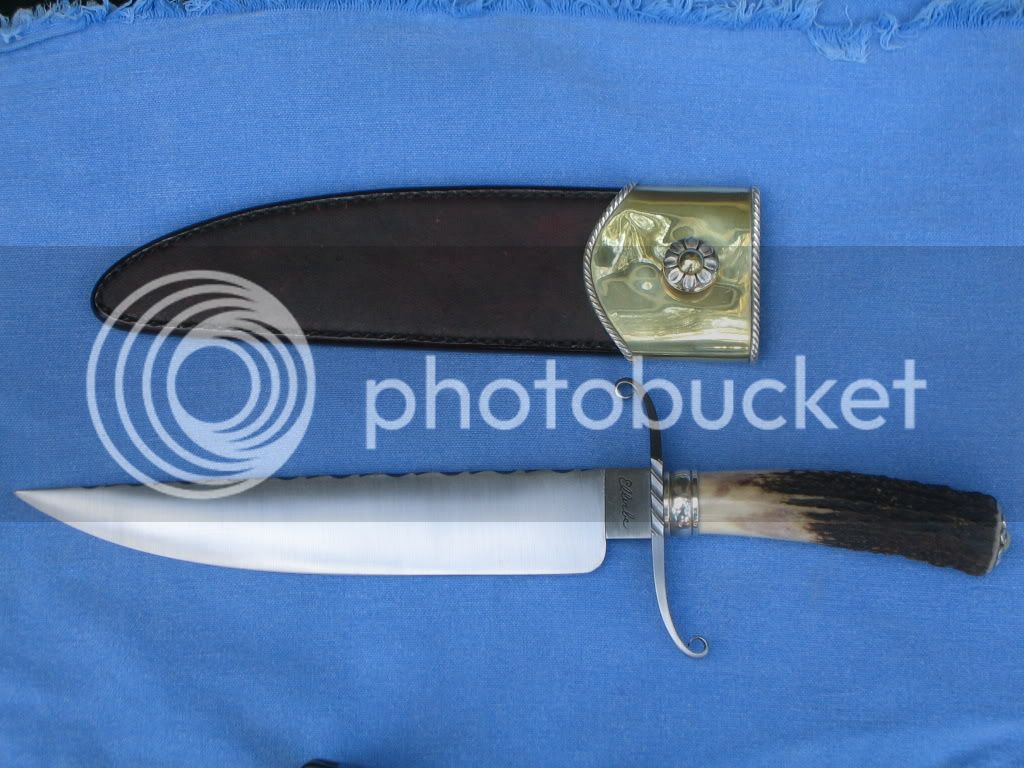
Here's another basic design on this guard. I don't do layout on these either, but a starting beginner might want to. The cuts are done with a round and a tri-corn. The important part is to make the round cuts deep enough for effect, and leave enough space between for the tri-corn cuts. You have to be a little careful with the half round cuts to not let the file cut wide at either end, and not let it roll over the edges. With either type file, once you get a groove started, you can make minor adjustments to the cut by pressuring the file left or right as you cut. The rope pattern on the sheath collar is as simple as it looks, and done with a tri-corn.

IMG_0332.jpg
 
Wick I gotta thank you for your simple explinations n the pictures that ya posted. They have answered many questions I had over the years N I'm betting alot of other guys feel the same. Sometimes a simple explnation n pic are more then enough to clear up confusion or doubt. Keep em coming buddy, your work can't be rated except to say you are a true talented craftsman of the highest caliber. Along with many others here on the forum. this is a great board with guys like you who don't mind shareing some of their secrets here n there--Thank you--YMHS Birdman
 
I'm glad that helped. One thing I left out on that guard, is that you do each of the ends first, then do the middle cuts. That way makes it easier to center them all up. Use the size round file that will give you the width cut you want, but get them all started before your finished depth, which does not have to be the exact width of the file.
 
As Birdman said Thanks Wick for the explanation :hatsoff: I'm glad i kept all those old lawnmower blades now i have plenty of metal to practice on.Thanks again Wick :thumbsup:
 
You guys give a try. Just go slow, and think it out before you cut. AND, bear in mind, this is done on soft annealed steel. Not after it is heat treated.
 
Back
Top