• Friends, our 2nd Amendment rights are always under attack and the NRA has been a constant for decades in helping fight that fight.

    We have partnered with the NRA to offer you a discount on membership and Muzzleloading Forum gets a small percentage too of each membership, so you are supporting both the NRA and us.

    Use this link to sign up please; https://membership.nra.org/recruiters/join/XR045103

wood patch boxes

Muzzleloading Forum

Help Support Muzzleloading Forum:

This site may earn a commission from merchant affiliate links, including eBay, Amazon, and others.

streetsniper

36 Cal.
Joined
Apr 18, 2008
Messages
83
Reaction score
0
where would I find info to make my own wood patch box. building a barn gun would like to keep it simple.
 
Wood patchboxes ain't simple. Unless you've done a few. Even then they ain't that simple. Besides, you really need a buttplate for the latch to catch to, but I suppose there's got to be another way to latch it. With a barn gun, I think a box of any kind would be out of place. How about a simple grease hole?
 
Buy the builders book "Gunsmiths of Grenville County", go to page #224 & it has all of how to do it in detail. (Several pages on info there from start to finish)

I suggest get the spiral bound as it will lay flat on your workbench.
Read the book, it could be the best investment in ML building you will ever make. :thumbsup:
 
YOu might take a look at this site:
http://www.midiowa.com/hootalrifleshop/wooden_patchbox_lid.htm

I believe it does a pretty good job about going at it one way. Most people have different ideas about how to make a latch for the lid, and that is going to be the main difference in what is done. The woodwork is done pretty much the same from gun to gun.

I agree with the above comment. A patchbox is not an easy thing to do, particularly the first time you do one. You should also review the Mike Brooks Tutorial on Gun Building. Think twice before putting a patch box on a gun that didn't have any!
 
Last edited by a moderator:
I've seen grease holes that look to be about 2"in dia. Was wondering how you kept grit and sand from sticking to the grease and then getting into your barrel. I know I've seen a couple of kentucky barn guns on Early Rustic Arms that had patch boxes. That's why I was considering them. Bill
 
Being your a carpenter, friend, ya should be able to do a wooden patchbox on your own since your very familiar with woodcraft. But take your time and do the research the guys recommended before you take it on.It aint easy, but dooable and the patchbox does look great on certain guns. I have a couple of rifles being built that have wooden patchboxes as well. I take it your not too crazy about the iron patchboxes that you see on some mountain rifles?
 
Most of the grease holes were only about 1/2 inch in diameter. You can't keep grit, dirt, lint, etc. from the grease with a hole in the stock. My suggestion is that you carry grease in a separate container, that has a lid, to protect the grease, and keep it clean. It helps to keep your shirt sleeves clean, too. If you are going hunting, grease up some patches and put them in a separate container( I use a Tedd Cash brash canister, that is 2 1/2 inches in diameter) for the hunt. I don't know how one goes about quickly greasing a patch, and doing it right! Seems to me that if you need a fast second shot, you either skip the patch altogether, and just shoot the ball. The reason for any " Fast Second shot " with any muzzle loader is that something that will EAT YOU is coming at you very fast.
 
You can inlet a little slip of iron into the stock in the box opening for the latch to catch on in lieu of a buttplate.
 
Although a metal patchbox would be alot easier, I don't know if it would look right on a smoothbore barn gun. I could be wrong. The banana shaped patch boxes look good to my eye.
 
I'm trying to understand the construction. Do you just hog out the patchbox area from the stock and use a new piece for the cover? The question really goes, to matching the grain.
 
You are basically dove tailing another piece of wood to the stock. (long dovetail...) Anyway I try to find a piece off the same stock. If the I can get the grain to line up thats a bonus. If not I try for a bit more plain piece of wood than the stock. I have never cared for the look of a real fancy figured wooden patchbox on a not as figured stock. To me it doesn't look right.
 
I think I finally got the idea, at first, I thought you cut the 'lid' out of the stock and used it for the cover. Somehow the wood looks better-a personal thing, I guess. I have several German silver patchboxes I've accumulated, but haven't been able to bring myself to use them on my current project. They just seem 'too much'-it's like your cutting away the best wood on the stock!
 
Here is one that I have started. I had to add more wood to the bottem of the lid because it is only about 1/4". I cut lids and stocks with a mill. It can be done by hand but, it takes a while. And even cutting them will a mill they still have to be hand fit to work right. At this point there is alot work to be done yet.

I have thought about putting a wood patchbox on guns with out butt plates but, I think it's asking for trouble.

PB3.jpg


PB2.jpg


PB1.jpg


This stock will have a grease hole under the front of the lid. I think dirt will still get in but, hiding it might slow it down a bit.

I too like to use wood for the lid with less figure than the stock. I am braking that rule on this one because I had a slice off the fore stock with burl and birds eye that I dont think will clash with the stripes in the butt (we'll see, I hope works out the way I think it will).

Bruce Everhart
 
At a gunshow a few years ago, I saw a true "barn gun" that was made from an old Brown Bess barrel, a 1760's English shallow-round faced lock, and assorted hardware. It had no buttplate, but had a sliding wood box. The lid was gone, and the bit of wood on the stock where the box would have latched was busted off (the gun was pretty well worn). By the way, it was also unstained (and probably was never even finished) and the wood was quite yellow from handling.

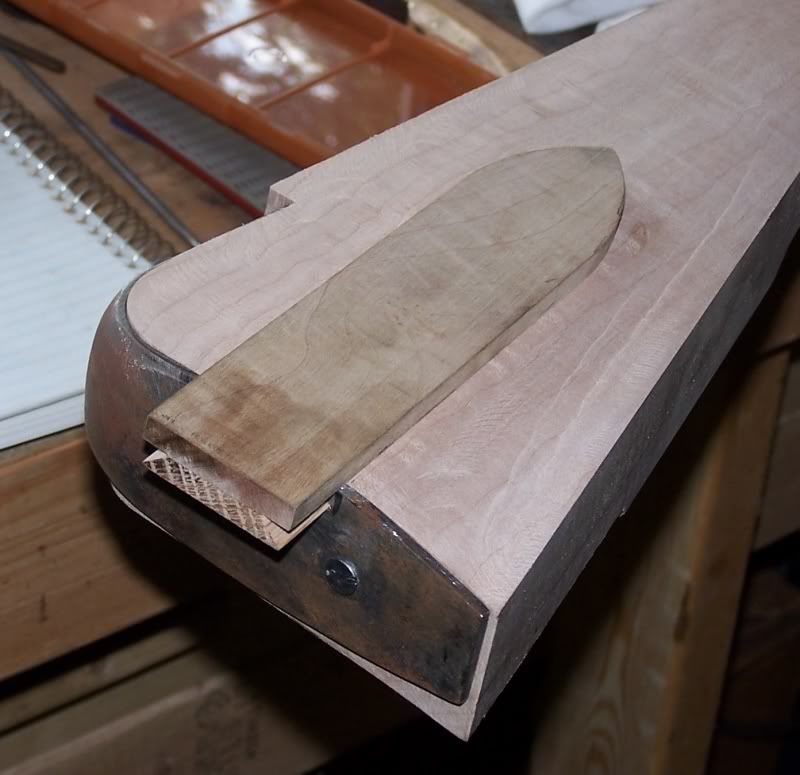
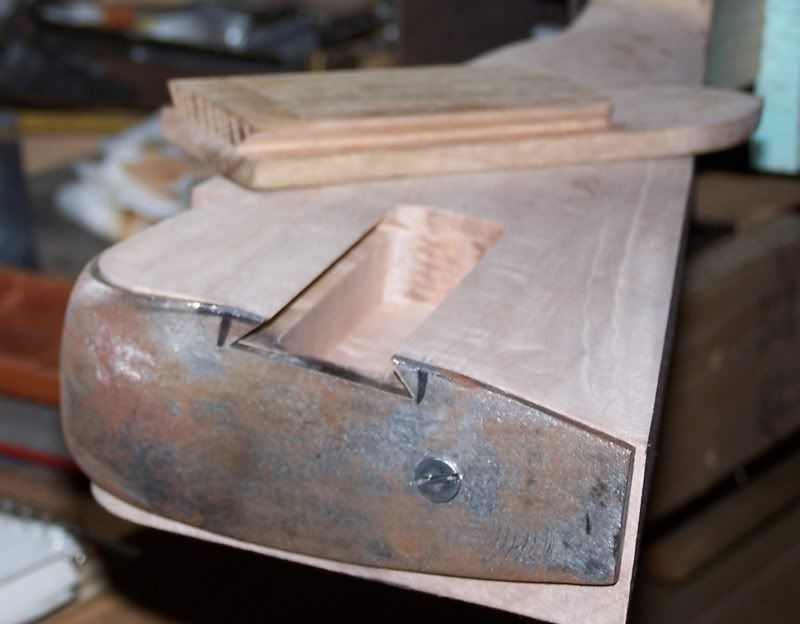
Here's how I make the wood boxes. First, I position everything on the stock, and flatten it off. And it needs to be FLAT all the way to the buttplate and a large enough area to catch all of the outer part of the box lid. Then I lay out the opening (making it slightly tapered) and drill it out and clean it all out and square it up. After that, I take a gauge and run it along each side of the opening and make a mark about a quarter inch or so, which indicates the bottom of the dovetail. The rest is done completely by eye. I will stab along this line with a chisel and then cut down from the top, and repeat until I get the dovetail cut out. Then I cut out the chunk of wood that's left and continue the dovetails out to the end. Put the buttplate on and cut out the dovetail in that to match the wood.

I make the lids from one piece. Years ago, when I started doing them, I made them from two pieces, thinking that surely it would be easier. Finally, I tried one out of one piece, and it is VASTLY easier. I try to cut the lid from the bit of wood that was beneath the lock are on the blank, but that isn't always possible, and I just have to get it from the top of the stock where I cut off for the barrel.

I make the piece of wood to match the taper of the dovetail in the stock, and a bit long, of course, and then take the same gauge that I used earlier and mark the bottom of the lid for the dovetail and chisel it out the same way. It's just a bit of hand fitting after that. After you've done a few, it gets pretty quick and easy, and can imagine that a wood box lid would be a pretty inexpensive option on a gun 250 years ago.

The spring catch can be made from just about any bit of steel the right size. An old door hinge pin or a 3/8" spike nail work fine. Just sawing and filing and a bit of forging will make your catch. There's so little travel in the spring that hardening and tempering aren't really necessary, but you can if you want to. Of course, you can buy a ready made latch.

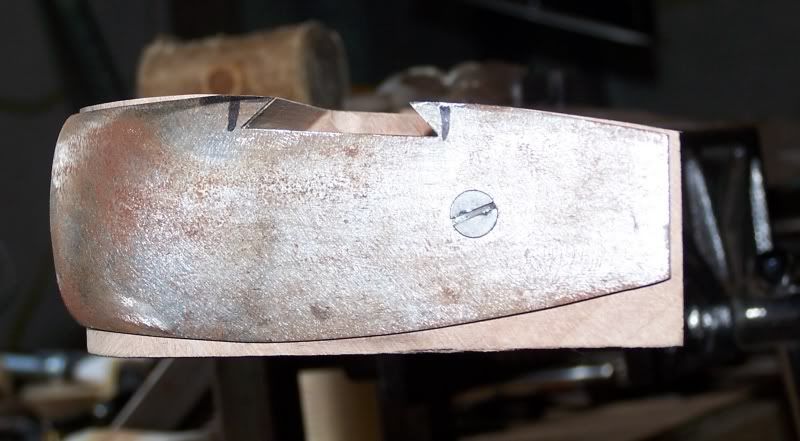
The metal end cap (if you use one) I find to be the biggest pain in making a wood box lid. What I do is to fit the box lid to the stock and buttplate, filing off the end of the lid to match the contour of the buttplate, just as if I weren't going to use an endcap (don't fit the catch yet). Now, the end of the lid is the proper contour and I make the metal cap and fit it to the wood, screwing or nailing it in place. Now, the end cap won't be flush with the buttplate, so I then work down the lid, fitting it forward until it all matches up.

Hopefully that all made sense.
 
Back
Top