• Friends, our 2nd Amendment rights are always under attack and the NRA has been a constant for decades in helping fight that fight.

    We have partnered with the NRA to offer you a discount on membership and Muzzleloading Forum gets a small percentage too of each membership, so you are supporting both the NRA and us.

    Use this link to sign up please; https://membership.nra.org/recruiters/join/XR045103

1803 Harpers Ferry - RE Davis Replacemnt Lock

Muzzleloading Forum

Help Support Muzzleloading Forum:

This site may earn a commission from merchant affiliate links, including eBay, Amazon, and others.

BobKrohn

40 Cal.
Joined
Sep 4, 2008
Messages
155
Reaction score
0
I bought a used Italian (Euroarms/Zoli/Navy Arms) Harpers Ferry Model 1803 rifle.
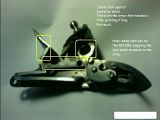
Factory lock has internals that are of obscenely poor quality. Notches that don't work. Frizzen spring that was probably 20 lbs. No fly on tumbler. Etc. Etc.
Outside, the gun looks pretty nice. The frizzen did spark well. Maybe they just figured they would all be wall hangers.

R.E. Davis makes a Harper Ferry 1803 lock. They make it for kit guns. It is NOT a drop in replacement for the Italian repros.
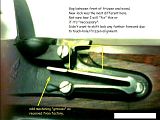
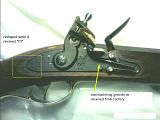
My only beef is with some odd looking machining type grooves on the lockplate, under the frizzen spring.
Part# 1018 current price is $125

They were very helpful and offered to send me the lock and not charge my credit card (except for postage) until I had a chance to have gun and lock next to each other. If I didn't want it I could just send it back. All they could say about the replacement was that others had done it and there would be "gaps".

Link to R.E. Davis 1803 Harpers Ferry lock

Note: Parts for original lock parts from Euroarms can be steep. You have no expectation that they would be any better. They are not set up for credit cards, PayPal, etc.

I got a lock and here are pictures to document my NON-EXPERT gunsmith attempt to fit the lock.

The surgery took maybe 2hrs total.
Lockplate is shaped differently. (has pronounced "tit" at rear)
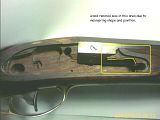
Some wood needs to be removed internally due to mainspring shape and placement.
Since new lock DOES NOT have pre-drilled and tapped holes for lock retaining screws, you will be able to make those fit existing holes exactly. (Note: metric threads).

Davis lock comes in the white with a sandblast (?) or beaded (?) finish. The Italian lock is case-hardened. I chose to brown my new lock.

Since I am a practical person was not OBSESSED with precise nit-picking historical accuracy AND wanted to still be able to (for some reason)
re-install the old lock AND thought it was easier for me to grind metal than carve wood AND the new lock was a little larger and allowed me to do so, I ground it to fit outline of old lock. This was done primarily at rear (the little "tit" shape) and the bottom edge.

If you have CONSTRUCTIVE ideas to improve or beautify the results...please let me (an others) know! Especially re the gap in front of frizzen.


Click on a picture for larger versions.


Bob

I think the finish on the lock was "as cast" as opposed to bead blasted. This may or may not be the case. Can't tell from the photos.

I don't know what to say about finishing the area in front of the lock as the gaps are large enough that any fix will still be somewhat visible. Mixing sawdust with a wood putty would fill it in, and it could be sanded and stained to somewhat match the surrounding wood. This would help seal the area up, but close examination would reveal it. Are you really concerned about that?

Too bad, you couldn't use the new lock parts on the old lock plate.

Dan
 
Bob,
To my way of thinkig, your problem isn't a problem at all. Picture yourself in the early 1800's on what was then the western frontier, and you broke your lock. You would most likely replace it with whatever was available at the time and all of the gaps etc would look just like what yu are dealing with.
I understand you would like to have a picture perfect rifle but to me it just makes it more authentic looking. Just my opinion. :yakyak: :v
 
Bondo & a little grunged up flat black paint (looks like powder fouling) will fix anything.
 
Bob,

Don't grind off the inside of the cock. It has to stop on the top of the lock plate. Instead, take wood off where it is scraping. Also, if you take off any material from the frizzen or pan, make sure it doesn't get hot and make sure the resulting pan fit is tight to the barrel.

Also, I have a similar Davis Common lock I am working on right now. The cock should come to rest on the top of the plate at the same time the tumbler contacts the bridle. Mine doesn't so I'm filing a tiny bit of material off the bridle to make it do that. If yours does this, doing so will take a lot of pressure off the internals.

Sean
 
If it were me, I'd restock it with the appropriate stock. Try and see if the barrel and hardware can be fitted to the new stock with little effort. If not, well I'd replace them too until the gun was built right. Anything not being used can then be sold on ebay or a gun auction place.
 
Thanks for helpful comments so far.

My only real concern about the gap near frizzen is the slight possibility of loose, unused priming powder getting inside the lock mortise.
If this built up unnoticed and ignited there would be lots of excitement on the firing line.

As I said, I'm not really interested in textbook re-creation. Just a fun and safe gun that has some resemblance to a period gun.

Paddlefoot's thoughts have lots of appeal to me.
I'm NOT being facetious here.
There's some sort of deep satisfaction in a job well jury-rigged. The in-a-pinch-fix that lasts for years. A nail and piece of wire holding a brake lever in place. Sweet!
Problem with expensive, precise, beautiful guns is that you (at least me) are scared to use them, knock'em around, have fun. I would even consider roughing the gun up to make it look used.
Maybe re-brown the barrel from its shiny brown to flat "Plum Brown" and match the lock as it is now.

So the various bondo/putty ideas from 'Mark Lewis
' and 'Boar-dilly' are perfectly good solutions.
Only problem is that there might not be enough wood to grab on to. Maybe drive some pins into base wood and build up around it? (like a dental implant?)

'Swamp Rat' Restocking is beyond my ability for one thing and may add still more expense. I really wish I did have the skill and tools to do that type of thing.

'DanChamberlain' I did consider the swap parts idea and had asked the guy at Davis about it. When I got the new lock it was close but no cigar.
Buying new tumbler from EuroArms and maybe re-temper? Beyond my ability too.
(Also, I assume that the Italian lock is all metric and the Davis is all SAE/English)

'Sean' Yup, heat would be bad.
All cock, frizzen metal removal was with a fine tooth file (very little removal). Actually, the whole thing could easily be done with a file. Constant fit testing.
I'm just not knowledgeable about in-letting wood and such. All I know is 1/4" hand-drill and file bit. The stuff removed was hidden from outside world. I have no nearby friends that are gunsmiths or woodworkers to learn from by example.
Most gunsmiths here are "expensive".
Four holes in my Lyman GPR to mount underrib rod guide $20... each hole. I used JB Weld instead... $5. Satisfaction of job well jury-rigged...Priceless!
I will investigate the "cock should come to rest on the top of the plate at the same time the tumbler contacts the bridle" issue. That's the kind of info I need and am totally ignorant of.
Thanks.

Question:
Just curious, an educational question. Since there aren't probably any mint condition originals around, would anybody know if lock components were case hardened like the repro or polished white (like CW rifles) or browned or what?
For that matter, how were the barrels finished?
 
Thanks, Bob! The information and the photos really do help. I appreciate your efforts in getting all that on here to answer my question.
 
Probably the neatest and least visible fix would be to let in a "Dutchman" along the barrel channel and into the the lock mortise far enough and low enough to fill in the gap. Then trim it inside the barrel channel and along the top of the channel so that it blends into the stock. Lastly you'll need to inlet the forward upper section of the lock. It's much easier to do than to describe. The new piece of wood can be held with glue and, if needed, some very small nails. I've done it a couple of times with good results and I am not the best woodworker in the world.
 
Virtually all lockplates, at least all good quality ones, were hardened. The question is whether the colors, if there were any, were polished off or not. If they weren't hardened the shank of the tumbler would eventually wear the hole egg-shaped. One of the shortcomings of reproduction locks is that this step is often (maybe usually) left out.
 
JV Puleo said:
Virtually all lockplates, at least all good quality ones, were hardened. The question is whether the colors, if there were any, were polished off or not. If they weren't hardened the shank of the tumbler would eventually wear the hole egg-shaped. One of the shortcomings of reproduction locks is that this step is often (maybe usually) left out.


JV Puleo, an excellent and often over looked point. The question may be was the lock polished when fabricated or were the colors left to wear off naturally with use? On the vast majority of smoothbored muskets, the locks were burnished (NOT buffed by modern means) when stocked, just like the rest of the gun's iron-work. Rifles may have been different but I wonder? Casehardened colors are not that durable, they will wear off relatively quickly and can be defaced just from use and normal cleaning. Remember, we are not talking about "modern casehardening" which is usually done with cyanide and is quite durable, we are talking the old process of using ground up bone and leather. It does an excellent job but is relatively fugitive in it's durability of the color. Also, when the arm is taken back by the unit armorer for refurbishment, he would refinish the gun, taking great pains to burnish the arm if that was the finish required or re-brown the barrel, polish the lock and brass hardware. The burnishing of the lock would remove any remaining colors from the hardening. We don't need to mention the fact that most modern users will brown or otherwise color the lock, an unnecessary step but often preferred for some reason or other.
 
I want to thank everyone for the information.

A friend sent me this post since I had just purchased a used Harper Ferry gun. I am having the same problems with the gun. I am fooling around trying to figure out what to do. The lock just doesn't have much power to get the spark started.

This is my first time posting on Muzzloading forum. I have tried to log into this web site several times. It seems my anti spam was blocking the infor to log into this forum.

P
 
I'm giving this thread a bump, because I am planning to do this same lock switch with my Navy Arms 1803. As to fixing that gap in front of the frizzen, perhaps building up the lockplate with weld in that area and then grinding to fit might be an option?
 
I have a Navy Arms 1803 in .58 it's a honey.
I bought the gun used, the previous owner Had the lock tweeked and tuned by a good BP Gunsmith.
Wow this lock is good, it don't care about what flint you use, pull the trigger and it goes boom.
Rather than starting down the road of lock replacement it might be worth your time to talk to a BP gunsmith about having the origional lock fixed.
 
Mine seems to spark just fine, but I'm not crazy about the "Navy Arms" stamped crookedly on the lockplate.
 
I too have a Zoli Harpers Ferry rifle,
(if ANYONE has ANY documentation for this, manuals, loads, ammo, lube etc., please let me know :shocked2: ) But my question is will the parts from Euroarms fit it? The lock has '108' stamped on various parts of the lock and on the stock under the barrel. I need a frizzen spring and a mainspring.

Glad to know that others have the same rifle. :thumbsup: Look forward to 'playing' with it.
 
I also have the 58 caliber 1803. My second favorite rifle. Inletting the dutchman ahead of the frizzen is an easy fix and if it is noticable it goes with the I fixed it myself idea.

So far my lock is doing what I expect from it but it is nice to know a replacement exists.
 
Strawhat,
When (if you have) you fired your rifle, did you make any adjustments to the lock parts? My lock has a very hard release on it. :surrender: Any pointers from your experience would be really appreciated. Thanks a bunch :bow: !

Cheers, Don
 
I still have the rifle and don't notice it having a overly hard trigger pull. If you are familiar with tools and the workings of a flintlock, you might try polishing the friction points of the lock and stoning the sear tip. Sometimes the angle of the tip can be adjusted for a better letoff. If you're not comfortable doing this, depending on where you life, there are fellows who would be glad to help.
 

Latest posts

Back
Top