• Friends, our 2nd Amendment rights are always under attack and the NRA has been a constant for decades in helping fight that fight.

    We have partnered with the NRA to offer you a discount on membership and Muzzleloading Forum gets a small percentage too of each membership, so you are supporting both the NRA and us.

    Use this link to sign up please; https://membership.nra.org/recruiters/join/XR045103

Accidently Bought a Rifle

Muzzleloading Forum

Help Support Muzzleloading Forum:

This site may earn a commission from merchant affiliate links, including eBay, Amazon, and others.
rowdyjoe said:
Just ordered one.
Ordered one? Omg,, isn't there a bait shop/sporting goods store in your neck of the woods?
Sorry, I take that back. I guess here in the land of 10,000 lakes I can look in 12 different places in town to find the best price for one.
I just used the link as an example, I think I said lot's of places make and market a bobber light. They're as common as Q-tips an Bobby Pins around here.

p.s.
rowdyjoe said:
- the head of the bolster screw is stripped so, getting it out will be a chore.
Leave it in there. It's not important. You have many other things to be concentrating on when it comes to shooting your rifle.
Calm down, don't over think things. It's 400yr old technology, not rocket science.
 
Well, I'm not a fisherman so, I'm not familiar with the tackle available today. Last time I went fishing, we used live worms. Rather than run around all over town looking for one, I found it on Walmart web site and ordered it for $4. Would have burned up more gas than the thing cost. They didn't have one at any of the local stores so, I ordered it for "in store" pickup. I'll get it Saturday.

Yep, I've decided to leave the bolster screw alone for a while but, that ugly head bothers me and will get replaced some day.

Roger on the NOT rocket science. No choice on the "calm down". I'm waiting for parts now.
I don't think I've been this excited about anything since my brother and I got a Lionel train for Christmas back in the mid 50's. :)
 
I don't think I've been this excited about anything since my brother and I got a Lionel train for Christmas back in the mid 50's.

That's what it's all about Joe, you'll get it sorted out with a little time and perseverance.
 
Got the "Thill" battery/light yesterday and dropped it down the barrel tonight. It works great and was almost too bright. I was able to see almost everything. Rifling is in very good shape ...nice and sharp. A little pitting near the muzzle but, none deeper that I could see. It should be a good shooter. I'm happy. :) Thanks again for the tip.
 
I think I've got it all sorted out and she's ready to fire. I had to work out a weird issue but, all is good now ....I think.
I received the sear spring and trigger assembly from Deer Creek today. I installed the new sear spring, after a false start but, it's working fine now.
The trigger assy was not so easy. I broke the main spring on the new assy while attempting to adjust the trigger. Wow, those thing are brittle. It broke right where the old one did ...at the bolt hole. So, I'll ask Deer Creek to replace the defective spring on Monday and in the mean time, I "fixed" (hopefully) the old one.
Now for the weird part. After repairing both assemblies, they wouldn't work together once assembled. The trigger leaf(s) was too close to the sear and would not allow it to cock in either position. Long story short ...I fixed it and it's now working.
I posted a more detailed account of the "fix" in the "Gun Builders Bench" section if you want to read the whole story.
I hope to take it to the range Monday and see how she shoots. Hope to post a range report shortly after that.
 
Took her to the range today and got to fire 4 rounds before the lock malfunctioned. Inspection at home revealed the sear spring rotated up and was not pushing the sear into engagement. Don't yet know how I'm going to fix that but, I found a couple of slightly loose screws and that may have caused/contributed to the problem. I'm thinking about a new lock.
I also had trouble with no. 11 caps (CCI magnum) misfiring. It seems the hammer struck them hard enough as they showed an indentation but, could not get even one out of 5 to fire. I happen to have some no. 10s (Remington) on hand and they worked but, also had one misfire with those. Beginning to wonder if my hammer strike is not hard enough ....or if I bought some bad caps. ????? Would it be safe to unscrew the nipple about 1/2 to 1 turn?

I hit a 17" X 11.5" target at 50 yds. four times. I wouldn't call it a group, more like a gathering.
First two hit approx. 8 to 10" to the right, 3rd shot hit approx. 1" left and the 4th shot was about 6" high. Don't know why it jumped from left to right like that but, I do know that my patches were too thin (not very tight in the bore), too large, and too soft. Got to get different material for patches and cut them smaller.

I ran about 4 wet patches (water and dish soap) down the bore at the range and then took it home to clean and inspect. I used the same solution at home and thought I had the bore clean until I inspected it with a light. Wow, nasty. So, I got out the cleaning solvent and a .50 cal. bore brush. Scrubbing with the brush followed by a patch revealed a nasty mess in the bore that took a while to get clean. I "think" it's clean now.
Looking forward to another trip to the range later this week.
 
Your sear spring has a small projection sticking out of the side of the upper area of the leaf.

It should be in the slot in the lockplate to keep it from turning.

My method of assembling one of these is to place the spring on the lockplate with the lower end resting on the sear.
Then, I insert the screw and run it in until it is just touching the springs eye.

With my thumb, I press on the rear of the spring where the U is, forcing it downward and towards the lockplate. After it moves down just a bit, the projection will snap into the lockplate groove. I then tighten the screw to hold everything in place.

The screw which passes thru the sear (or on the bridle at the sear) should be just "snug". It should not be tight.

If it is overtightened, the sear will not move freely so it may not move into engagement with the full cock notch or the half cock notch.
It will also be difficult for the trigger to move giving the appearance of a very heavy trigger pull to get it to fire.

The other screw(s) should be tightened.

Do not unscrew the nipple. It needs to be snug against the drum or bolster in order for it to fully seal off the high pressure powder gasses.
The caps may be defective or, more likely, the nipple cone is slightly too large for them.

If the cone is a little large it will prevent the cap from fully seating so that the priming compound is resting on the top of the nipple.

If this happens, the hammer ends up pounding the cap down until it does finally seat on the end of the nipple. The next attempt to fire the gun usually results in the cap firing.

It is difficult to determine if this is happening but generally speaking, the cap should not be a tight fit on the nipple. If it is fully seated and the priming compound is resting on the end of the nipple, you should be able to rotate the cap with just some strong finger pressure. (It's difficult to explain but the cap should not easily fall off of the nipple but it also should not be tight.)

I don't know what kind of solvent your using but plain water and some dish soap should be all you need to fully clean the bore.

Have fun. :)
 
I've been using either Remington #11 or Winchester #11 caps on all my rifles. Never had a no fire situation....They fit tightly, but not so tightly that you can't lift them right back off.
 
"If the cone is a little large it will prevent the cap from fully seating so that the priming compound is resting on the top of the nipple.

If this happens, the hammer ends up pounding the cap down until it does finally seat on the end of the nipple. The next attempt to fire the gun usually results in the cap firing.

It is difficult to determine if this is happening but generally speaking, the cap should not be a tight fit on the nipple. If it is fully seated and the priming compound is resting on the end of the nipple, you should be able to rotate the cap with just some strong finger pressure. (It's difficult to explain but the cap should not easily fall off of the nipple but it also should not be tight.)

I don't know what kind of solvent your using but plain water and some dish soap should be all you need to fully clean the bore."


The nipple is a new stainless "Traditions" brand and both no. 11's and 10's caps seat on the nipple rather loosely. I can remove them easily. I attempted to re-fire the no. 11's more than once and the last couple of them I tried 3 or 4 times. I then gave up on the 11's and tried the 10's with success (except for one).

The solvent I used is a Hoppe's brand for copper, carbon, lead, etc. I don't know why my water/dish soap mixture didn't get the bore clean. We were pulling, what appeared to be, clean patches before inspection with the bore light. We (my grandson and I) were shocked at the crud that came out on the first few patches after using the solvent and bore brush. Maybe I should have used the bore brush with the water mix? I'll use Hot water and a bore brush next time.
 
Both no. 11's and no. 10's fit about the same for me ....rather loose. Could this be a trait/fault with Traditions brand no. 11 stainless nipples?

Maybe I should try a different brand of nipple?
 
I have the CVA replacement high performance stainless nipples. They were $6 at Cabelas...but I have the stock oem nipples on my other CVA rifles, and they HAVE to have #11 caps, 10s just won't go on. Went to the range with the one I bought today. Played with the patch and load a little. Settled on 80 gr of 3F, .013 patch. Shooting at 50 yards, the last 2 pictures in this album show today's results. The bore cleans up with 3 hot water patches, and looks like chrome. https://goo.gl/photos/pxLE21kcJyeek9wFA
 
Very good shooting. Hope to have mine shooting like that soon.
I am on the verge of buying a new nipple. The MSM Spitfire gets very good reviews. Something has to change because it's not working well as is. I'm also on the verge of ordering a new lock from Deer Creek but, want to try one more thing on my current lock.
Speaking of Deer Creek, I called them this morning concerning the broken trigger spring on the new trigger assy I bought from them. They said to send it in so they could look at it. I asked for a replacement spring or assembly. We'll see.
 
Have you lubricated the lock?
It's rather hard to get much oil down between the tumbler and the lockplate so with the lock removed, you might want to do a case of overkill with the oil and really douse the area.

Wipe off the excess oil from the lockplate, reassemble the gun and give the #11 caps another try.

If they don't fire on the first attempt, they aren't worth having so toss them.

I've never had a problem with CCI caps,regular or Magnum but that doesn't mean there isn't something wrong with yours.
 
OK Jim.
I'm working on the lock now and having difficulty figuring out the problem. I've lubricated it with light machine oil. It's working OK outside the stock but, as soon as I put it back in the stock, it won't stay at full cock (trigger assy removed). With the lock and stock upside down, it will sometimes cock but, right side up it won't catch in the cock position. Most of the time it will stay at half-cock. I'm about to pull my last few hairs. :) I can't tell where the stock is interfering with the lock. Can't physically see it and can't find any rub marks. ???? Grrrrrrr !

Bottom line, I think the nose of the sear is broken and is causing most, if not all, of the problems. So, since I can't find a new sear, I'll have to buy a whole new lock. I sure hope that fixes the problem. At least I'll get to see what all the parts are supposed to look like when whole. :)
 
A close eximination of the nose of the sear should be done to see if it is really broken.

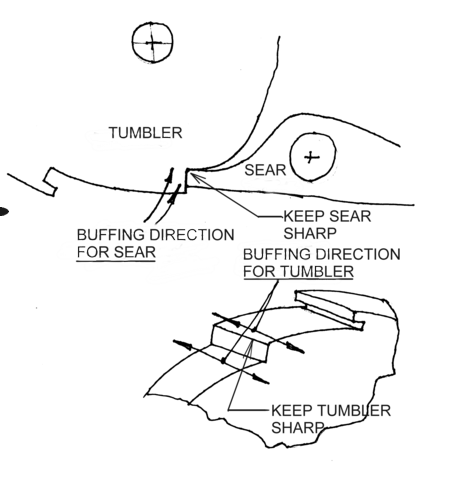
It should come to a small, smooth flat surface that can mate squarely with the full cock notch in the tumbler.


Also pay attention to the edge of the full cock notch on the tumbler.
I've seen many which had the edge where the notch meets the outside radius of the tumbler completely rounded off. This of course left no flat for the sear to engage with so it would not hold a "full cock" setting.

I don't know how your looking for interference between the lock and trigger parts with the stock but many of us use a transfer medium like the black soot from a candle applied to the metal parts.

If they touch the wood at any time, they will leave a black mark.
Sometimes the black mark is hard to see so after blackening the lock parts, carefully reassembling it making sure nothing touches the wood while doing so and then operating the lock & triggers, everything is carefully taken back apart.

Once the lock or triggers are removed the first thing to look at is the metal parts.
Often, if something is touching, it won't leave much of a mark on the wood but it's pretty easy to see if the black soot has been rubbed off of the metal parts.

Another transfer medium that works pretty good is lipstick.
Just a very light coating on the metal parts will do.
Lipstick is also often easier to see on the wood than a tiny bit of black soot.
 
The tip of the sear on the one I bought was broken off, and the fly was stuck. I suspect that the hammer fall with the stuck fly caused the sear to drop into the half cock notch and snapped off the sear.
 
Thanks for the excellent explanation but, it's a moot point now. I've bought a new lock and hope to have it by Sat. Hope it doesn't need any fitting but, won't know until it gets here.

The nose of the sear (part that makes contact with the tumbler) was blunt and ragged looking. I tried to dress it up with a swiss file but, it didn't help and may have made it worse.

My fix for the broken main trigger spring seems to be holding up well. It survived the short shooting session so, maybe it will last a while.

I'm expecting a replacement trigger assembly from Deer Creek in a week or so. Had to send the new one back so they could see/inspect the broken main trigger spring.

Maybe I'll have a working rifle with new internals in a couple of weeks.
 

Latest posts

Back
Top