You are using an out of date browser. It may not display this or other websites correctly.
You should upgrade or use an alternative browser.
You should upgrade or use an alternative browser.
Building a Chambers Isaac Haines rifle kit
- Thread starter dave_person
- Start date

Help Support Muzzleloading Forum:
This site may earn a commission from merchant affiliate
links, including eBay, Amazon, and others.
- Joined
- Jun 12, 2005
- Messages
- 8,031
- Reaction score
- 1,033
wow- can't wait 'til it's done 
SingleMalt
36 Cl.
Dave, I'd try aqua fortis. I know there's a fine line between the two, but with a lye wash to neutralize the acid, you'll see some red tones after applying finish.
- Joined
- Nov 26, 2005
- Messages
- 5,270
- Reaction score
- 11,156
Hi Wayne,
Ferric nitrate in water is what most folks here call "aqua fortis". I will experiment with the lye wash to see. Thanks
dave
Ferric nitrate in water is what most folks here call "aqua fortis". I will experiment with the lye wash to see. Thanks
dave
SingleMalt
36 Cl.
Hi Wayne,
Ferric nitrate in water is what most folks here call "aqua fortis". I will experiment with the lye wash to see. Thanks
dave
I made some with nitric acid several years ago. If you'd like to try some, let me know.
- Joined
- Nov 26, 2005
- Messages
- 5,270
- Reaction score
- 11,156
Hi Wayne,I made some with nitric acid several years ago. If you'd like to try some, let me know.
Thanks for the offer but I've used aqua fortis made with nitric acid and dissolved iron, nitric acid alone with a top stain, or ferric nitrate dissolved in water on many guns over the years. Ferric nitrate dissolved in water is what you and most call aqua fortis. It is exactly the same as aqua fortis made by dissolving iron in nitric acid only the acid part is much weaker. It is also much easier to vary the concentration of the stain using ferric nitrate crystals rather than liquid aqua fortis. FYI, originally, aqua fortis meant "loud water" and referred just to nitric acid, which alone will color wood orange to pink after blushing with heat. The acid alone was used as stain as early as 1100 AD. Only much later was a stain made from iron dissolved in nitric acid referred to as aqua fortis.
dave
...nitric acid, which alone will color wood orange to pink after blushing with heat.
Well....I could always give the gun to my young grand daughter!!!
- Joined
- Nov 26, 2005
- Messages
- 5,270
- Reaction score
- 11,156
Hi Mike,
I was thinking pink with flame decals on the patch box. Be careful, I might paint your stock orange like I did Frank's Little Fella's rifle. Actually Mike, years ago I used to stain maple stocks with weak nitric acid and then blush them with heat turning the stock orangey-pink. Then I top coated with some sort of brown stain. It always worked very well but now I usually just use ferric nitrate and don't fool with acid.
dave
SingleMalt
36 Cl.
If the stock will be pink, flower decals in purple and lime green would look good.Hi Mike,
I was thinking pink with flame decals on the patch box. Be careful, I might paint your stock orange like I did Frank's Little Fella's rifle. Actually Mike, years ago I used to stain maple stocks with weak nitric acid and then blush them with heat turning the stock orangey-pink. Then I top coated with some sort of brown stain. It always worked very well but now I usually just use ferric nitrate and don't fool with acid.
dave
- Joined
- Nov 26, 2005
- Messages
- 5,270
- Reaction score
- 11,156
Hi,
Years ago I made a simple half-stocked percussion rifle for a friend I worked with. Shortly before finishing it, I described to him what it looked like with the stain and finish. The next morning he came in to work and told me he dreamed about the gun. In his dream, the barrel was completely wrapped with chrome pipe, there were flame decals on the butt stock, and instead of a lock there was an STP sticker. He really like the actual gun when I gave it to him but he was a little disappointed there were no flame decals.
dave
dave
If we're going to add flame decals, they should probably be coming out of the touch hole! Could also put them on the barrel coming back from the muzzle. A nice "smurfet" thumb piece would be a great added touch.
Seriously though...I haven't seen a finish you've done, Dave, that I wouldn't like. The one's you post pictures of often have the beautiful reddish tinge in them and have a gorgeous finish, so I know it's going to turn out perfectly.
Seriously though...I haven't seen a finish you've done, Dave, that I wouldn't like. The one's you post pictures of often have the beautiful reddish tinge in them and have a gorgeous finish, so I know it's going to turn out perfectly.

- Joined
- Nov 26, 2005
- Messages
- 5,270
- Reaction score
- 11,156
Hi Folks,
Got a lot done on the gun today but also did more buttoning up of the property for winter and even washed and waxed my car. I finished all the carving details prior to staining. I thought some of you might like to see the tools I use for detailed carving. Keep in mind one caveat, I have some disability in my hands. I suffered severe frostbite in my fingers and toes several times during my mountaineering and mountain rescue days. As a result I have significant nerve damage in my hands with very little feeling left in my finger tips. I cannot carve details accurately with a full sized chisel pushed by hand or by mallet. I cannot position the cutting edge of a full length chisel accurately without hovering over the edge closely making it difficult to tap with a mallet or push by hand. Consequently, I use palm chisels and micro chisels where many top line gun carvers use full length chisels. My saving grace is my hands are very strong and I usually do not need a mallet. I also sharpen my tools scary sharp. Anyway, my tool selection is heavily influenced by my disability.
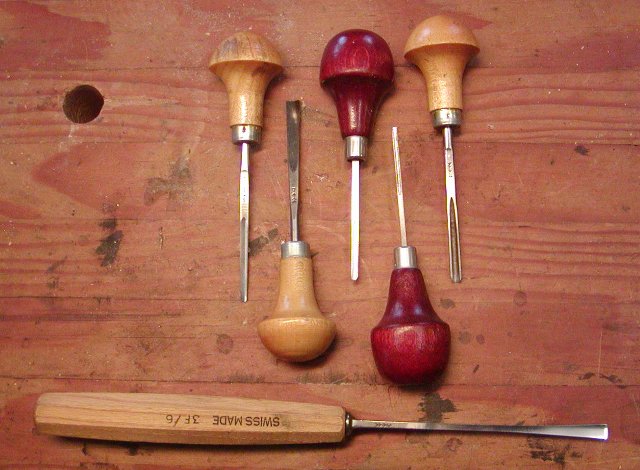
The first image shows the small gouges that I use to cut inside hollows.
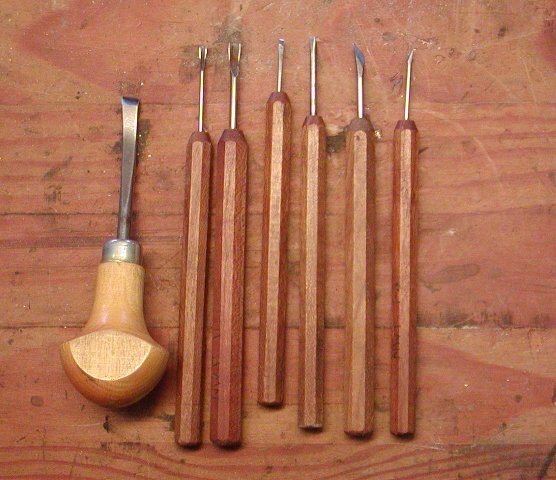
The second image shows the small skews and "vees" I use to cut edges, clean backgrounds, and create borders.
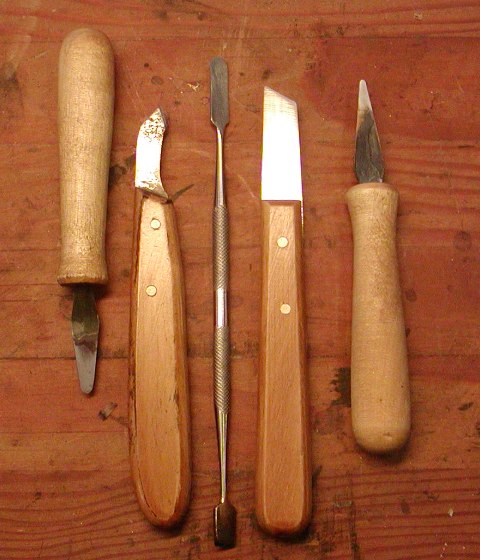
The next photo shows tools I use for scraping around details.
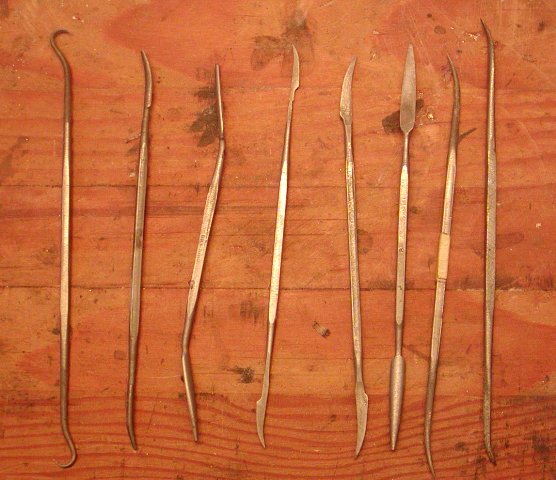
Finally, there are the riffler files that are very useful.
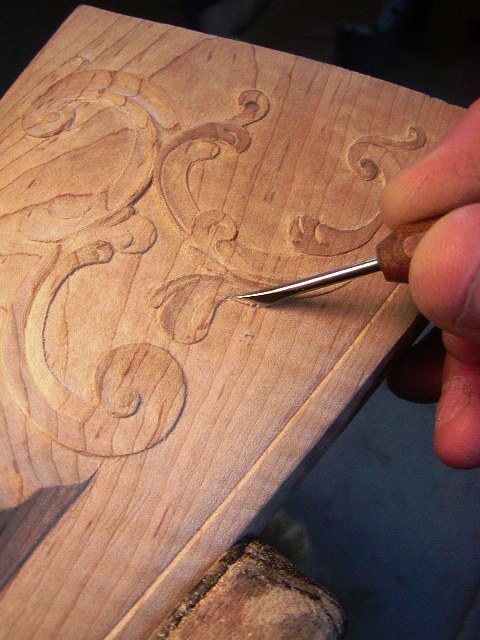
Here I am using a tiny skew chisel to clean up edges and background around carving.
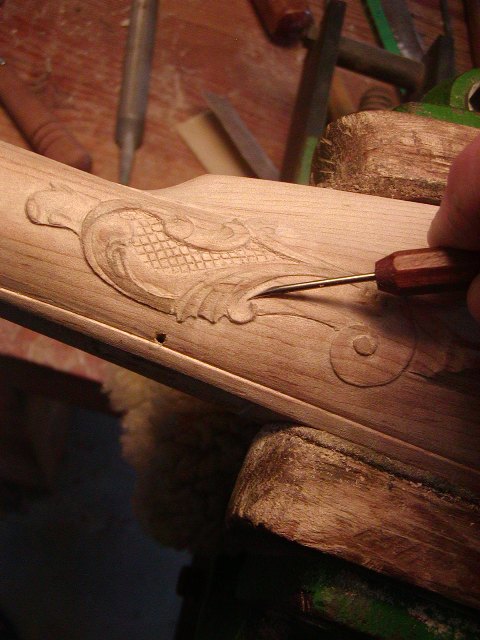
Here I am using a tiny skew chisel to clean up a tight corner.
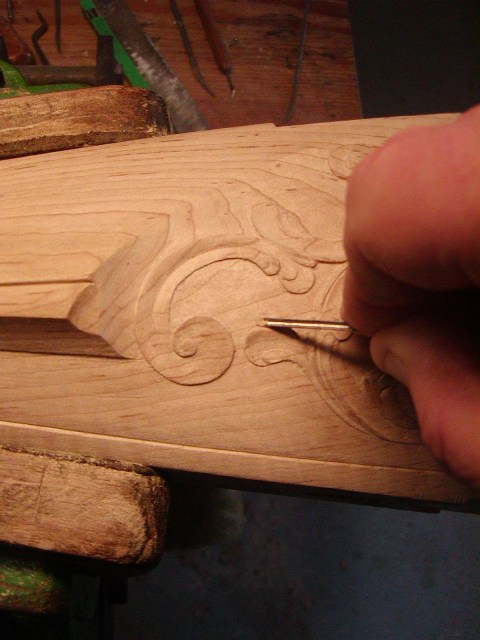
Here I am using a tiny gouge to cut a detail.
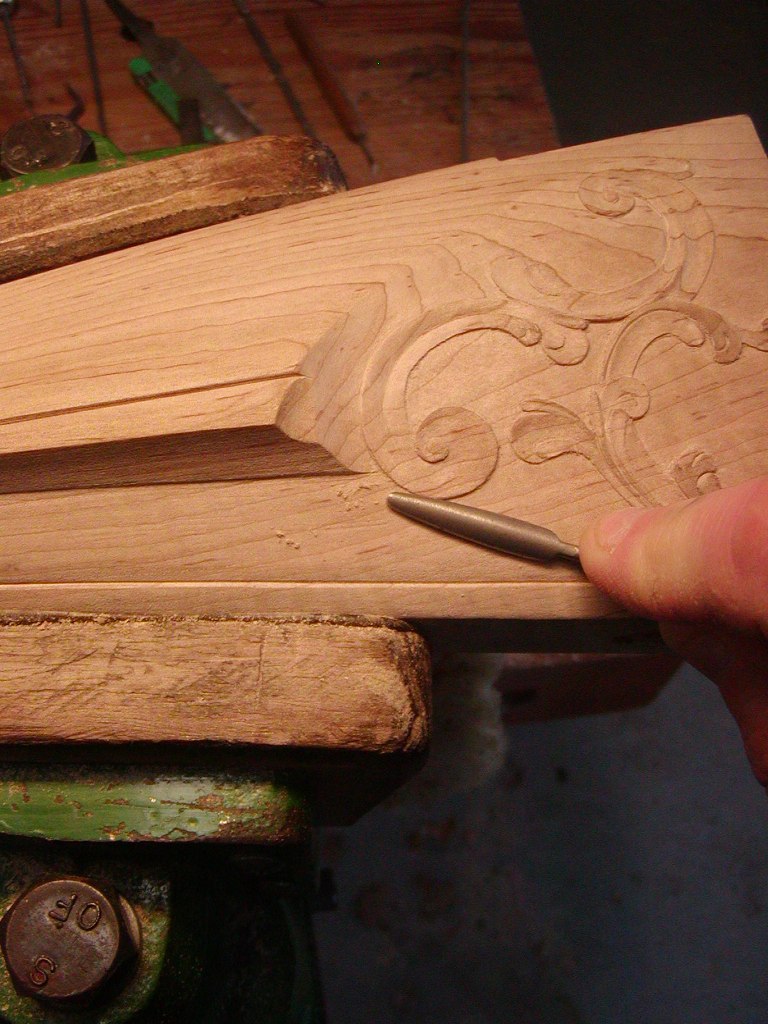
Here I am using a flat bottomed riffler to smooth a background.
Here I am using an edge riffler to smooth the edge of a volute.
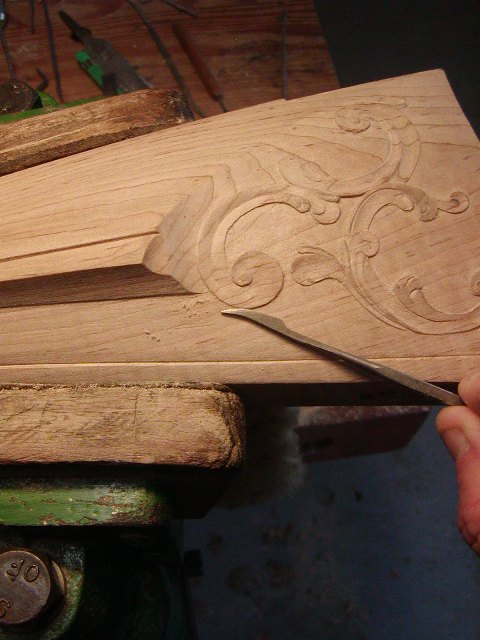
I stained the stock using ferric nitrate and use the staining to reveal rough spots in the carving that need attention. I will go back and touch up the stain as many time as necessary until the stock is ready for finish.
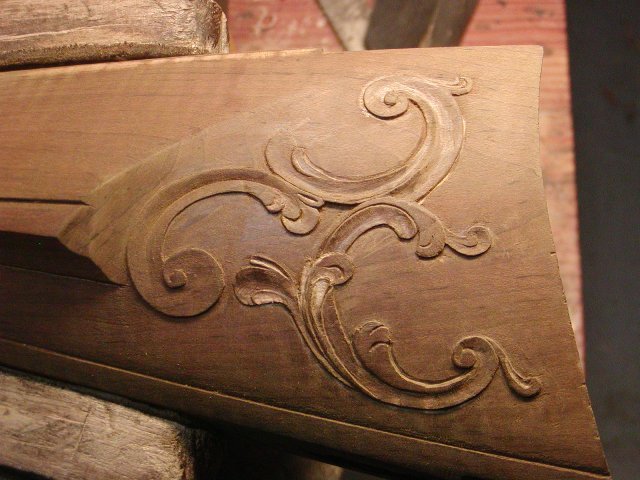
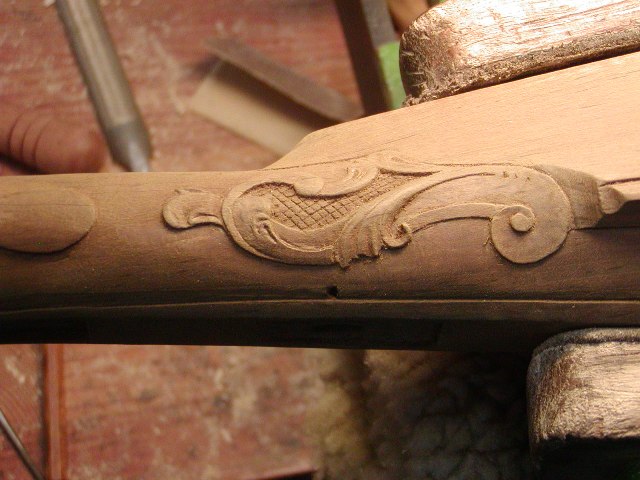
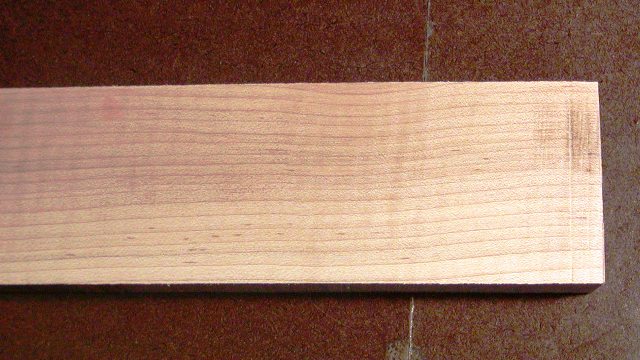
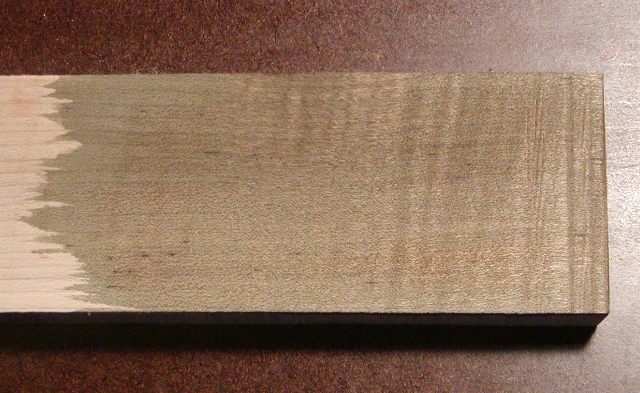
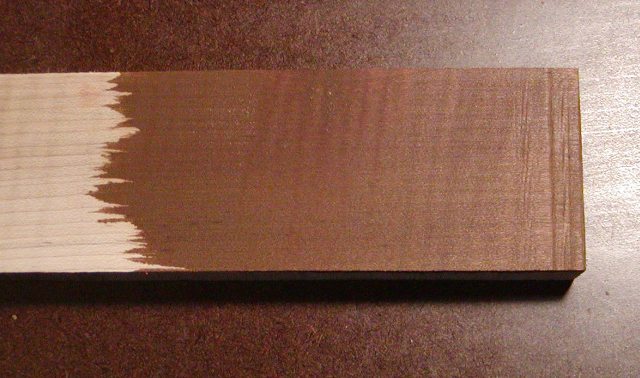
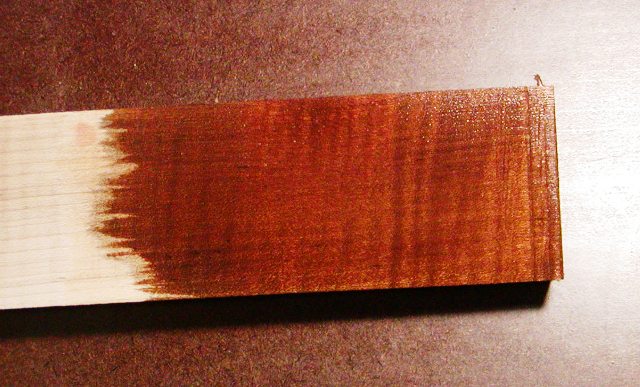
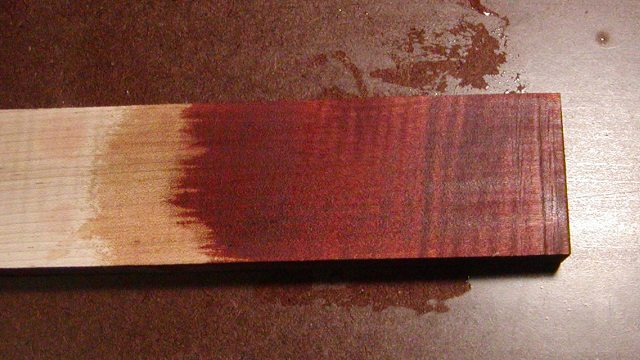
With respect to staining the stock, the following series of photos shows my process for this rifle. The first photo shows maple without any stain. I stain the wood with a mix by volume of 1/3 10% nitric acid, 1/3 tap water, and 1/3 ferric nitrate crystals. I added the nitric acid to increase the red undertone for this particular stock (after experimenting). The next photo shows the stain dried on the wood. I blush the stain with heat from a heat gun which changes the gray color to reddish brown. Because I included actual nitric acid to the mix, I decided to neutralize the acidity by washing the wood in lye-based oven cleaner, a suggestion from Singlemalt. I normally would have used either baking soda in water or ammonia to neutralize the acid but I liked the slight reddening effect that the lye produced. You can do something similar with peroxide. Anyway, the result is very beautiful. I cannot wait to see it with finish.
More to come,
dave
Got a lot done on the gun today but also did more buttoning up of the property for winter and even washed and waxed my car. I finished all the carving details prior to staining. I thought some of you might like to see the tools I use for detailed carving. Keep in mind one caveat, I have some disability in my hands. I suffered severe frostbite in my fingers and toes several times during my mountaineering and mountain rescue days. As a result I have significant nerve damage in my hands with very little feeling left in my finger tips. I cannot carve details accurately with a full sized chisel pushed by hand or by mallet. I cannot position the cutting edge of a full length chisel accurately without hovering over the edge closely making it difficult to tap with a mallet or push by hand. Consequently, I use palm chisels and micro chisels where many top line gun carvers use full length chisels. My saving grace is my hands are very strong and I usually do not need a mallet. I also sharpen my tools scary sharp. Anyway, my tool selection is heavily influenced by my disability.
The first image shows the small gouges that I use to cut inside hollows.

The second image shows the small skews and "vees" I use to cut edges, clean backgrounds, and create borders.

The next photo shows tools I use for scraping around details.

Finally, there are the riffler files that are very useful.

Here I am using a tiny skew chisel to clean up edges and background around carving.

Here I am using a tiny skew chisel to clean up a tight corner.

Here I am using a tiny gouge to cut a detail.

Here I am using a flat bottomed riffler to smooth a background.

Here I am using an edge riffler to smooth the edge of a volute.

I stained the stock using ferric nitrate and use the staining to reveal rough spots in the carving that need attention. I will go back and touch up the stain as many time as necessary until the stock is ready for finish.


With respect to staining the stock, the following series of photos shows my process for this rifle. The first photo shows maple without any stain. I stain the wood with a mix by volume of 1/3 10% nitric acid, 1/3 tap water, and 1/3 ferric nitrate crystals. I added the nitric acid to increase the red undertone for this particular stock (after experimenting). The next photo shows the stain dried on the wood. I blush the stain with heat from a heat gun which changes the gray color to reddish brown. Because I included actual nitric acid to the mix, I decided to neutralize the acidity by washing the wood in lye-based oven cleaner, a suggestion from Singlemalt. I normally would have used either baking soda in water or ammonia to neutralize the acid but I liked the slight reddening effect that the lye produced. You can do something similar with peroxide. Anyway, the result is very beautiful. I cannot wait to see it with finish.


More to come,
dave
I almost always use lye water to bring out the contrast in the stripes on curly wood. Rather than using some sort of cleaner which may have things in it I don't want, I just use plain lye, available at my local Ace Hardware in the plumbing section.
The only words of caution I'll say about it in addition to saying it will eat your skin off in an instant is, always add the dry lye to the water. Do not add water to dry lye.
If you add a small amount of water to the lye, the heat it generates as it dissolves can cause the water to boil and splash the lye on things.
For what it's worth, lye water brings out the tannin in the wood which darkens it. If it is used on walnut, it will darken the surface to an almost black color.
New addition to bucket listHi Folks,
Got a lot done on the gun today but also did more buttoning up of the property for winter and even washed and waxed my car. I finished all the carving details prior to staining. I thought some of you might like to see the tools I use for detailed carving. Keep in mind one caveat, I have some disability in my hands. I suffered severe frostbite in my fingers and toes several times during my mountaineering and mountain rescue days. As a result I have significant nerve damage in my hands with very little feeling left in my finger tips. I cannot carve details accurately with a full sized chisel pushed by hand or by mallet. I cannot position the cutting edge of a full length chisel accurately without hovering over the edge closely making it difficult to tap with a mallet or push by hand. Consequently, I use palm chisels and micro chisels where many top line gun carvers use full length chisels. My saving grace is my hands are very strong and I usually do not need a mallet. I also sharpen my tools scary sharp. Anyway, my tool selection is heavily influenced by my disability.
The first image shows the small gouges that I use to cut inside hollows.

The second image shows the small skews and "vees" I use to cut edges, clean backgrounds, and create borders.

The next photo shows tools I use for scraping around details.

Finally, there are the riffler files that are very useful.

Here I am using a tiny skew chisel to clean up edges and background around carving.

Here I am using a tiny skew chisel to clean up a tight corner.

Here I am using a tiny gouge to cut a detail.

Here I am using a flat bottomed riffler to smooth a background.

Here I am using an edge riffler to smooth the edge of a volute.

I stained the stock using ferric nitrate and use the staining to reveal rough spots in the carving that need attention. I will go back and touch up the stain as many time as necessary until the stock is ready for finish.


With respect to staining the stock, the following series of photos shows my process for this rifle. The first photo shows maple without any stain. I stain the wood with a mix by volume of 1/3 10% nitric acid, 1/3 tap water, and 1/3 ferric nitrate crystals. I added the nitric acid to increase the red undertone for this particular stock (after experimenting). The next photo shows the stain dried on the wood. I blush the stain with heat from a heat gun which changes the gray color to reddish brown. Because I included actual nitric acid to the mix, I decided to neutralize the acidity by washing the wood in lye-based oven cleaner, a suggestion from Singlemalt. I normally would have used either baking soda in water or ammonia to neutralize the acid but I liked the slight reddening effect that the lye produced. You can do something similar with peroxide. Anyway, the result is very beautiful. I cannot wait to see it with finish.


More to come,
dave
1. Spend a day being schooled by Dave in stock adornment and carving!
SingleMalt
36 Cl.
New addition to bucket list
1. Spend a day being schooled by Dave in stock adornment and carving!
I don't think a day would be long enough.
SingleMalt
36 Cl.
Dave, I'd like to know where you found the riffler files you're using? I saw something similar at Woodcraft.
- Joined
- Nov 26, 2005
- Messages
- 5,270
- Reaction score
- 11,156
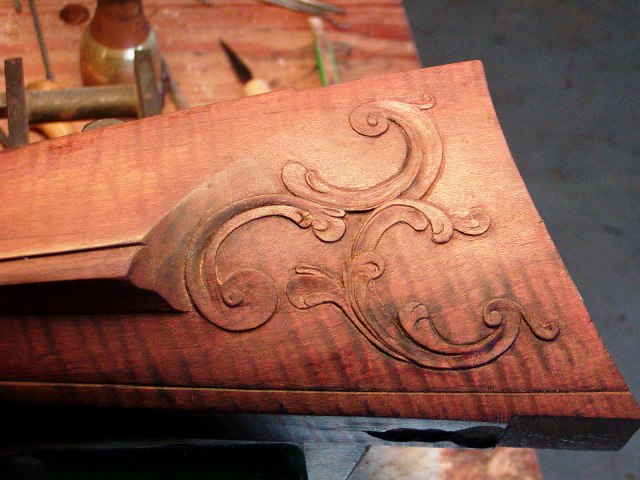
Hi,
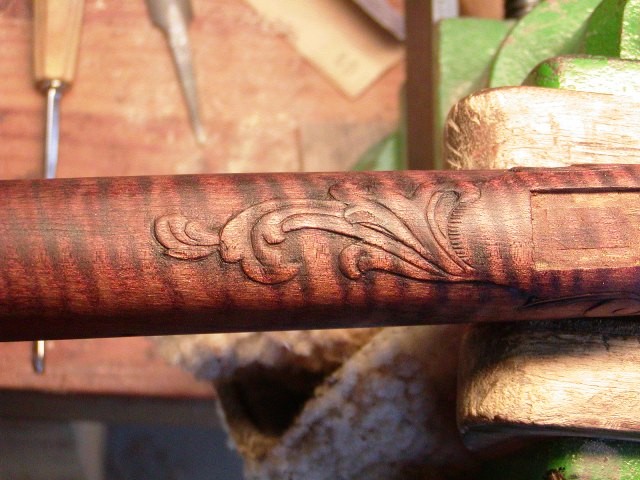
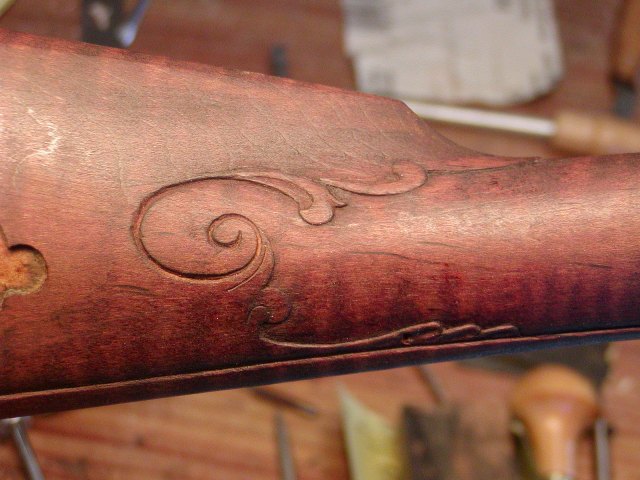
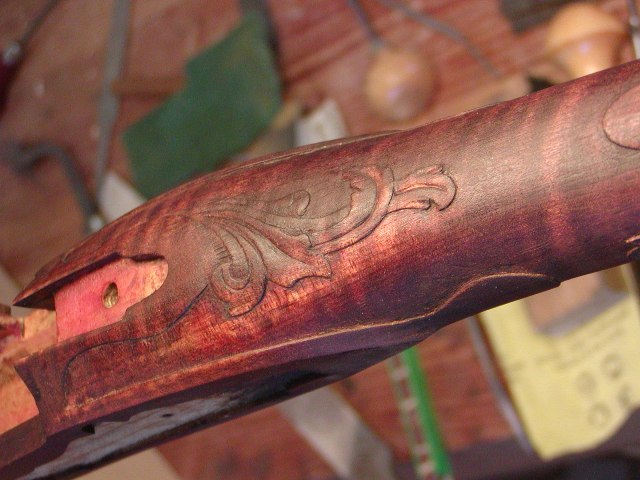
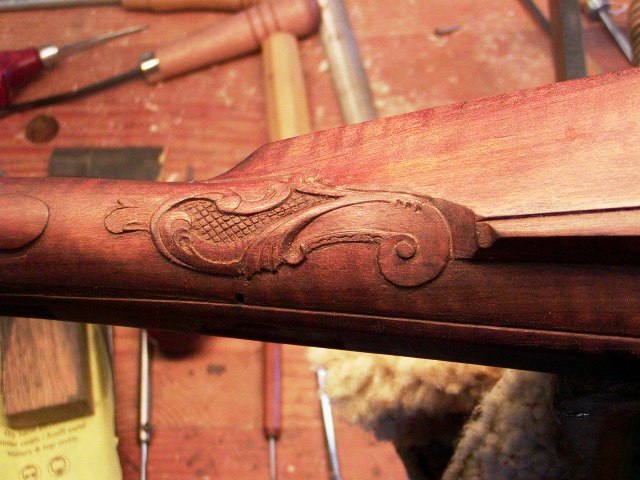
Got a lot done the past few days. I finished all the carving and stock details. I sanded the stock with 220 grit paper and then lightly scraped the final surface so that it has a very slight scraped texture as did most originals from that period. There are some makers who go too far with that IMO but a light scraping really enhances the authenticity of the appearance. Then I stained the stock with ferric nitrate dissolved in tap water and added a little 10% nitric acid. After the stain dried, I blushed it with heat turning the color to a reddish brown. I neutralized any residual acidity with a wash of lye solution, which also deepened the red color a little. After that rubbed the stock back a bit with a green Scotch Bright pad, and cleaned it off with a brush and then a rag dampened with mineral spirits. When dry, I gave it a sealer coat of 50% Sutherland-Welles polymerized tung oil mixed with 50% mineral spirits. This penetrates deeply and I coated the insides of all the cavities and morticed but did not coat the inside of the patch box cavity yet. I'll do that a little later. The photos show the stained carved areas with the sealer coat applied. I will let it dry for 24 hours and then put another thinned coat on but will likely wipe off the excess because the finish should start to pool on the surface in spots. After that, I'll hand rub in very small amounts of unthinned S-W tung oil until I build up the finish. Now off to polishing the brass and engraving.
dave


SingleMalt
36 Cl.
It really looks sharp, Dave.
- Joined
- Nov 26, 2005
- Messages
- 5,270
- Reaction score
- 11,156
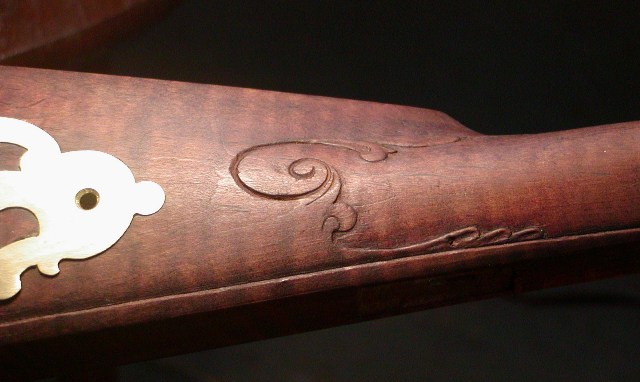
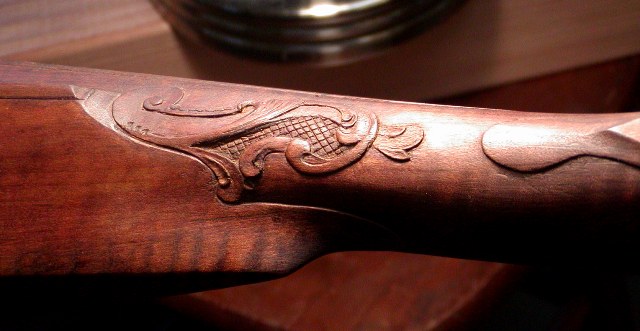
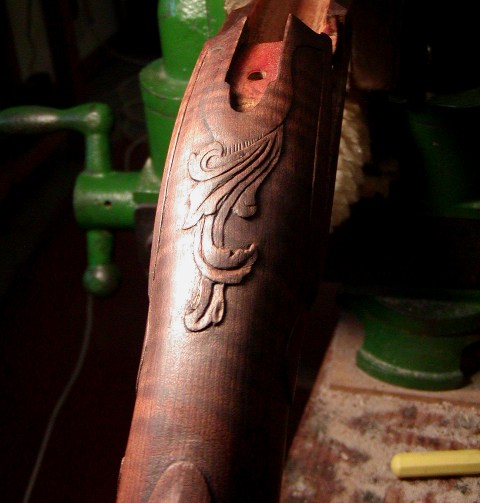
Hi,
Thanks for looking and commenting folks. After the first coat dried I rubbed the stock back with a green Scotch Bright pad to lighten the color a little. The photos below show the rubbed stock using a single light source, which really emphasizes the depth and detail in the carving.
dave
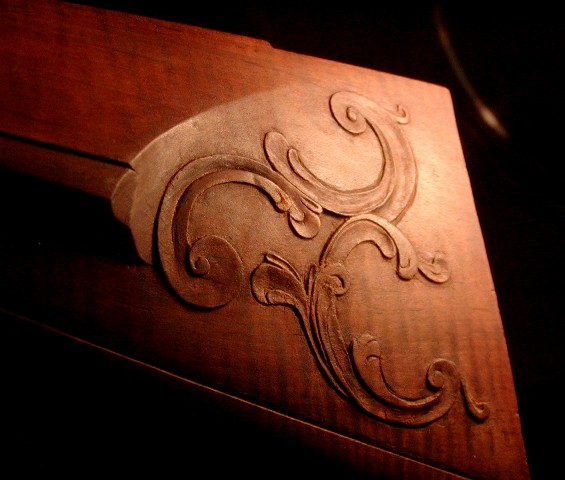
Thanks for looking and commenting folks. After the first coat dried I rubbed the stock back with a green Scotch Bright pad to lighten the color a little. The photos below show the rubbed stock using a single light source, which really emphasizes the depth and detail in the carving.
dave


Similar threads
- Replies
- 8
- Views
- 371
- Replies
- 5
- Views
- 248
- Replies
- 4
- Views
- 1K
- Replies
- 2
- Views
- 846


