• Friends, our 2nd Amendment rights are always under attack and the NRA has been a constant for decades in helping fight that fight.

    We have partnered with the NRA to offer you a discount on membership and Muzzleloading Forum gets a small percentage too of each membership, so you are supporting both the NRA and us.

    Use this link to sign up please; https://membership.nra.org/recruiters/join/XR045103

CVA Nipples?

Muzzleloading Forum

Help Support Muzzleloading Forum:

This site may earn a commission from merchant affiliate links, including eBay, Amazon, and others.
I am going to ask because I have gone through this post very quick and you have had some good advice about checking and cleaning. :grin:
Unless I missed it and I may have as fast as I read this no one has asked what your are using for powder. :hmm:
If it's not real black you will experience more fouling with the subs in my experience. I used American powder Jim Shockley's crappy sub when I first shot. My consistancey was terrible and after about 14 shots even though I was wiping between shots the fouling had gotten pushed down until the drum and nipple was full and no ignition.
I went to GEOX 2f and I will go out of my way now to get it at any cost. The results of my groups tightend immediately and fouling was cut way down and using the lube I am using now, Hoppes#9BP Solvent and Lube there is practically no fouling to speak of and I have not had a misfire since the change. Most of the time it's not the nipple that casues the problem and usually if it is you can visually see that problem if looking for it!
 
I have 4 CVA rifles and 2 of them had this problem. First of all CVA locks are economy locks and don't have the thump of better made locks. Second, I changed the nipples to hot shot nipples. Third, I no longer use cci caps on my CVA rifles. They always fit just a little too tight and would mushroom on the first hammer fall but not go off. I now use Remington caps exclusivly on my CVA rifles, they pop more reliably. Forth, when loading tip the rifle lock down and tap a little then tap the butt on the ground gently. Clean the nipple between shots and if you swab the bore between shots make sure you run 2 or 3 patches down the bore otherwise you're just shoving the crud into the flash channel. When I do all of the above my CVA rifles are as reliable as any high end rifle.

Don
 
IDPatchnBall said:
UPDATE...
One last question... how do you get that combustion drum off? Do you just ruin it with vise grips or chill the drum and don't worry about it with a new one ready to install.

Be aware that CVA jumps up and down and says that removing drum or breechplug voids any warranty, and may irrevocably damage the gun. I'd do plenty of homework on this project before trying it.
 
IDPatchnBall said:
UPDATE...

All very good information and here is what I found out.

Where the hammer mechanism meets the wood, it was not flush or recessed deep enough, hence forcing the hammer centerline rubbing on the interior cup wall and not hitting the cap with correct perpendicularity. Tested this with the recommended paper test. (That test worked out great!) The lower left portion of the paper was attached and the "chad" was not clean cut. Area between 7 and 9 on a clock looking at the cap was still attached. See attached photo A. So,I am going to order a cleanable drum and nipple from DGW and replace it. I take it because this IS a kit style gun that there is some areas that might be sloppy and just has to be reworked a bit. Has anyone else run into this problem?

ab.jpg


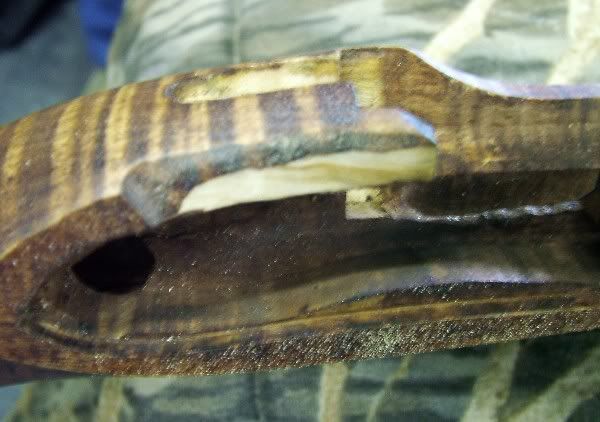
The other area of concern was the wood on the stock, right behind the hammer. It was hitting there and as it struck, would force the hammer distal from the centerline. See attached URL to photo B.

aa.jpg


So, I did get the drum clean out screw removed and then cleaned the pizz out of that area with stiff bristle brush. ( Yeah it ws durty but from the git go, we could see light when shinning a light down the barrel) Then, put everything back together and fired a bunch of caps and went 9 for 10 with CCI.

Lessons learned have been numerous and with the new parts on order.... I think we may have this figured out. I am sure that added a few grains of powder to the Combustion drum will really help things with "Poppin' a Cap"

Thanks for everyone that contributed to this thread.

One last question... how do you get that combustion drum off? Do you just ruin it with vise grips or chill the drum and don't worry about it with a new one ready to install. I can see that the correct depth is vital on the drum depth because that helps determine the nipple angle and how well the hammer hits. Am I in the right ball park?

IdPnB

I had that issue to when i built a deer creek kit. You have to take quite a bit of wood out of that area. I would still replace the nipple.
 
My dad gave me this gun a few years back, he won it at a Rocky Mt. Elk Foundation event and it was built by someone other than myself. Comments on the internal sealing are spot on. I agree with that. I have some sealers that will fix that issue in the off season. I took the whole gun apart to day and it's pretty clear there are some "KIT" issue that needed to be addressed. Good input.

The drum doesn't have flattened sides so I suspect that I will scratch it up when I attempt to remove it, part of the game, that is, if I do change it. The fit of the lock/hammer is much better at this point and I feel more confident that the cap and nipple are more seated. While talking about nipples and caps, correct me if I am wrong but the seating of the cap can't be Loose or sloppy right? I mean, the actual spark form the cap occurs as the edges hit the sharpness of the nipple and it goes into the nipple hole... correct? Each copper nipple is pressed into shape so that inner edge is a tad bit rounded and elevates is ever so slightly creating a space and giving a soft hit? yes - no? Why are the caps so different? I would think that there would be some sort of industry standard!

Powder is Pyrodex ffg. I also have American Pioneer Powder. Which one is better?

BTW, Comus, thanks for the heads up on the CVA warranty, but, if the gun isn't working and is failing, I beleive I need to get it operational so that I am not making a stalk on an animal for naught! Bottom line I want it to work to the best of it's ability. Don't you agree?

So, my next test will be, A new nipple, "hot shot" and then shots with tilting the gun and tapping it with heel of hand to get some powder into combustion trough. Thanks for the explanation on the "FINES". Makes perfect sense.

So, this has been a very good discussion for me and I want to thank all those that have offered up 2 cents... it's actually worth a dime! Thanks again! appreciate the dialog!

IDPnB
 
you might also try putting a piece of thick, damp leather around the drum and use a quality small(8 inch) pipe wrench. the leather will protect from marring and the dampness might give bite.
 
I'm not sure why I keep reading about removing the drum.
Unless it is hopelessly damaged I wouldn't even consider removing it.

As for hunting and making sure the first shot fires without a delay I would suggest that before you load the gun, remove the nipple and run a clean pipe cleaner down thru the flame passage to make sure it is open and clean and dry.
Then pour about 1/10 of a grain of powder into the nipple hole and replace the nipple.
With the hammer at half cock, load the main powder charge and the projectile. Then cap the gun.

Even with the substitute powders like Pyrodex it will fire on the first shot.
zonie
 
IDPatchnBall said:
BTW, Comus, thanks for the heads up on the CVA warranty, but, if the gun isn't working and is failing, I believe I need to get it operational so that I am not making a stalk on an animal for naught! Bottom line I want it to work to the best of it's ability. Don't you agree?

Well, yes and no. I've heard tell from some folks that you really can mess up the gun by removing those parts, and I'm personally pretty leery of anything that might weaken the thin steel between me and the pressure of gunpowder going off. I may just be more cautious than some, though. Warranties I may or may not care about, but if I suspect there may be a real safety issue underlying the warning, I pay more attention. I do suspect that you'll find the other solutions may do the trick without that particular modification. At the least, then, I'd try the drum replacement last.

I think I recall another member here--may have been the one who goes by the name "Mule Brain"--who posted about what he called an "extreme dryball problem", in which he lodged a ball down the barrel and ultimately ended up removing the drum and breechplug to get it out, eventually having to machine himself a brand new drum. If I remember aright, he had a heck of a lot of trouble with the project. You might touch base with him about how this project is best done, if you decide to go that route. Happy hunting!
 
You know, with that deer creek kit, It used the cva lock and i had an issue for months where the lock seemed tight, sear wouldnt catch in the tumbler, kept falling to half cock. I pulled it apart tonight, use 2000 grit sandpaper on a block and spent about 3-4 minutes polishing the rear of the lockplate smooth. Guess what? Doesnt feel tight anymore and the sear goes into the bumper now with no problem! If yours is a kit, pull that lock apart and polish all the moving parts. Sure it will take a little while, but after tonight, Im going to do it to all of my locks.
 
If you decided to remove the drum you can get a CVA replacement at TOW or Deercreek. I don't know what CVA says about removal but Traditions is what I shoot and they say the same, as too it will void the warranty.
I can give you some advice though as I had to remove mine on the Traditions 50 cal. The metric CVA replacement is what is in it.The one with cleanout and squared off shoulders for wrench.
If you are going to attempt removal take a few minutes and search for Extreme Dryball Problem and Extreme Dryball Problem PartII under my handle.
I show pics of a two-way wrench I made for removal and installation of the drum without damage!
Removal is kinda of a last resort thing, but It can be done and without damage if done correctly. All a fellow needs is a little knowlege before you make a mistake! Cleaning if that's all that is needed can be achived without drum removal.
Lots of luck on what ever direction you decide to go!
 
Talking about warranties on a product that only costs a few hundred dollars is almost silly. You can't file a lawsuit against the manufacturer, much less retain a lawyer to draft the complain for less than the cost of a new gun. Warranties on these items are simply sales gimmicks, trying to impress the buyer that the manufacturer stands behind his product. That is good sales hype, but no one is going to file a suit if the gun doesn't work right.

For that reason, I suggest you put that warranty way down on your list of concerns, and, if you decide you really want to keep the gun, do whatever is necessary to make it shoot well. "Damn the torpedos!" :surrender: :hatsoff:
 
I have a .45 CVA Kentucky and I had problems you describe. I found the original nipple that came with the kit works the best. I replaced it not long after I started shooting with a new nipple and I started having problems. It turned out the new nipple was "taller" than the original and the hammer was not striking it squarely. I put the original back on and, boom, problem went away. There wasn't anything wrong with the nipple so I've been using it ever since. I've used CCI, RWS, Navy Arms, and Remington caps both #10 and #11. The #10's fit tighter and aren't as prone to falling off.

Make sure the hammer is it half cock and the fired cap is removed before loading the next shot. I run a patch between shots which usually pushes crud in front of the drum opening so I snap a cap before loading again to clear the drum. Works every time.
 
More good input and the more I consider the removal, the less chance I will replace the drum. It does have a clean out screw on the outside and I finally removed the screw and it's now allot easier to clean out. ( Mind you, I did bugger it up some but I will replace it with a new one that I can get out.) Anyone ever thought about a screw with a wing nut on it so that the drum was easier top access for cleaning or adding some "Fines" for ignition?

As for the warranty issue... I sort of agree. The kit is just that... It's not like it's a big dollar gun. I want it to be accurate and fire. I would rather have a gun that doesn't fail in their field and FIRES, than a good Mantle gun that never gets shot. Just me... but most my guns are tools not art work... Know what I mean?

IdPnB
 
Thanks Grant,

So you hunt with yours? What are you doing prior to walking into the field? Do you think that the shoulders on the nipple should be real square?
What load are you using?

IdPnB
 
I don't hunt, but before I shoot I run a patch with bore cleaner on it to clean out residual oils. Then dry patches 'til they're dry. I fire a couple of caps next with the muzzle close to the ground to see dirt move. Usually I push my nipple pick through the nipple to make sure there isn't any cap debris blocking the hole. Then I'm ready to load.

I use 55gr. 2F Goex, an Oxyoke yoke felt wad, and then a .440 ball patched with pillow ticking cut at the muzzle. I use Lehigh Valley Lube. I don't use conicals as the barrel has a 1:66 twist.

In between shots I run one patch. Then snap a cap to clear the drum. I've had cap debris get stuck in the nipple but you can tell when you're ramming the next ball, it goes down really hard. If the air can't go out the nipple, ramming the ball will be like pushing against a balloon. Use your nipple pick to clear it.
 
ahhh that makes sense. why the .440 instead of a .50? I think I will give that a try. Are you holding the gun at an angle to "Tap" fines into the drum as well?
 
My rifle is .45 caliber thus the .440 ball. Slapping the side of rifle after pouring in the powder always helps getting some powder into the drum. The main thing that helps me is snapping a cap in between shots whether not you run a patch between shots. I've turned down my jag quite a bit but pushing that patch down the barrel always seems to push crud down there in front of the drum opening. I've fired as many as 24 times without cleaning in between and have not had a misfire as long as I snap a cap.
 

Latest posts

Back
Top