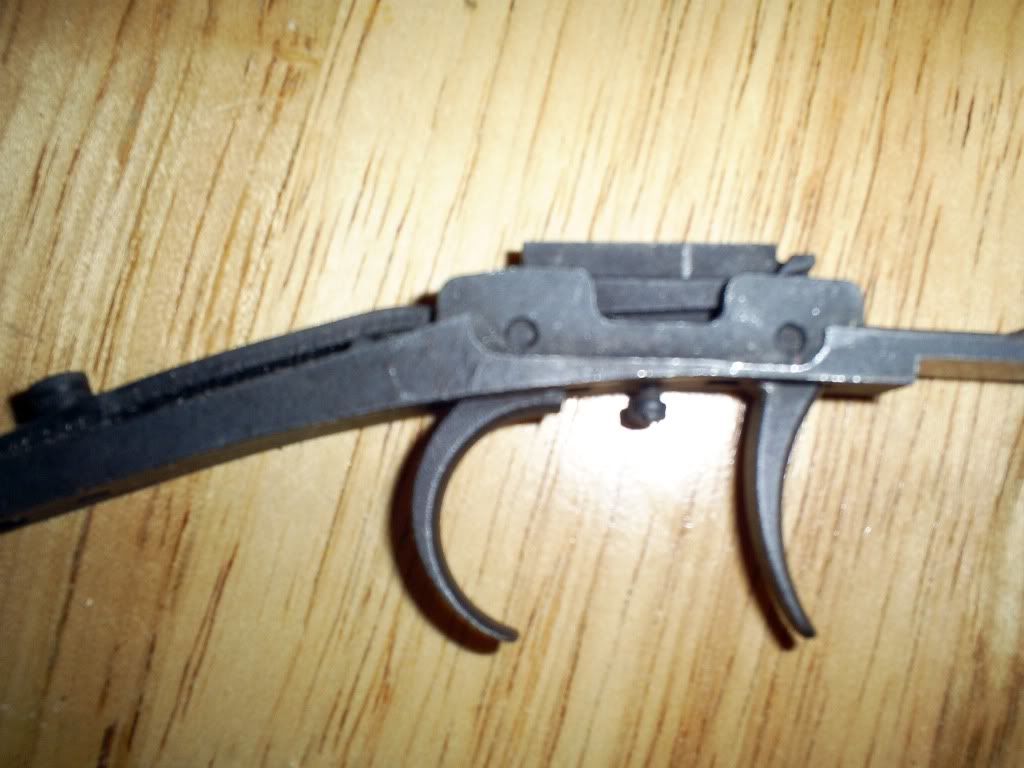
Double triggers

Muzzleloading Forum

Help Support Muzzleloading Forum:

This site may earn a commission from merchant affiliate links, including eBay, Amazon, and others.

wayne1967

54 Cal.
Joined
Dec 27, 2008
Messages
653
Reaction score
97
Location
missouri
I've got a rifle that I am going to convert over to set triggers. I kinda screwed up on the first single trigger I put on it and placed it too far forward so the trigger pull was too heavy.

On a double set trigger do you want the sear bar right in the "X" where the front and rear flats come together at the pivot?
 
If I'm understanding what you mean, yes. THere is the trigger bar and the bar for the set. Where they form an "X" is the place to put it.
But they make single set triggers, too. You just push the trigger forward until the "click" to set it.
 
Well, hang on there a minute. That X idea can be a tad deceiving. Depending on how you manipulate the triggers, that X can move back and forth. I'm sitting here playing with some set triggers, and I can't get a consistant place where the X forms simply by pushing the triggers toward each other. I think a better description would be "the center of both trigger bars". Pretty much the same idea of the X, only that measurement will never change. Subtle difference in terminalogy, but it could make a big difference in leverage. My X may not equal your X, but centers never change. :surrender:

I use the center measurement as a guideline for installing triggers, then install the triggers so the the front trigger bar contacts the sear bar just a hair forward of center. That gives me more trigger leverage without alot of trigger travel. In other words, the further rearward you install the triggers, the more leverage you get (lighter trigger pull), but also adds more trigger travel (trigger creep). Moving the triggers forward reverses this balance (heavier trigger pull but less creep).

Ok, with all that gibberish said, I think most people line up the center of the trigger bars with the sear bar and are happy with the results. :surrender: Bill
 
It's a Davis true double set. The type that you can use the front without setting the to. Setting here looking at it, it looks like if you do use just the front it will have a long pull until it clears the rear trigger bar.
 
I thought it was the opposite. The closer the sear bar to the trigger pivot the less pressure it takes.
 
Lol. Well, that's what I was trying to say in my own long winded way. The closer toward the butt you install the trigger plate, the closer the sear bar is to the front tigger pivot point, therefore, it takes less pressure to trip the sear. But, you also add more travel to the trigger, something to consider if that's an issue with you.

I hope I'm making sense. If not, Necchi is going to post a pic any second here to make this more clear. :rotf: Bill
 
Thanks for clearing that up, Bill. I sometimes have difficulty explaining things. I do it the way I explained, because I don't plan on using the front trigger only. I always use the set. It just takes a minimum amount of time. :v
 
Just be aware the set triggers require a "fly" in your tumbler to prevent the sear from catching at the half cock. :hmm: :hmm:
 
This should not be this hard to figure out but for some reason it is stumping me. In the unset position the rear trigger bar is higher than the front trigger bar. But it is spring loaded. So you want your sear bar just barely touching the unset rear trigger bar and when it is set and used it springs up past this point activating the sear bar? Looks like if you do use the front this way it will have a lot of travel in it before it touches.
 
Dear Colleagues,
I installed a Davis Double Set trigger on my current
Edward Marshall build, using the adjusting screw
centered over the sear bar.
The trigger worked OK set, but the unset pull
was about 8 lbs. I had to polish the nose of the sear where
it engaged the tumbler to get a reasonable 3 3/4 lb pull,
on the front unset trigger.
Moving the trigger plate to the rear would have worked, but
then I would have had to extend the front of the rear trigger
kickoff, to hit the sear bar.


mainspring
 
picture1672.jpg


Here's a slightly fuzzy pic of some triggers on a rifle I'm currently building. These are T/C triggers, but work the same as your Davis set.

The scratch mark on the front trigger bar is where it contacts the sear bar. I confirmed this by installing it and looking through the lock mortice. I tried to get a pic of it installed, but the flash caused some weird shadows. The adjustment screw is centered between the two trigger bars, and can be considered the equivalent of the "X" you were originally asking about. As can be seen, the contact point is in front of the center. This gives more leverage than if the contact were in the center of the trigger bar. Hence, a lighter trigger pull. But, like Maispring was implying, more leverage doesn't automatically mean getting the desired trigger pull. It sounds like he installed his Davis triggers as far back as he could, and he still had to fiddle with other things to get a light enough pull.

On this rifle, the front trigger does move back about 1/8" at the tip before it comes in contact with the sear, But I don't see that as a problem. The trigger creep I mentioned was the travel that happens after the trigger makes contact with the sear. Most guys only use the unset trigger when they are hunting, and don't notice the amount of movement before contact is made. It's mostly just aim and snap. I think they would notice it, however, if they had to really pull on that trigger to make the gun fire, even in the heat of buck fever.

I'm just like Mike Brines, I NEVER use the trigger unset, but I do build guns so that anyone can use them, set or unset. Plus, this particular rifle is for my daughter, who is unfamiliar with double set triggers, so I want it to work any way she feels comfortable shooting it. That's why I like to have the contact point just forward of center.

So, to answer your original question, If you're planning on using the triggers unset, I think you will be more satisfied if you install them so that the contact point is just foward of center, or forward of the "X".
I think you won't even notice the travel (if any)in the trigger before it makes contact.

I'm just saying how I do things. I hope this helps. Bill
 
Thanks. That's about where I have it. I inletted it last night but still need to remove some more wood to clear the rear bar spring.

I had to modify my trigger guard a little and I am going to have to heat and curl the rear trigger just a little.
 
Having problems getting where the set trigger works and the hammer will cock without setting. The rear trigger bar is high but if I loosen the bar spring it doesn't have enough kick to throw the sear.
 
Do you have it secured into place with screws? Until you do this, it won't work no matter how tight you hold it.
 
Loosening that spring screw isn't going to do anything except make the spring not work. :wink:

I've been improperly using the term trigger "bar", when the more proper term is trigger "knife" (my bad). I'm going to use the term "trigger knife" to cut down on confusion.

If you can discern how much too high the rear trigger knife is in the unset position, the simplest solution may be to shave a little metal off the top of the knife. Take the lock off and look in the sear bar hole to see how high the rear trigger knife rests in the hole. If it's toward the top, that may require too much metal to be taken off the trigger, and may not be the best solution. If the knife rests low in the hole, you may only need to file off a little metal to keep from tripping the sear. A roundish notch cut with a rattail, just where the two parts make contact will do the trick. I've done this before, but only where there's just a small amount of metal that needs to be removed. Just make sure this is the route you want to take before you file, as you can't un-file the metal afterwards.

Another option would be to install an adjustment screw under the spring. This will allow you to lift the spring by turning the screw in, to the exact point where the knife won't trip the sear when unset, but still have enough power to trip it when using it set. It takes a small screw, I think something like 4-40, but 6-32 might work as well. I believe I did this once using a 6-32 screw, and then filed it off flush after I got the adjustment I wanted. However, most people don't file them off. This might not be best way to go if you're not familiar with small taps and drills sizes and such. Just throwing it out there.

Or, you could shim up the spring with very small pieces of sheet metal. You would need to place the shim where it won't move, and also not interfere with the surrounding wood. And it may take trying different thicknesses of shim before you uget it just right.

Like Boiprof said, whatever you do, make sure the installation screws are tight before you test if your fix is working. I hope some of this helps. Bill
 
Finally got it. Just had to keep working down the rear trigger bar. Had to take the front down also because it was lifting the sear before the rear would activate.
 
Yay! I believe all models of Davis triggers have alot of extra metal on top of the trigger knives, that can be filed off safely.

So how is the front trigger pull? Are you happy with it? Bill
 
Back
Top