• Friends, our 2nd Amendment rights are always under attack and the NRA has been a constant for decades in helping fight that fight.

    We have partnered with the NRA to offer you a discount on membership and Muzzleloading Forum gets a small percentage too of each membership, so you are supporting both the NRA and us.

    Use this link to sign up please; https://membership.nra.org/recruiters/join/XR045103

First build - J Chambers Isaac Haines

Muzzleloading Forum

Help Support Muzzleloading Forum:

This site may earn a commission from merchant affiliate links, including eBay, Amazon, and others.
Joined
Jan 1, 2015
Messages
67
Reaction score
0
This is my first build. I am nervous and realize my limitations and lack of knowledge.
This is what I ordered;
J Chambers Left Hand (LH) Isaac Haines
LH Siler Flintlock
Buckeye Barrel 50 caliber
Finish kit - stain/finish/brown
Assembly DVD

I need to do some research on the Isaac. I need to get some basic woodworking tools. The part that makes me most nervous is inletting the barrel for the rear sight. I did not order a patch box. I don't know if I want wood or brass or if it is even required.
I plan on using this rifle at the range and for hunting deer. Mostly range work as I live in SoCal, though I would like to pop a coyote.
I have a room dedicated to my "hobbies" so setting up a build bench will not be a problem.
Any suggestions or advice are greatly appreciated. What tools and or references are must haves. ...
 
Do you have a good book ? Gunsmith of Grenville co. is a good one, there are others. It will be 40 bucks well spent, Peter goes into great detail on assembly. Includes history, original rifle pic's and tools needed as well. Lots of help here abouts, don't hesitate to ask---and we like pic's. Good luck. We have a nice little rendezvous over Vets day weekend www.smftlv.com......Tom
 
Last edited by a moderator:
Socal147 said:
The part that makes me most nervous is inletting the barrel for the rear sight.

Rear site location has nothing to do with inletting the barrel.

You inlet LOCK first 75% of the way. Then you locate where you want the Vent Liner to be. THEN you inlet the barrel back
to where the vent line is aligned with the center of the flashpan. Note that most do not want the breechplug threads
to intersect with the vent liner threads, so you must make some critical measurements to get this part right.

Keep in mind with the Videos, everything goes perfect...... :hmm: If it don't, they just film that part over. :idunno:

It is a nice rifle, I have hunted with a I. Haines for many years & probably have shot ? 40+ deer with it. Great for target as well.

If you are unsure of something, simply Ask... :wink: Lots of help on here, & some of them actually know what they are talking about.

Good Luck,

Keith
 
I have the kit in right hand sitting in my gun safe...it's third in line for building. Regarding barrel inlet into the stock, except for squaring up the breech area, mine came as a snap fit. The lock is already mostly inlet. I mean mine almost already sits all the way down in.

When you talk about "inletting" the barrel for the rear sight, are you talking about forming the dovetails?

While I don't claim to be any kind of expert, having only done two builds (both ToTW, which are not nearly as "finished" as a Chambers), I can empathize as a relative newbie to building. I came to this game with zero wood or metal working background. That's why, on my second build just finished..the "Hawken Inspired" Fullstock Flintlock just posted in the forum yesterday, I took almost 600 pictures of the process and narrated them. I have quite a few pictures of making dovetails in the barrel...I did it for underlugs and sights. Feel free to check it out.
https://www.flickr.com/photos/100435142@N08/sets/72157639906287386/

I have heard that the Chamber's DVD is good. As already stated, Gunsmith of Grenville County is very good, if not a bit overpowering for a new builder, IMO. What I mean by that is his book is SO jam-packed with every bit of information, it's almost overwhelming for someone just starting. James Turpin's DVD is pretty good (available at Track of the Wolf.) I very much liked Susanne Warren Bicio's "Longrifle Construction Manual" as a new builder. I think she's more "newbie" friendly, personally. Great book of all the needed information, pictures, tips from a master, etc, but not the World Book Encyclopedia.
http://www.historicalarmsmaker.com/publications.html

If I can do this, anyone can...with LOTS of patience...read, study...then proceed at a comfortable pace that does the job right. And of course, this forum has all the help you'll ever need just a keyboard away.

Good luck!

Mike
 
Last edited by a moderator:
The rear of the barrel needs to have a dovetail cut for the rear site to be installed. That step worries me. I probably did not state it correctly. Thanks for the advice. I did order the Gunsmith of Grenville County book for reference.
 
There are a few you tube videos that show how to cut dovetails with a hacksaw and a triangle file, check it out.

If you're content with taking one sliver of wood off at a time you can build a rifle and not mess it up :grin: Best of luck :hatsoff:
 
I can't offer much on the physical aspect of your build cause I'm in the same phase as you pretty much, but can help on good reference material. Recreating the AL, Turpin's DVD, Grenville Gunsmith and You Tube and others all good, but primarily tell you how to do things, but if you mess up or they don't specifically mention what you are after you're kind of stuck.

To me one of the more valuable references for fixing what went wrong and didn't is a deal with 500+ pages and that would be this forum, pictures and all. I probably have more time to sift through them then you, but there's a mountain of info here that you can't find in any book or video. What I was impressed with was that many of the same people, Birddog, flecto, Zonie, and others are still patiently providing answers to smart and dumb(ask how I know) questions now as then. :bow:
 
i'll come down on the side of the consensus (but just this once) ... Peter Alexander's The Gunsmith of Grenville County is money well spent: it will more than save the cost of the book in parts you don't ruin and time you don't spend waiting for replacements ...

you will need some inletting chisels. the ones from TotW have served me well - here's a link: http://www.trackofthewolf.com/Categories/PartDetail.aspx/715/1/CHISEL-BC-38
(can't figure out how t put a picture in there ... gotta work on that)

avoid the temptation to purchase a 'set' of chisels (or just about anything else, for that matter) ... you will inevitable use only a few of the set, and the remainder will just sit around and tie up capital, which you should have spent on other or better tools.

my newest mantra:

cheap tools suck

(not inexpensive tools - cheap tools, as in, tools made with substandard materials or shoddy manufacturing technique.)

also, get a good sharpening system going: you want your edged tools sharp enough (literally) to shave with. I use a bit of float glass and wet/dry sandpaper, followed by a leather strop.

if you use dull edges, you will hack up your wood and you will inevitably slice yourself open like a gutted fish.

getting bloodstains out of a nice stock is a real pain in the ... bla bla bla ...

(don't ask me how I know... :redface: :shocked2:

good luck with your project!
 
Last edited by a moderator:
Relax! I'm one to to talk but....

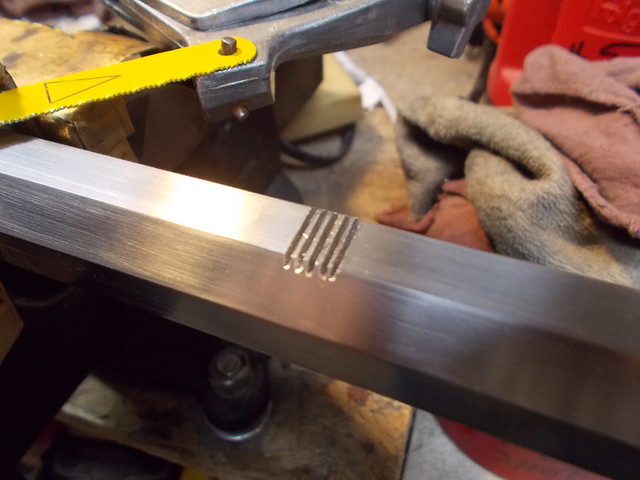
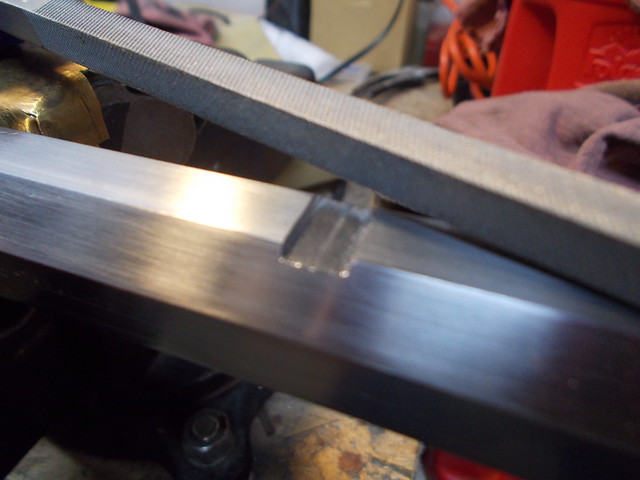
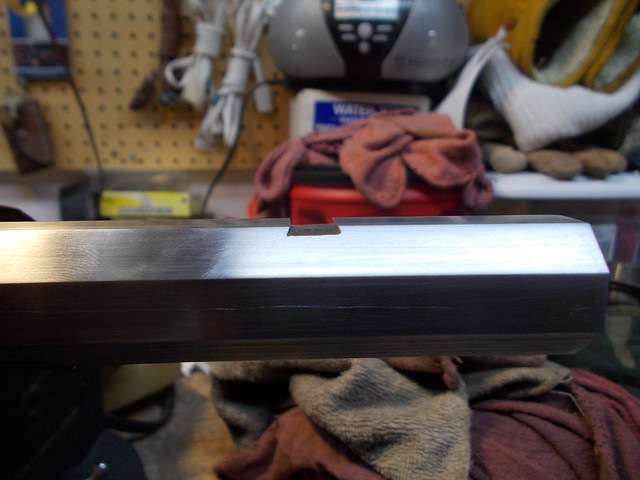
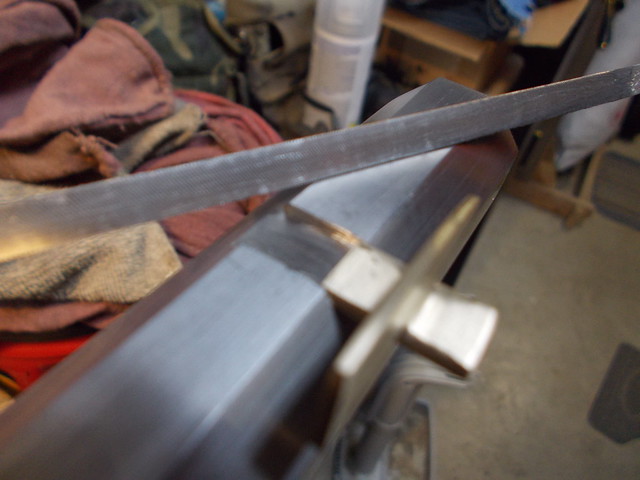
The sights and lugs are really the one of easiest parts of the job. Besides do not worry about that yet. You have plenty to do before you even get that far. Also you will have 3 underlugs to dove tail into the barrel. That will be great practice for the tops side sights that show.

First Get the books. Grenville County(written in Canadian so you will have to read a sentence at least 3 time before it...clicks), Shumways Recreating the American Long Rifle. Dixon's Art of the Pennsylvania Longrifle. The Dixon book is about 20 bucks. If you can swing it I also recommend Shumways Rifles in Colonial America series for study. I wish I had them.

Next if you have a Dremel or other rotary tool, throw that joker as far as you can. It may be better to lock it in a box and throw the key as far as you can. :wink: The only power tool you'll really need is a drill. A drill press would be great and needed but you can get by with a handrill if you have to and if you are very very careful.

Must haves....

A solid work bench, You are going to find out rifle building is hard work a sturdy work bench is a must. Preferably bolted to the floor and wall.
Lighting, not just overhead...overhead and adjustable is great...even a adjustable desk lamp is better than just overheads.

Helps to have a layout area, The kitchen table is a bit%^.

A heavy Bench vise bolted to the work top. You have to have one to hold the work securely. I actually had two on my bench a good one and a cheap one. That way I could hold the barrel/stock in two points.
The good bench vise was my platform for the file work. Do not forget the padding for the jaws.

A big honking adjustable wrench for the breech plug. I use an antique steam wrench also known as a monkey wrench.
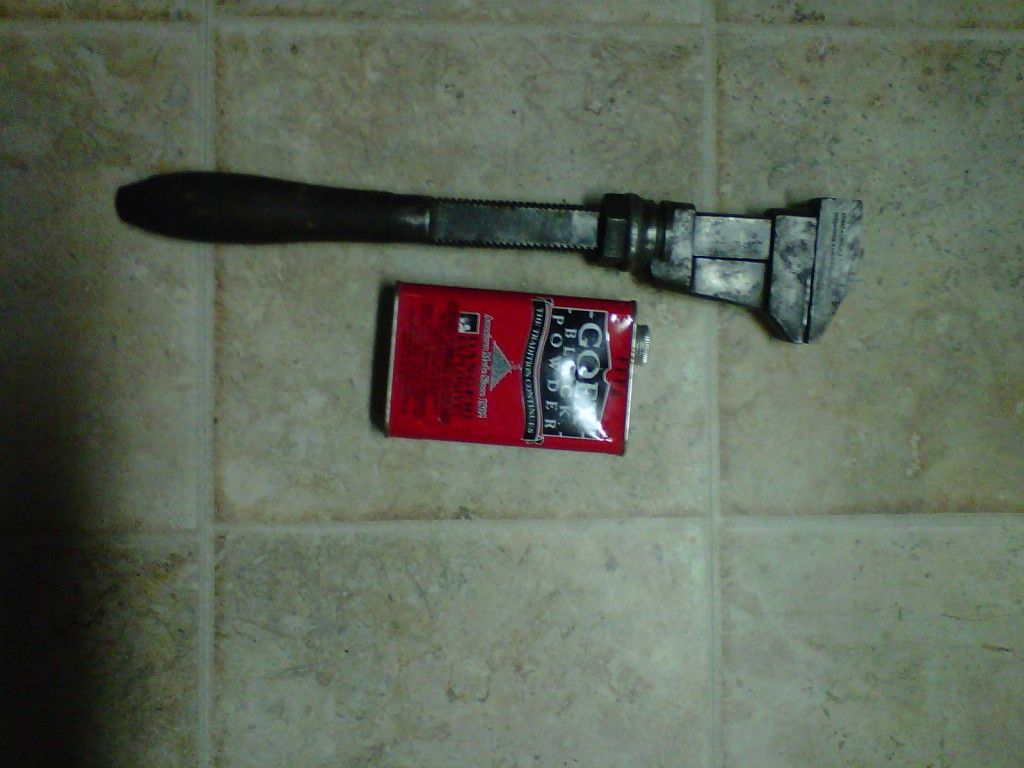
This is not a pipe wrench. It does not have the slack in the jaws like a pipe wrench also the jaws are smooth a pipe wrench will not work. This old wrench has just enough slack in the jaws to clap down on the breech plug with solid contact with little danger if slipping. Some use smaller versions of this, some use crescents ground to fit, others use a home made breech wrench. It's a good idea to have good solid contact and even some brass shims to protect the work.

You will have to remove the plug several times during the build.

You will need these three cutting tools IMHO a 1/4" bench chisel, a 1/2" Bench chisel and a gouge just slightly smaller than the curve of the lock nose.
You need a driver, either a chisel mallet or equivalent. I use an wooden old tool handle.
You will need to know how to sharpen these tools and keep them sharp with a quality stone and strop. This is very very important.
Avoid a set, most of them you will not need. IMO avoid palm chisels. Buy good quality tools. I use Stanley Sweet hearts. Forget ACE, Lowes, Home Depot as they do not have the quality you need..

You need an exacto type knife.

You need a 48" ruler or straight edge, a dry wall rule works well.

You need inside and out side calipers, need not be expensive. Mine are plastic elcheapos.

My mind is blank but this square...

Some good selection of files. Including a safe sided triangle file for those dovetails. I find a good rattail is needed for shaping. These files,straight, bastard, round will be your must used tools, old new just make sure they are good.

Good rasps like a cabinet makers rasp. Stanley sure forms ect.
Chalk for files. File brush

Needle files, sometimes you need a very good file to start the groove for your hack saw.

A very good hacksaw with good blades.

Fingernail files IE pop cycle stick emery, can be cut to shape.

Inlet black some use candle soot, Prussian Blue, lipstick and Sharpie markers...what ever works for you.

Drills, countersinks and taps for your bolts and screws.

A selection of good quality sand paper unless you are going full 18th Century then you need a goodly selection of scrapers. Do not forget backing for the paper.

Lock vice to disassemble lock.

Lastly and most importantly patience and perseverance.

I'll go ahead and mention this...a good storage place in case life gets in the way. Pipe busted basement flooded, I had to dismantle and store my rifle, have yet to get set back up. So if the worst happens be prepared.

Skill advice.....

When you have your stuff set up. Buy some blocks of wood. Take your lock apart file it clean it up, inlet it into those blocks of wood using your new tools. Could do the same with the barrel breech. Be patient when you get the hang of things, start on your rifle. Most Nobody does this but it is good advice.

The books will have detailed tool lists. You may want a back saw, or jewlers saw, if carving you may want some scratch stocks and a bigger selection of chisels. The above is not counting optional home made purpose tools.
 
Mountain Dewd said:
There are a few you tube videos that show how to cut dovetails with a hacksaw and a triangle file, check it out.

If you're content with taking one sliver of wood off at a time you can build a rifle and not mess it up :grin: Best of luck :hatsoff:

I have been a machinist and hobby gunsmith for thirty years. I would love to see someone cut a dovetail with a hacksaw and file. To be 16 again!
 
I've done it but you also need to modify a cold chisel to make the undercuts...

To the OP...I believe if you tell Jim where you want that rear sight, he will cut the dovetails...

Also...That is a great rifle, mine is similar but I prefer a .54...Have fun!!!
 
It is not a big deal cutting the dovetails. After you cut the 3-4 in for the underlugs, the sights will not be a big issue.

First ya must line up where ya want them, so they don't interfere with the RR pipes & the nosecap.


Mark it just undersize if what you need this slot to be. MAKE SURE it is Undersize of what you want. If you cut it too big,
then ya have to buy a larger underlug or make one to fit the slot.


Cut it with a hack saw in lil slots. Cut a lil, look at the other side, cut a lil more. Try to keep the saw straight & both sides cut the same.


Then ya angle the saw & cut the pieces standing up out of the dovetail. Take your time & don't get in a hurry. Yes, at this going it looks like Sh// but that don't matter, you will clean it up with a safe file.


File the groove with a Safe File. You can buy a safe file or make one by taking a 6-8" Ultra Slim 3 corner file & you grind
off one flat side.
When you file, you alternate the safe down, then against the angles side of dovetail, back down, etc. It is important you keep the file flat & even.

Still looking for this photo. sorry :surrender:

Then you tap the sight or underlug in, ou want it snug so you try it often, When it will go in 1/2 way, then you tap it on in with a hammer. Then
I grind off the sides of the dovetail.


I also round off the sharp tops of the Underlug, as they constantly cut my hand. And I stake the underlug. So do this, some don't.


Notice this underlug has a slot in it.... I use that on most rifles. I am gonna make a slot in one anyway & this saves me the hassle of making the slot.

Also, I like the base of the dovetail to not be thicker than .040 If it is thicker than that, I grind it down to about .030 to .040 as I want the dovetails shallow.

Safe File made from ultra-slim file.


I also round off the very sharp edge of the underlug or sight, as you file will not cut that ultra-sharpe edge that is ground on it. So I take a couple thousands off from bottom rounding slightly up.


Now some use a Upsetting Chisel to do their sights & dovetails. I have one & have used it, but I made so many rifles
before I got one, I usually get past the part of using it & before I realize it I have the dovetail done. First dovetail
I did long ago tool me about 2 hrs. I was so scared I was going to ruin the barrel. Hundreds of dovetails later, It now takes
me about 20-25 min. to do 4 of them from start to finish. Now I will take more time with a sight dovetail as I want it perfect.

Good Luck

Keith Lisle
 
All the pics show how to properly install a bbl lug or front/rear sight. I do it slightly different...use a sharp cold chisel to remove the "ribs" after hacksawing and except for the front sight, use an upsetting chisel to form the dovetails and to raise some metal on both sides of the dovetails.....bbl lugs and rear sight.

The raised metal alongside the bbl lugs is peened down to achieve a very tight fit w/ the bbl lugs and then filed smooth w/ the bbl. Makes for a very neat job.

The raised metal alongside the rear sight is filed into moldings after the dovetail has been filed for a press fit w/ the rear sight. I usually make this dovetail only .035 deep as are all the bbl lug dovetails, but the raised moldings for the rear sight yield an effective depth of approx. 1/16".

Easy to make the bbl lugs out of .04 sheet brass and after truing up the bottom of the lugs, they fit well into .035 deep dovetails.

The front sight dovetail is only filed in and the depth is approx. .050 depending on the front sight. Don't like the bottom of the blade showing daylight w/ the bbl.

As was said... practice on key stock or other suitable pieces of steel....after the first "real" dovetail is achieved, the rest are easy....Fred
 
Wow, thanks all. I have some serious catching up to do.. Thanks a million for the photos. I have a decent hobby room set up. I use it for reloading and other mostly gun stuff. I have a bench I can modify to secure the parts and stock as needed. I do need to buy some tools and read ....... A Lot!
 
Where were you guys back in 1969 when I built my first ML gun? Lots of good advice here. Lots of things I could add, but some things need to wait till you are actually doing that process. One thing I might mention is, when "safe siding" a file keep it cool. While grinding the one side hold it in your hand and when it gets uncomfortable ( warm) quench it in water. The same goes with your chisel when you grind it to make the tool to upset your dovetail. Take your time, step back and look at the big picture once in a while. It is all worth the trouble in the end. Taking that first big game animal with a gun you made is like gravy on your french fries.
 
When you are cutting the underlug dovetails make sure that you will not be interrupted and distract your concentration. Someone I knew was talking with the cousin who showed up to watch and ol' cuz was given a good demonstration on how to put underlugs in the SIDE of the barrel. :cursing: :cursing: :cursing:
 
Back
Top