Frizzen advice needed

Muzzleloading Forum

Help Support Muzzleloading Forum:

This site may earn a commission from merchant affiliate links, including eBay, Amazon, and others.
Joined
Feb 24, 2019
Messages
1,316
Reaction score
2,318
Location
Central Texas
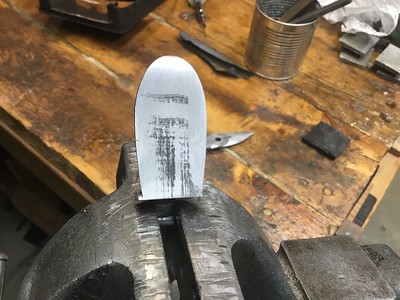
A friend brought me this lock yesterday and the face of the frizzen is pretty abused. Pics below.

I know there are professional services to reface/reharden etc, but what can be done in the meantime?

400 grit sandpaper to smooth out the finish? A courser grit first?

The flint seems a bit short which may be a contributing cause of the problem with it hitting too far down the face. The lock sparks well, but I bet it eats flints too.

Comments and experience are appreciated!

75845787-652D-4CF4-A8CB-0AF2D5648EE8.jpeg
A8E0AC10-83F6-410D-A03F-7F81A705FEE7.jpeg
A4035633-33B1-4EEF-B56F-0519CB7A01EA.jpeg
 
Last edited:
What make is that lock? If it is an El Cheapo import it may need face hardening or a new face put on it, like a piece of bandsaw blade. Doesn't take an expert to do that, just someone with some ml experience. If it sparks fine, that is probably not the problem. But eating flints sounds more like a geometry issue, that is why I suspect it is an El Cheapo import. Hard to fix that problem. Others may chime in with ideas.
 
If it works, don't try to fix it. If it doesn't spark, then you may need to do something with it. I agree, it looks more like a lock geometry issue than a metallurgical problem. I would try to replace the part rather than try to case-harden it or something. You might find a replacement that is close enough to work with some modification.... alternatively, any competent blacksmith should be able to fashion a new one for you... at a price, of course.
 
I've used sandpaper a couple of times when I noticed a rut or two on a frizzen face. If a quality lock the frizzen will be hardened more deeply than on import locks. This will negate any necessary re-hardening of the face.
 
Seems like a well made lock to me. Rifle looks to have been made in the 80’s, not a kit. Bill Large barrel.

Pics below if anyone can ID it.

AF137C49-62B3-4A82-B64E-A555B9F703D9.jpeg


44781FED-4D2D-43B3-990A-5C2A670FD321.jpeg


Edit to add: the nipple fell out of the lock, got to figure out how to reinstall that… So much to learn about these rifles!!
 
Good thing about a Siler, you can send it to Jim and he will rework it for you, throw the nipple away, that's for a percussion..
 
Kiss the face of the frizzen on a 6" grinding wheel, the radius of the wheel is about right to clean up the gouges. Keep the frizzen cool of course, and don't take off any more than you need to in order to clean up the striking surface. And wear goggles, you're going to have sparks everywhere.

When you put it back together, follow Ord Sgt's recommendation of a longer flint (or seat the flint out farther with a shim or thicker piece of leather at the back).
 
Looks like a Siler to me as well, a good lock that has a through hardened frizzen. I’d get a longer flint and continue to shoot with out grinding.
 
If you don't have a grinding wheel a sanding drum on a drill press works too. As stated previously, it's important to keep it cool to keep the face from softening.
 
One of the advantages to being self employed is that your boss is likely a real a-hole, which makes it an easy, guiltless, pleasure to run away from work and do what you want for a few hours!

Started on the frizzen with some 220 grit wrapped around a steel dowel. Smoothed up, and polished up…which concerned me a bit…but I sallied forth gleeful in my ignorance.

98A7A555-D579-434A-B682-2DF540586800.jpeg


There were also complaints that the lock rusted gratuitously at every opportunity, so after a thorough cleaning I applied cold blue and then rubbed it most of the way back with oiled steel wool. Feeling good about myself, and the appearance of a professional job well done, I made a cocktail and proceeded onward!

I fitted a longer flint, and it fitted nicely! See the pic below to compare old and new and admire my very handsome refinish work. The flint seems to look overly large to me…but as noted above, it fitted well!

5F58E092-5F8E-4F34-9F35-80A676BF4B0B.jpeg


A final wipe down. Some grease where grease goes, and back on the gun. All looks well (the fitted flint looks too large to me still…I’ll have another cocktail to dispel those evil thoughts) and it’s time to strike cock to hammer!

Sparks galore! The polished hammer face concerned me, but it seems not an issue.

All is back in place and looking rather spiffy! Thanks to all for your advice! (And, I might add, no one suggested the key to success here…a good stiff drink!)

58281576-4C82-469B-A2FA-1B0B51E1A342.jpeg
AA7978A6-CFEB-4784-80C1-103E2F949564.jpeg
70B76664-0F2E-4CC2-BC2E-962A47B93D29.jpeg
 
Last edited:
Back
Top