• Friends, our 2nd Amendment rights are always under attack and the NRA has been a constant for decades in helping fight that fight.

    We have partnered with the NRA to offer you a discount on membership and Muzzleloading Forum gets a small percentage too of each membership, so you are supporting both the NRA and us.

    Use this link to sign up please; https://membership.nra.org/recruiters/join/XR045103

Gettin' the Stripes

Muzzleloading Forum

Help Support Muzzleloading Forum:

This site may earn a commission from merchant affiliate links, including eBay, Amazon, and others.

Griz

45 Cal.
Joined
Mar 5, 2004
Messages
540
Reaction score
1
Dumb question #5;
Can anyone tell me how to get the dark stripes to show when working with curly maple? I use acid to stain my end plugs and powder horns and it can make a very nice color, looks like it is 200 yrs old. I am thinking of a few other projects and I would like the stripes to stick out with the light and dark colors and I am not sure how to achieve it. Any body have any procedures they are using? Thanks as always.
 
Griz, What kind of acid are you using on the powder horns?
Getting the real aquafortis is nearly impossible now. No one will ship it. Some are using Muriac with some success.

Personally, I have seen the acid turn green with age and do not use it on my own guns.

I use a stain made from rusty nails boiled in vinigar, then aged in a dark place for a couple of weeks. I use it in the final stages when raising the grain. It whiskers the wood and soaks at the same time. By the time the stock is smoothed I can hit it with linseed oil and the color will burst out. It is cheap, you do not have to worry about supply and it is much safer than acid :thumbsup:
 
Ghost;
I use Chromium Trioxide, Very Dangerous Stuff. I get it from Dixie Gun Works. A very small container, when you get it there is nothing in the jar except for a few little crystals, add warm water and you have a jar of acid.
WEAR RUBBER GLOVES at ALL times when using this stuff. A very good friend was using this and had a very small dry crack in his thumb and a very small amount got on that crack, he washed it right a way but it still got infected so bad that it infected the bone in his thumb and they thought it would have to be amputated. It is really nothing to mess with. I almost hate to use it but the color it produces is wonderful. The jar it comes in has no directions, I let it on as long as needed to get the color and nuetralize it with water, then when I buff the horn it seals it. The problem is, it will not bring out the stripes in the maple like I see in Tomahawk handles, Rifle stocks ...does your rusty nail mixture bring out the stripes?
 
Dumb question #5;
Can anyone tell me how to get the dark stripes to show when working with curly maple?

I wish I had a slab of maple to test this on before I expose my neck, so to speak...

What if you put lemon juice on the wood and once dry, hit it with a heat source to darken the highlights?

Lemon juice is used for the famous invisible ink trick, write on paper and iron it for the message...
 
Griz...I have used "Chromic Acid" years ago. You can mix water with the purple crystals to get the desired amount of strength..But you should apply heat,,,either with a small torch of over a hot plate..That gives good results..."if" you have any figure in the wood to begin with. Later I switched to nitric acid and liked that much more..Naturally the nitric has to be softened first and neutralized after,,but nitric is no longer available leaving only items like Laurel Mountain...etc. The Chromic acid allowed the stock to turn green when exposed to sun light but would return later...Hope this helps....Wulf
 
The old timers used nitric acid with iron filings disolved in it and some other stuff--check out Eric Kettenberg's website for a good discussion. I have recently been trying Febrings leather dyes--you get them at your local Tandys. You can mix colors to get the shade you want. Just plain dark brown Febrings works pretty good, or you can mix in cordovan for more reddish tints.... :peace:
 
I posted this many months ago in the Builders Bench forum under the title Lyewater and Wood.
I will repost it here to save you the trouble of looking it up, but be forwarned, there is real danger to your body with this.

Lye Water and Wood
#6642 - 01/16/04 08:19 PM
[Edit post] Edit [Reply to this post] Reply [Reply to this post] Quote

First off I'll say MuzzleLoader magazine published my story about this about 2 years ago but as it's my story I will go thru it here in new words so I'm not infringing on something.

For those of you who don't know what lye is I'll give you a quick lesson. The old timers got it by leaching wood ashes with water. It is a white crystalline material and can be found at some hardware stores in the plumbing section. It is used to open plugged drains. Don't use anything except pure lye for this proceedure.
It EATS skin, hair,grease and eyeballs! By eats I mean it DESOLVES them. It is a very strong caustic (or base). For that reason, if you try this you MUST wear eye protection, long sleeves and rubber gloves. It's also a good idea to have some vinegar (acid) handy to neutralize it if it gets on you. Interestingly it does not attack brass, German Silver or steel so your inlays can be installed in the stock and won't be affected by it.

I don't know that the old gunmaker masters used this method but it's been used for hundreds of years by woodrights so the masters must have known about it.

All wood has Tannin in it. It is what makes wood look brown. lye water has the ability extract tannin out of the wood cells and to "float" the tannin to the surface of the wood.

What this means to you is this: If you have wood with "figure" to it like curly Maple or Ash you can use this method to increase the contrast between the dark and the light figure of the wood.
The dark areas get darker and the light areas are mainly uneffected. No, this won't make what isn't there appear but it does increase the contrast.

This technique should be done after all of the sanding, burnishing and whiskering have been done and the stock is ready for the first coat of stain but no stain has been applied yet.

With all of your PROTECTION ON mix about 1 teaspoon of lye in a cup of cool water.

Using a narrow NYLON brush (any hair bristled brush will instantly be destroyed) paint the solution on the bare wood, totally covering all of the stock (and inlays if any) with a generous coating. Even if it runs, it won't hurt anything (unless it's alive that is).
At first it just looks like wet wood but as it drys it will start getting darker. No it doesn't change a lot but the dark places will get visibly darker while the light areas just turn a light tan.

While the wood is drying wash out the brush and kill the germs down the drain with the left over solution.

When the stock is DRY, paint it Once only with a coat of vinegar to nutralize the lye. Don't go over it again or you will dilute the contrast you worked so hard to get.

When it is again dry, it is ready for staining or whatever you have planned for it.
By the way, it also removes ALL of the oils your hands left on the wood so stains usually are more evenly absorbed by the wood during that process.

Because there is a limited amount of tannin in the wood, doing this process multiple times doesn't have any effect beyond redistributing the tannin thereby destroying your new work. What you get the first time is it but I think it is worth the trouble.

A word about Walnut: The process will also enhance walnut but if the wood is very dark it may make it so dark that the figure looses some of its contrast . If this happens then you will have to resand the darkness off and dewhisker again.

It does work very well.
Have fun. :)
 
Great information fellows. Thanks a bunch. I guess I'll go burn some skin off and give it a whirl :nono:
I wonder if heat applied to the chromium trioxide would bring out the different colors better :hmm:
 
Griz, if the stripes are there the rusty nails and vinigar will bring them out. The mixture tends to make the hard stripe go dark and the soft stripe go honey colored. Plain maple will go uniflrm in color but any stripe that is present will burst out like there was a light bulb under the wood. I have mostly used it on Maple. I do not know what it would do on other woods. I did use it on walnut once to take it completely to black.

I have lost count of the guns I have used this stain on successfully. I have only had one failure and that was due to me not aging the blend. I used it fresh and it did not work.

This is a stain, not a dye and requires the oil as an agent to change the color after applying. It will look nasty black or grey when you put it on and whisker it down. You have to apply the Linseed to get the good color. The more coats you apply, the darker the color. Apply all the coats before oiling, they will not take after the oil is applied.

I like it just for the safty factor. The only danger involved is if you brew it up in the kitchen. It will stink up the whole house. I was single the first time I made it so my son threw a fit and ran me out of the house! You could drink this stuff, if you could stand too, and only get your daily dose of iron and vitimin C.
:results:
 
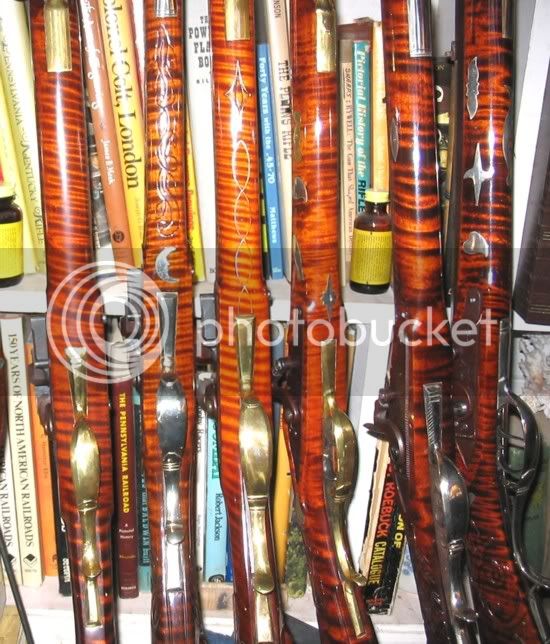
Although using the lye method has it's dangers, I thought you might like to see the contrast it plus water base Birchwood Casey Walnut and Colonial Brown produces.
These stocks are what Dick Greensides at Pecatonica River Long Rifle Supply Co considers his #3 grade Curly Maple.
(Sorry about the clutter in my bookcase)
maplestripes.jpg


As you have to neutralize it, (and vinigar works well) I'm wondering if the vinigar and iron plus some extra vinigar after it's cooled (to increase the acidity) would produce something even better?
 
Well, now that I wiped all the drool off my chin. Great looking rifles, love the inlay. They do have the colors I am looking to achieve. I am going to try the rusty nails mixture soon and will keep you posted. I may also get brave and try this mix also. Thanks for the information and the pics.
If you want to give any of those away....Can't hate me for trying :yakyak:
 
Griz,
thanks for the ????? i have learned a lot from all posters
snake-eyes :master: :thumbsup: :peace: :master:
 
Last I saw you still can buy the Aquaforis( spelling) I bought mine a couple of years ago at Track of the Wolf but heating is difficult to get it even. I think I will try the vinigar and nails trick when I stain the stocks on my the 2 stocks I am working on. Jim
 
jh45gun; if you can send some pictures and give us an update. thanks
 
Griz: Thanks for the kind words.
Over on the Hunting forum, these are called Pimp Guns.
I guess that's because of the "in lays"?
:crackup:
 
jh45gun; if you can send some pictures and give us an update. thanks

Be a bit before I get to that stage griz, but will when they are finished. These will be full stock underhammers. Barrels were Knight Model 86 for a switch barrel system they had. I got them on close out for 30 bucks a piece. (origionally 180 bucks) and figured I could buy a reciever from Knight no such luck they were discontinued and no longer in stock. SO I decided to make some underhammers out of them. Shotgun barrel is a 12 guage with removable choke tube, Rifle barrel is a fast twist 54 cal 1 in 28 twist. My gunsmith drilled and tapped the bottom of the barrels for a nipple and redid the breech plugs for a longer bolt to hold the tangs in place. Bolt hole was where the nipple went origionally. Stocks I bought from a friend for 10 bucks a piece. stock channels were sanded out to round and glass bedded to fit the round barrels as they were octagon to begin with. Tangs were made out of angle iron. Sights on the rifle barrel are a peep sight set I bought at a rummage sale for a buck! They came off of a Savage NRA 22 Target Rifle ( Old) I am left handed so am taking off the cheek piece as you see in the pics. Got a buddy who is going to cut out my hammers and triggers out of the plate steel as he as access to a torch and power hack saw and grinders all I have is a dremel at the moment for the fine finishing work. So waiting for him to get them parts for me after I inlet the trigger/hammer assemblies I will finish the stock work. Jim

CNXT0004.jpg
[/img]

CNXT0002.jpg
[/img]
 
Having a heck of a time finding a decent free photo hosting site that does not mind posting pics on the net any ideas? Jim
 
sounds like you are much braver than me to do that much gun work. As for photo site, I do not have a camera and would not know the first thing about photo's or posting them. I seen a lot of the fellows on here use a place called photo bucket. I'm not sure about it though.
 
I typically use Hunt101 to host pictures free. They do seem to have lots of down time though. But it is free.

Here is a picture of a scrap of Maple I stained with Laurel Mountain Forge Lancaster Maple Stain. This piece shows shades using 1-4 coats of stain thined 50-50 with mineral spirits to both allow deeper penetration and better color control. 4 coats on left and 1 coat on right. it was finished with LMF Permalyn sealer and finish.

208640.jpg
 

Latest posts

Back
Top