• Friends, our 2nd Amendment rights are always under attack and the NRA has been a constant for decades in helping fight that fight.

    We have partnered with the NRA to offer you a discount on membership and Muzzleloading Forum gets a small percentage too of each membership, so you are supporting both the NRA and us.

    Use this link to sign up please; https://membership.nra.org/recruiters/join/XR045103

J.P. Beck Rifle Build

Muzzleloading Forum

Help Support Muzzleloading Forum:

This site may earn a commission from merchant affiliate links, including eBay, Amazon, and others.

Josh Wrightsman

32 Cal.
Joined
Jan 14, 2015
Messages
16
Reaction score
0
Hey guys. I'm fairly new here on the forums and to rifle building.
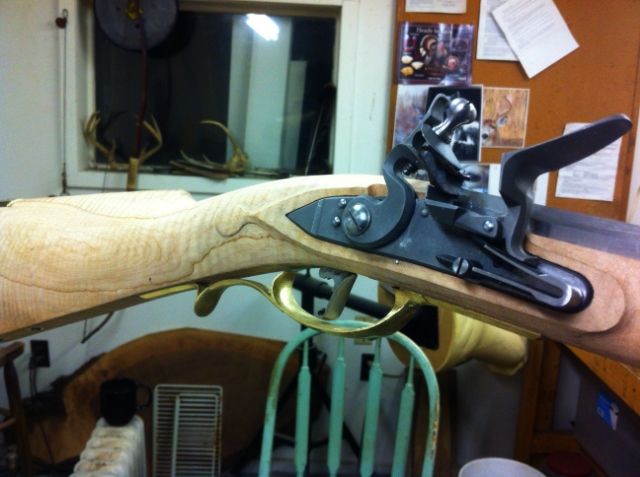
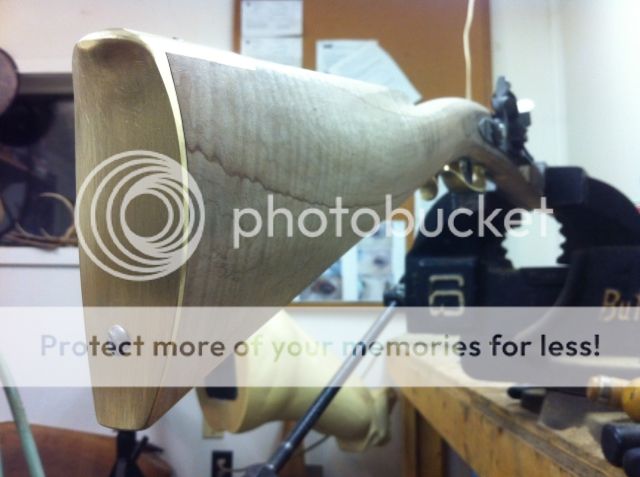
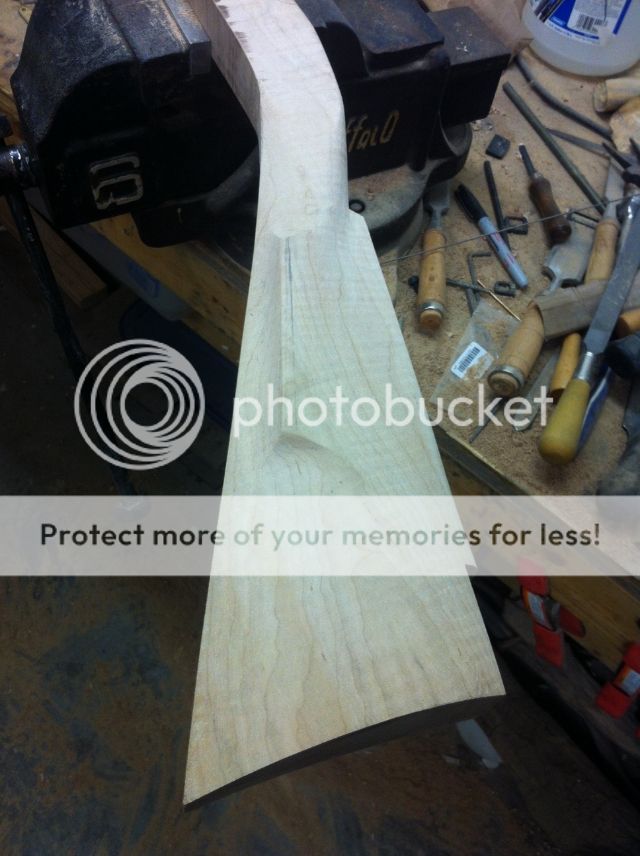
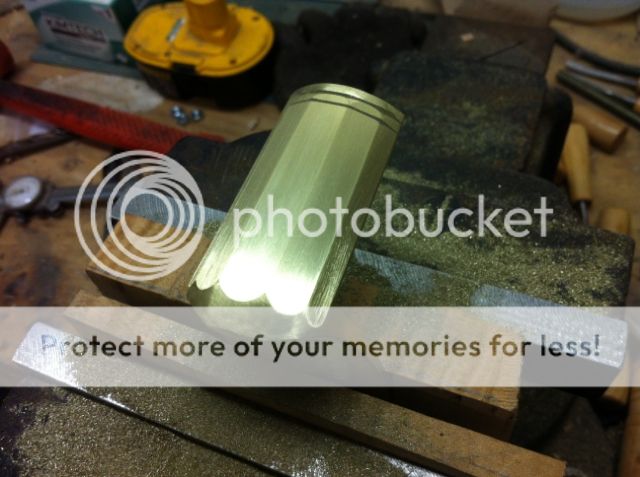
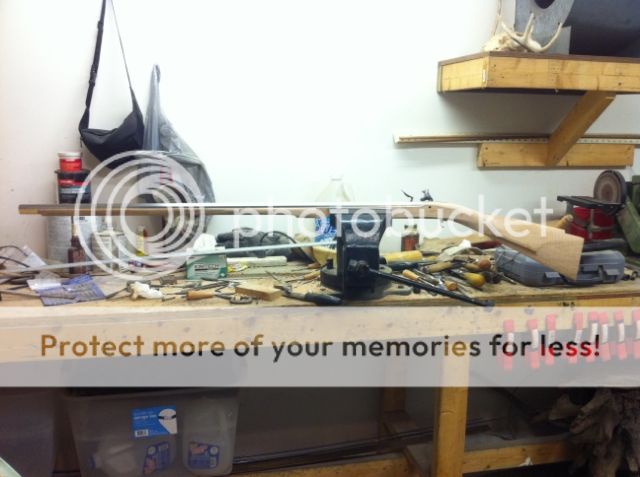
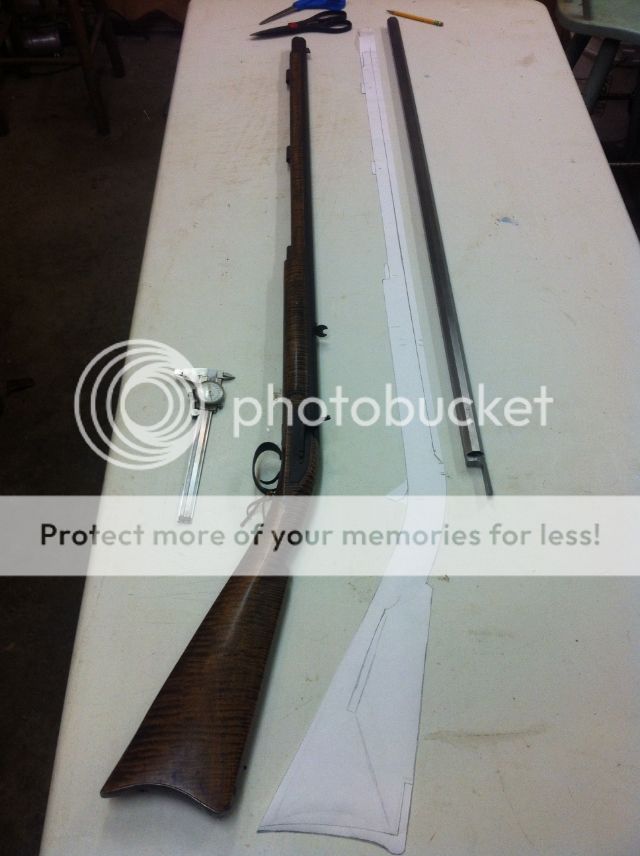
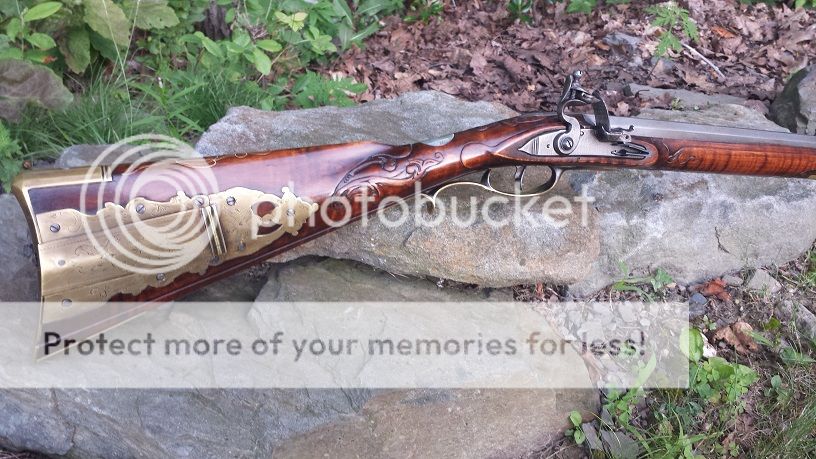
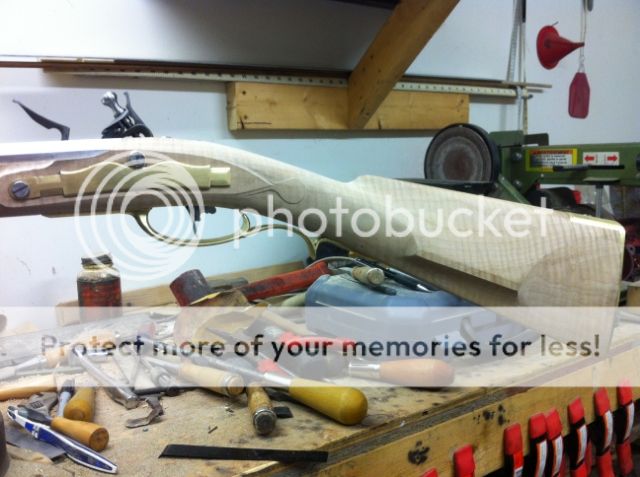
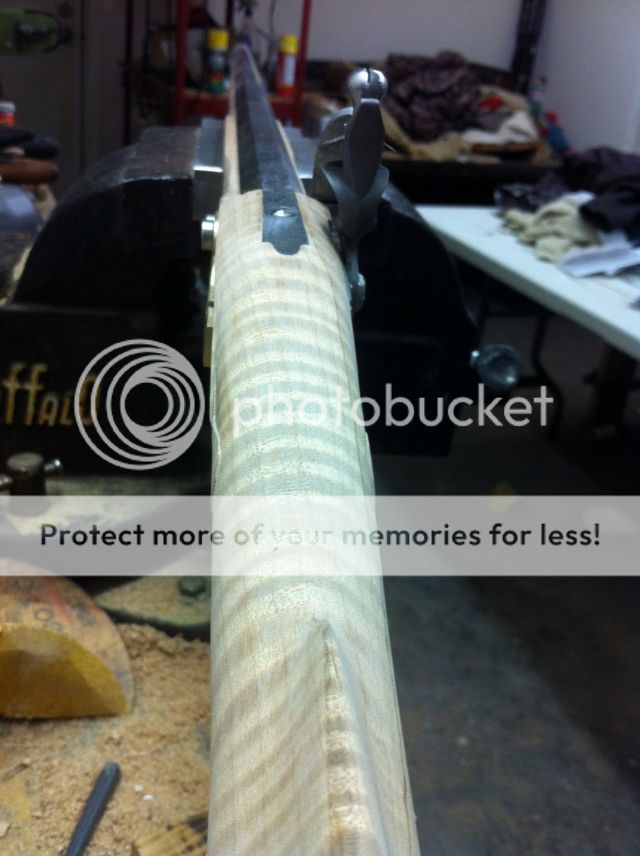
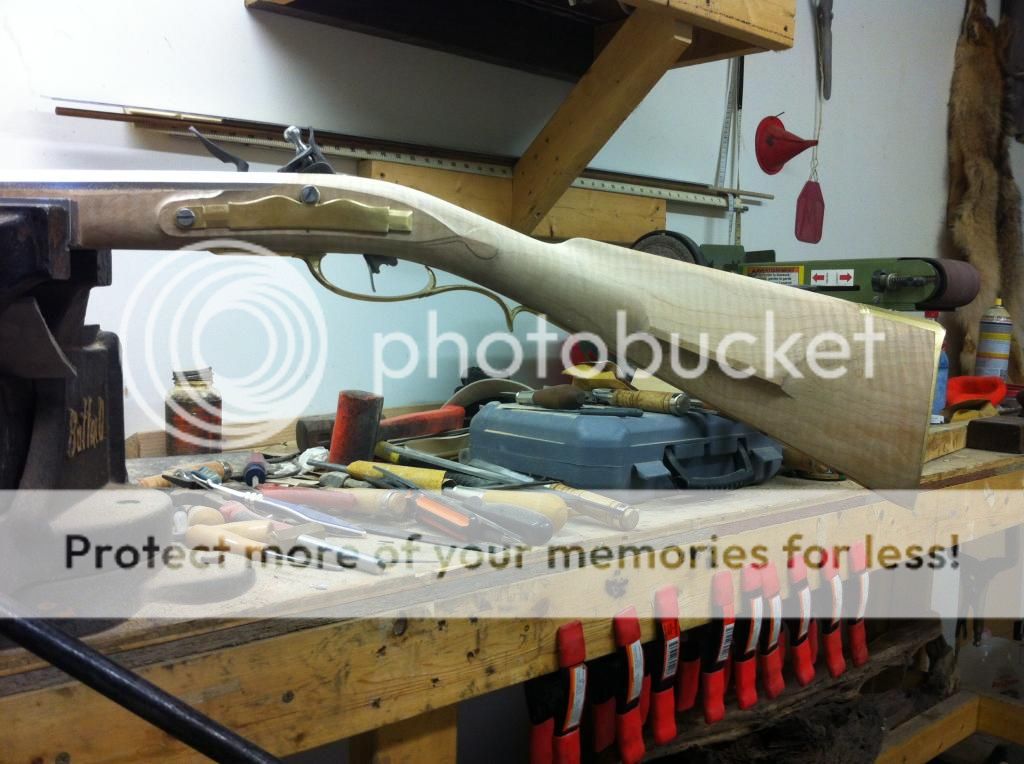
I took a huge leap and dove head first into building a rifle from scratch. I've never built a kit or read any books on gunsmithing but I have been around tools and muzzleloading my entire life.
Here are a few pictures of my progress using what info I could find online and from using measurements of a couple rifles. I have ordered The Gunsmith of Grenville County and will study it thoroughly when it arrives.

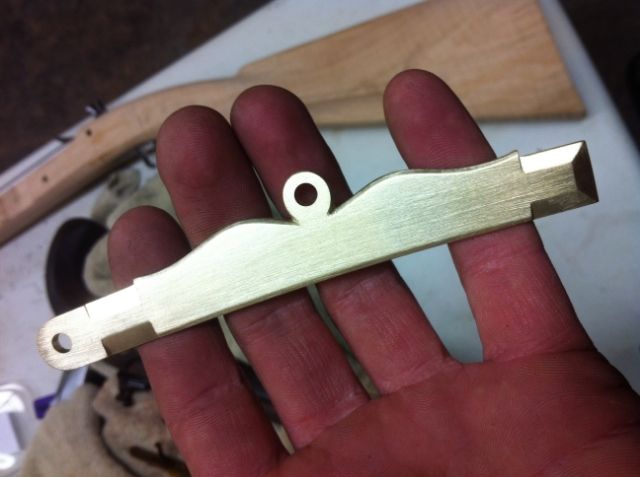
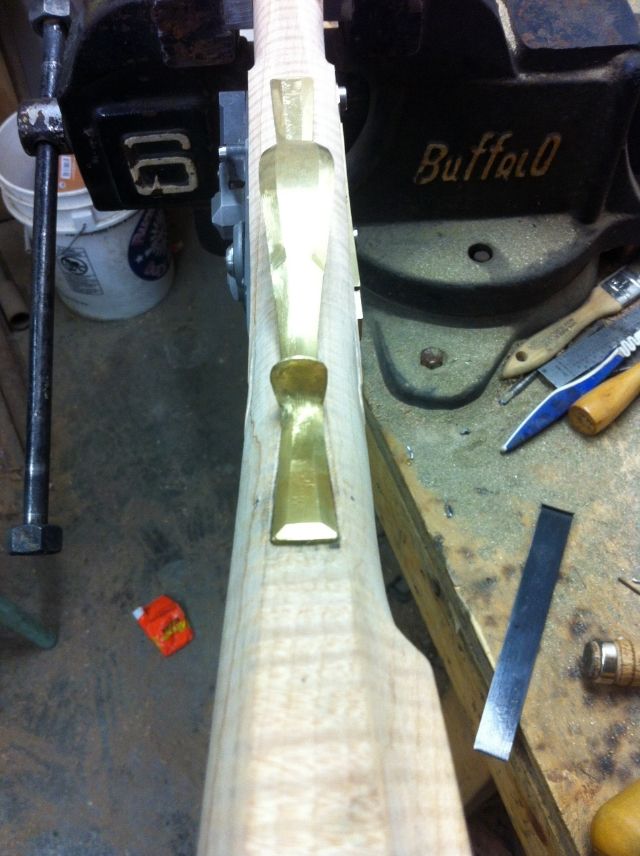
Today I start inletting a brass patchbox and am a bit nervous about it :haha:
I'm assuming I should inlet the door and hinge section of the box first and then the two side plates?

Here is a link to the pictures. Cant figure out how to post them here?
Link
 
Ok, I figured out how to post pics so here they are. The barrel is a 42" Rice .50 cal 1:66, Large Siler from Chambers. I believe most of the work is done. Now onto the fine details.
A9DAA374-A55F-4F48-A55E-51A1B5105564_zpsiz7vbbpg.jpg


29BDF6BD-7F4E-4A98-B15F-DBFE0A0FC34A_zpssw83dmbl.jpg


Side plate filed out of a piece of brass bar stock I had laying around. I didn't like the one I had originally bought.
65EC551A-DB8B-4785-9ABB-E7D894A3C5E6_zpsblrkq0ll.jpg


That cheek piece was a PAIN to get right. The blank I used was only 2" wide.

C7C75FCC-B78E-494C-8496-8BBCA0F6F711_zpscdghcpy2.jpg


F032D323-B5ED-4843-AE3E-4E73A94AAE2C_zpsoy1spw3a.jpg


e7c9c9af-a071-4b9b-9a27-f1ae02babde5_zps7d9c36d6.jpg


Here is one of the rifles I used for measurements. Really cool handmade mule ear "side slapper" lock on it.

2B6F9F17-F8E6-4A08-92E6-F5D33BE1D063_zpsgsngnm8s.jpg
 
That is some skilled work. I can't imagine you being nervous about doing a patchbox given that you have done such beautiful work up to now. A patchbox should be a slam dunk for you. I have built several rifles but have not yet had the guts to try starting with a blank piece of wood. All of my builds have been using a 90% inlet stock. Well, my H&R underhammer is the exception but the stock work on it was not all that challenging as a stock for a long rifle like yours is. Well done! Well done, indeed! Now you will have to post some pictures of it fully finished and some photos of your targets.
 
Hi Josh,
You are doing very well for a first gun from scratch. I urge you to not inlet the patchbox or anything else yet. Are you trying to build a gun that looks like a real J. P. Beck? Do you have any photos of any of his guns? If you are serious about a Beck, you should take a break from building and look at some resources. I think just a Google search for J. P. Beck will bring you photos. The next thing is that you need to remove a lot more wood, particularly around and under the wrist, make the cheek piece much smaller, and shape the lock panel section to be less slab sided and more round in cross section except for the flat panels for the lock and sideplate. You likely will have to reinlet the rear of the trigger guard after removing wood from the bottom. Again, you are doing very well but don't think that all the components have to be installed first before really shaping the stock. I don't inlet trigger guards, triggers, locks, sideplates, ramrod thimbles, toe plates until after 90% of the stock shaping is done. Moreover, I urge you not to inlet the patchbox until you have almost finished the buttstock to the point of final sanding or scraping.

dave
 
Thank you much for the replies. Yes I'm trying to duplicate as close as possible to an original beck rifle but I also want it to fit me comfortably.
I was a bit worried to take any more material off the wrist section. I really don't know how small to make it and didn't want it to be weak. I know this is where most stocks break at. Right now the wrist measures 1.330 wide and 1.620 tall at the comb. I've found measurements of an original beck rifle online and this is close to those.
I'm not sure what you mean by rounding off around the lock panel sides? Do you mean to make the bottom area belowe the lock more rounded making the flat area around the lock smaller? I've done a lot of google searching images of beck rifles. It would be much easier if I had one in my hands to look at. Lol
Thank you so much for the help!!
 
Very good advise from Dave. Your metal work is great you are doing a fine job so far. The lock panel also "jumps" out at me as it needs some attention. That wood looks like a premo piece of maple.
 
I found this pic of a Beck rifle here on the forums and it really helps to see what Dave was saying about how the wrist needs shaped more round then what I have now. Also,,, Is there a general rule of thumb for the width of the flat area around the lock??? .187 maybe???

Beck1_zpsa24e51a5.jpg
 
When you get your Gunsmith of Grenville County book, there is an entire section on making and installing patchboxes and release mechanisms. You'll have all the info you need and more once your book arrives.

I'm a novice builder and removing enough wood and cutting into my barrel for lugs, etc [strike]is[/strike] was the scariest thing to me! :grin:
 
Josh, it's looking pretty good - um, I mean, you messed it all up. You should send it to me for disposal and you can try again :rotf:

From what I can see you are well on your way to building an outstanding rifle.

And I applaud your determination. Beck, along with Armstrong rifles are on my "when I'm good enough" list.

I have avoided either so far because as Dave is pointing out to you, in order to get it "right" you have to be very fussy - either my patience or skill level just isn't there yet :grin:
 
Boy that rifle is beautiful!!! I see exactly what you are saying now. I have been slimming down the wrist and lock area today and it feels much much better when I shoulder the rifle. I had to inlet the rear foot of the trigger guard again like you mentioned but it looks much better now. Also shortened up the cheek piece to 3 5/8 long.
I will post some more pics later on.
 
Josh,

I'm going to post the links here to a J.P. Beck rifle that was sold by Julia's (a high end auction house).

What's valuable about this link is that they have (for some rifles) what they call a 360 view where they take 30 or 40 pics and you can rotate through the view (in the wrist/lock/sideplate area) - super great for working on a rifle that you can't hold for reference.

Anyhow, looking at the page, to the upper left of the first pic is a little camera icon with arrows around it - you click that and it takes you to the 360 view.

Once it loads, you "left click" and "hold" your mouse button down and by moving it left or right you can (move) through the rotation.

Sounds "cryptic" but check it out.

Here's the link (julia's)

or here's the link right to the 360 thingy - super cool (360 Beck)

This should give you some valuable insight to the shaping you are doing right now...

Should have added. It's common with early builds to be reluctant to remove wood and make rifles a lot more "robust" then they were originally.

I handled, at length, a Beck recreation that Peter Alexander built. The first two things that came to mind when I first picked it up was - "is this ever light" and the second was "this is way skinnier/finer than I ever would have guessed just from looking at pictures".
 
Wow that is the coolest thing Ive seen in a long time!!! That helps a TON!!! I actually have been studying photos of that same rifle.Thanks!!

I have the wrist slimmed down pretty good now and around the lock/sideplate. It is a lot cleaner looking. I also tucked the trigger guard down closer to the wrist which gives it a better feel.

Heres a few pics of the wrist area. I believe I can take it down a little more.

8966F948-283B-42E2-9DAC-D230C2FC5938_zpsvb5pxfwy.jpg


DBE653AC-47AD-415D-8515-FC058E28A1E1_zpsizst1bsz.jpg


DFC9C2A0-9F79-41EF-A6BC-4B9EE5549110_zpsno9lag6a.jpg


21649BA0-AB3D-42A1-902E-92CB219653F9_zpsohvnrxah.jpg
 
Wrist width = barrel + 1/4"...... :youcrazy: but mostly true.....

Your doing a dang good job :bow:
Maybe some wood from the top of the wrist at the comb, and make the comb angle toward the center on the barrel???
And your comb can be slightly "bowed"...
Fred can join in here and kinda tell where it can be slimmed some...?

You have the idea alright.....put it down for a couple of days.....the go look at her again.......you'll see where to tweek, and after doing that for a couple of weeks......she'll be done :doh:
And yes,,,,,,,she needs a nice patch box!!!

Marc n tomtom
 
Yes, it's still looking a little thick.

That is some super curl in the wood - should look outstanding when it gets finished.

Are you familiar with what is often called "Shumway" measurements?

This is a worksheet that I use when building. This is for a Christian Hawken rifle.

If you want or think it would help I do have a set of measurements for a Beck rifle and could give them to you.

You could use my work sheet as a guide to what measurement goes with what letter etc.

Anyhow, here's the worksheet -

CHawkenworksheet_zpscfe57e1e.jpg
 
Now that helps tremendously!! I'm at about 1.600 on the wrist at the nose of the comb. I'll take it down another .100 and I should be right on your measurements. Width wise I'm dead on with your worksheet.
I have no clue what shumway is???

The maple stock is from a local mill. I bought it about 10 years ago for a whopping,,,(not sure I should say this) $60 :redface:
 
Hi Josh,
Good lad. Now you are on track. I also suggest you consider moving the bottom of your cheek piece up a little and trim some of the front off to make it shorter. Don't change the height, just the outer dimensions.

dave
 
I moved the cheek piece up about as far as I can without getting to the point where it would start to effect the height.
Man it feels like I've filed off 500 pounds of wood from this thing :haha:

Using the 360deg photos that galamb posted of the original Beck Rifle it looks really close. I'm 3.5" from the butt plate and 3.625 long on the cheek piece. This is within 1/16 of the measurements I have of an original beck. Although I do not have measurements of how high the cheek piece is supposed to be.

Does this look alright to everyone??? Or should I move it up some more?

E1C8A465-8AC6-44E6-B033-D80392F675EA_zpss4lnts17.jpg
 
Josh, would you want to show more barrel? Looks as if the wood is 1/2 or more on the barrel......that makes a visual difference.....look at some pictures, then check yours...... :hmm:

Marc n tomtom

PS....yup MOST of the wood falls to the shop floor on flinters.....think "boat paddle" you start with a 6ft x 3" x 12" piece....and end up with wood broomstick :doh:
 

Latest posts

Back
Top