Nice tutorial I only met Bill once, at Charlie Stone’s in Neshanic.
Making a British Officer's Pistol
- Thread starter dave_person
- Start date

Help Support Muzzleloading Forum:
This site may earn a commission from merchant affiliate
links, including eBay, Amazon, and others.
- Joined
- Aug 14, 2019
- Messages
- 176
- Reaction score
- 225
Thanks for taking the time to write and photograph the process. I'm subscribed!
- Joined
- Nov 26, 2005
- Messages
- 5,361
- Reaction score
- 11,658
Hi,
Moving forward pretty fast. Before I start, I want to say how delightful making this pistol is. I needed a break from long guns and this fits the bill nicely. Bill Kennedy designed this and several other pistol kits that are probably the best you could ever buy and as historically accurate as anyone could produce without resorting totally to customized parts. He knew his business. There are a few minor details that I will make even more historically correct but I don't have to do much. I'd forgotten how much I enjoy building pistols, particularly real British duelers. I have most parts for 2 pairs of duelers but I need to find or recreate the right locks. There are none commercially made that even come close. I have the mahogany and oak lumber, hardware, and woolen baize fabric for proper cases. I also have parts for a late 17th century English pistol, and 18th century turn off pistol, and an all metal stocked Scottish pistol. I think after I am done with my current queue of work for other folks, I am going to take a sabbatical and get some of those pistols built. I guess I need to get a move on.
It was time to solder on the barrel lugs, inlet them, and drill for the barrel pins. On this pistol the barrel is pinned. If you examine British pistols or guns from this period, you will notice that those with barrel keys almost always have hook breeches and those with pins do not. Lugs came with the kit and they were very easy to solder in place. One goes about 1.25" back from the muzzle and the other 3.5" from the breech. I use sturdy 3/32" pins for barrels. Next up were the ramrod pipes and here I found a problem. The cast pipes were very nice but the tube walls were so thin that I could deform the pipe just by pressing them into to the mortices. I decided that was too fragile so I used 0.04" sheet brass to make a front pipe with raised collar ends. Then I cut off the tang on the rear pipe, made a new tube with a short extension and soldered on the cast tang. I do this all the time for cast English fowler rear pipes. Cutting the mortices was easy and the pipes came out really nicely.

These photos show how I make them but are from a different thread:


Time for the trigger guard. Here was another issue. The nice cast guard only has a forward lug for a cross pin. I suspect the intent was to use a screw through the guard for the rear extension. The problem is that you rarely find good quality civilian pistols that use a screw. It is common on ordnance issued military pistols but not on civilian or private purchase guns. There is usually a lug and cross pin or on really high-end pistols, the lug if filed into a hook that catches a screw head imbedded in the trigger guard mortice. That way no pin shows. I opted for a lug and pin so I made a lug and threaded the bottom.

Then I drilled and tapped the trigger guard, screwed in the lug and soldered it in place. I had countersunk the outside of the hole so could peen the excess threaded post into the countersink. Once the excess is filed away, the hole mostly disappears.


I inlet the front of the guard first. Then I work to the rear, gradually inletting the rear extension until I get to the end. Once in, I drilled the pin holes and inserted the pins. I use 5/64" pins.


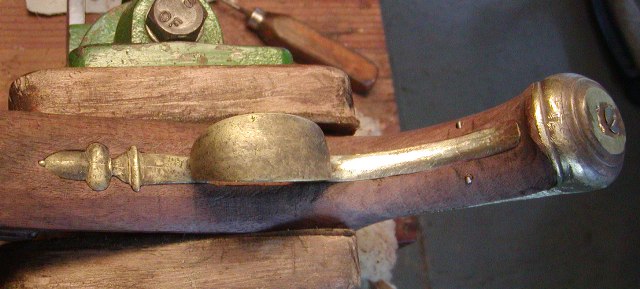
Finally, I installed the end cap. I put the cap in place, then used a tiny drill to make an exploratory hole from the trigger guard mortice. It is an awkward job because the stock limits the angle I can drill. My drill hit the tab on the end cap to one side but the height was right. So I drilled for a wood screw but angled the hole a little to the other side. It came out great.
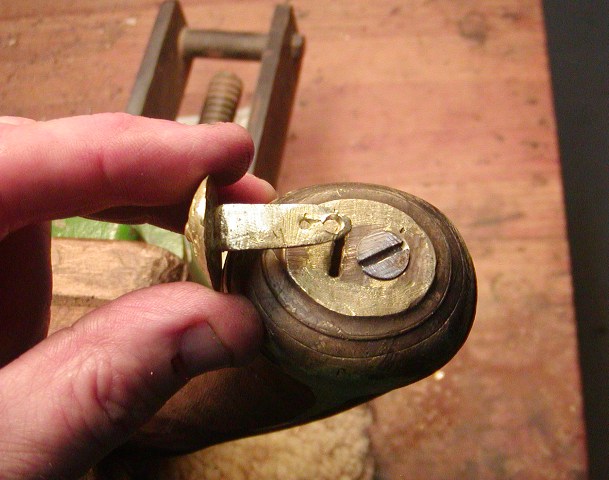
Next, I took a wood screw and screwed it in place to thread the wood, then I filed the tip of the screw so it would go through the tab on the end cap.
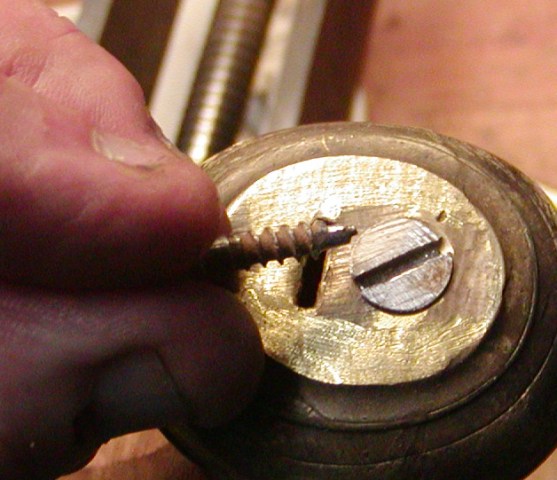
I counter sunk the hole, installed the end cap, and threaded the screw back in and it pulled the cap up nice and tight.
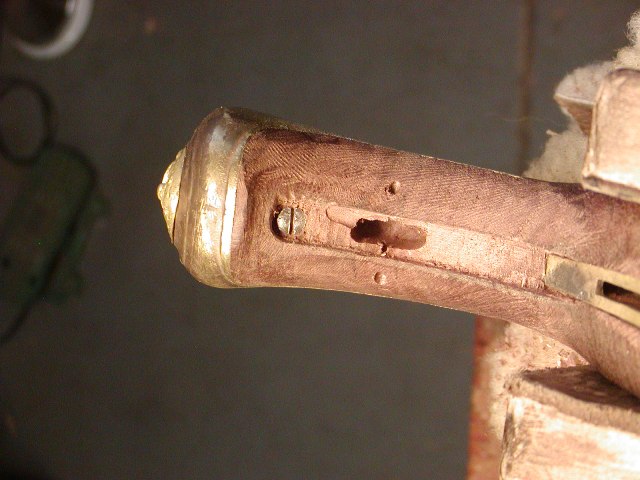
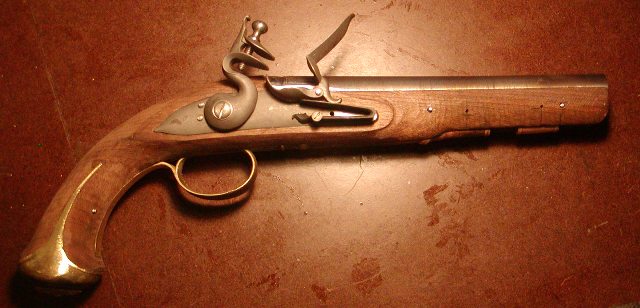
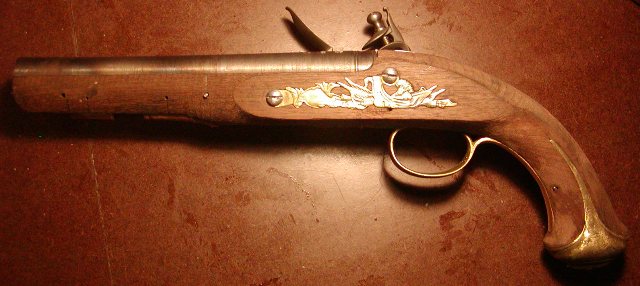
More to come.
dave
Moving forward pretty fast. Before I start, I want to say how delightful making this pistol is. I needed a break from long guns and this fits the bill nicely. Bill Kennedy designed this and several other pistol kits that are probably the best you could ever buy and as historically accurate as anyone could produce without resorting totally to customized parts. He knew his business. There are a few minor details that I will make even more historically correct but I don't have to do much. I'd forgotten how much I enjoy building pistols, particularly real British duelers. I have most parts for 2 pairs of duelers but I need to find or recreate the right locks. There are none commercially made that even come close. I have the mahogany and oak lumber, hardware, and woolen baize fabric for proper cases. I also have parts for a late 17th century English pistol, and 18th century turn off pistol, and an all metal stocked Scottish pistol. I think after I am done with my current queue of work for other folks, I am going to take a sabbatical and get some of those pistols built. I guess I need to get a move on.
It was time to solder on the barrel lugs, inlet them, and drill for the barrel pins. On this pistol the barrel is pinned. If you examine British pistols or guns from this period, you will notice that those with barrel keys almost always have hook breeches and those with pins do not. Lugs came with the kit and they were very easy to solder in place. One goes about 1.25" back from the muzzle and the other 3.5" from the breech. I use sturdy 3/32" pins for barrels. Next up were the ramrod pipes and here I found a problem. The cast pipes were very nice but the tube walls were so thin that I could deform the pipe just by pressing them into to the mortices. I decided that was too fragile so I used 0.04" sheet brass to make a front pipe with raised collar ends. Then I cut off the tang on the rear pipe, made a new tube with a short extension and soldered on the cast tang. I do this all the time for cast English fowler rear pipes. Cutting the mortices was easy and the pipes came out really nicely.

These photos show how I make them but are from a different thread:


Time for the trigger guard. Here was another issue. The nice cast guard only has a forward lug for a cross pin. I suspect the intent was to use a screw through the guard for the rear extension. The problem is that you rarely find good quality civilian pistols that use a screw. It is common on ordnance issued military pistols but not on civilian or private purchase guns. There is usually a lug and cross pin or on really high-end pistols, the lug if filed into a hook that catches a screw head imbedded in the trigger guard mortice. That way no pin shows. I opted for a lug and pin so I made a lug and threaded the bottom.

Then I drilled and tapped the trigger guard, screwed in the lug and soldered it in place. I had countersunk the outside of the hole so could peen the excess threaded post into the countersink. Once the excess is filed away, the hole mostly disappears.


I inlet the front of the guard first. Then I work to the rear, gradually inletting the rear extension until I get to the end. Once in, I drilled the pin holes and inserted the pins. I use 5/64" pins.


Finally, I installed the end cap. I put the cap in place, then used a tiny drill to make an exploratory hole from the trigger guard mortice. It is an awkward job because the stock limits the angle I can drill. My drill hit the tab on the end cap to one side but the height was right. So I drilled for a wood screw but angled the hole a little to the other side. It came out great.

Next, I took a wood screw and screwed it in place to thread the wood, then I filed the tip of the screw so it would go through the tab on the end cap.

I counter sunk the hole, installed the end cap, and threaded the screw back in and it pulled the cap up nice and tight.


More to come.
dave
Brokennock
Cannon
Thank you for sharing all this.
While great to see and learn, it is making me even more disgusted with the construction issues I am finding on my flintlock pistol.
While great to see and learn, it is making me even more disgusted with the construction issues I am finding on my flintlock pistol.
old ugly
40 Cal.
this is an awsum thread! thanks Dave.
I have a question re the pin through the lug at the front of the trigger guard, is it hidden behind the left side plate, or is it visible for removable without taking off the side plate? it looks like removing the side plate maybe tricky without marking wood or the plate.
thanks tom
ou
I have a question re the pin through the lug at the front of the trigger guard, is it hidden behind the left side plate, or is it visible for removable without taking off the side plate? it looks like removing the side plate maybe tricky without marking wood or the plate.
thanks tom
ou
- Joined
- Nov 26, 2005
- Messages
- 5,361
- Reaction score
- 11,658
Hi OU,
That is a great question and something that has gotten me in trouble on other guns. Fortunately, the side plate removes easily but it is not required. If you look at the bottom of the plate directly under the rear lock bolt, you will see the hole for the guard cross pin. Sometimes the trigger pin also gets hidden.
dave
- Joined
- Nov 26, 2005
- Messages
- 5,361
- Reaction score
- 11,658
Hi,
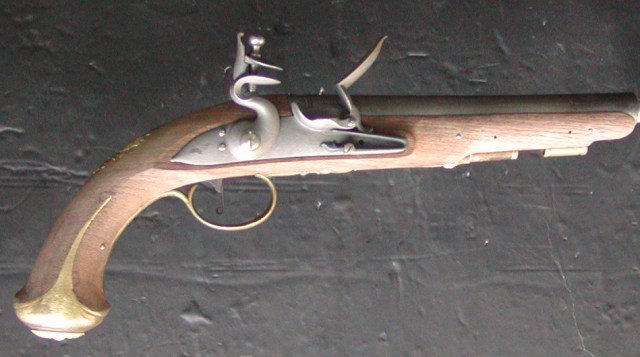
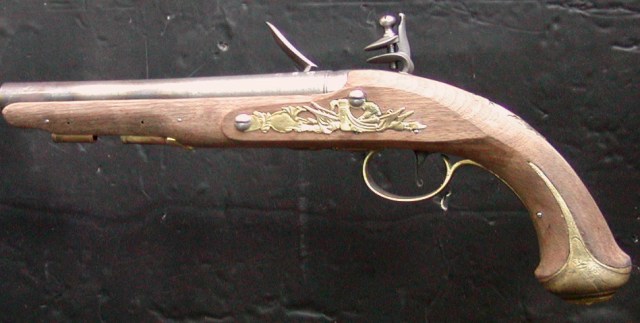
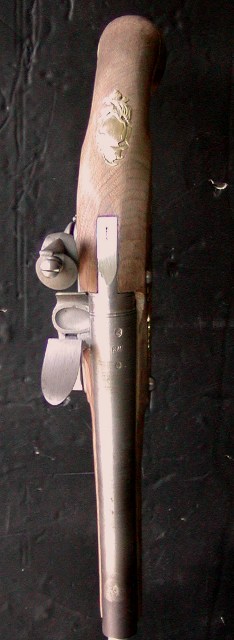
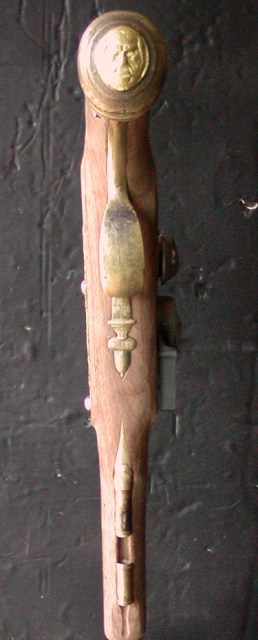
I inlet the wrist plate and fitted the screw through the wrist that anchors it. The screw is hidden under the trigger plate and guard. I took a lot of wood off the stock and shaped the lock panels. I also mounted and adjusted the trigger. I have to carve the lock panel moldings and around the barrel tang and final shape the stock. Then stain it, finish the wood, tune and polish the lock and hardware, and make the ramrod. However, I have to put it aside for a while and move on with other work. More to come.
dave


Brokennock
Cannon
Yet another one that makes me scream to myself, "I Want THAT!"
- Joined
- Nov 26, 2005
- Messages
- 5,361
- Reaction score
- 11,658
Hi,
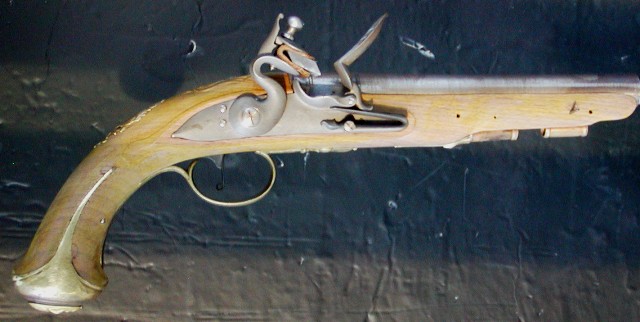
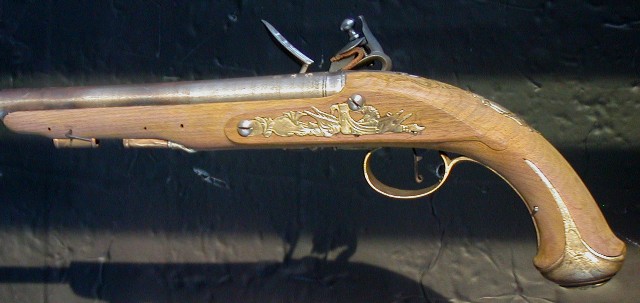
Back to it. I got the final shaping done and carved the lock panels and around the barrel tang. I chose to carve the same shell design I used on my officer's fusil. It is difficult to find black walnut dense enough to easily carve small details. This stock was marginal but I managed pretty well with super sharp tools. The whole time I was wishing for English walnut. I scraped and sanded with 220 and it was ready for the first coat of stain. I use pure yellow aniline dye dissolved in water. That gets rid of the cold purple brown of black walnut and makes it look much more like English walnut. The first coat also shows up rough spots and scratches so I end up mostly scraping and sanding it off. It also serves as my final stock whiskering. After final fitting and filing of all the parts, and cleaning up any rough spots, I will paint on another coat of yellow. Then I may or may not stain the stock with alkanet root infused in mineral spirits. After the yellow, I will paint part of the stock with mineral spirits, which will give me an idea of the color when finish is applied. The color results from that will determine if I use alkanet root or any other stain. More to come.
dave


- Joined
- Nov 26, 2005
- Messages
- 5,361
- Reaction score
- 11,658
Hi,
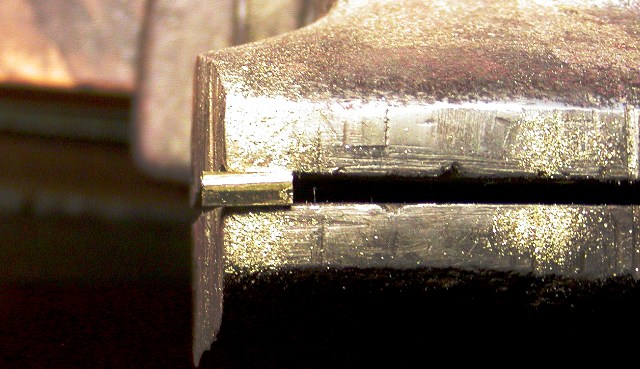
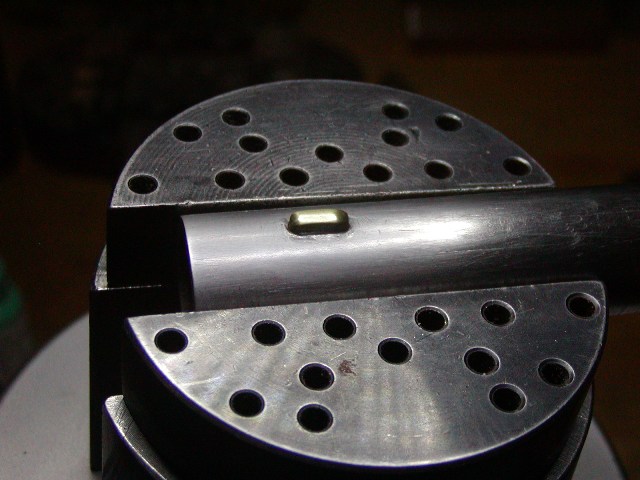
Thanks for looking folks. I thought some of you might want to see how I install a morticed front sight, which was a common way these sights were installed. Many horse pistols did not have any sights but many did and I wanted one. These were typically installed without any solder. The sight of gold, silver, brass, paktong, etc, was made with a tiny dove tail along the bottom edge. I cut a line with a jewelers saw and then file a dove tail on that line with a tiny triangular needle file.
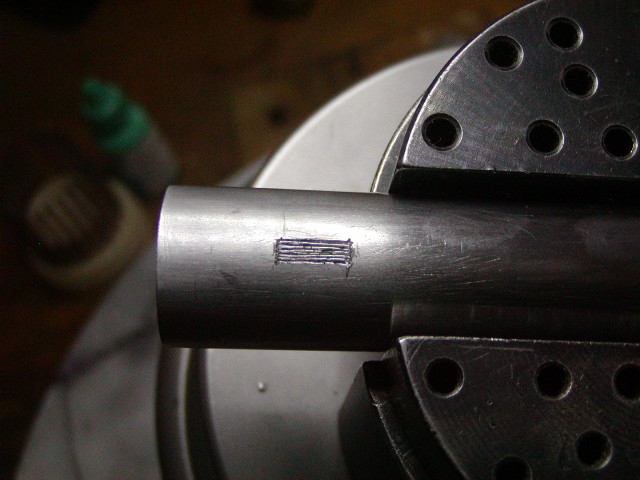
Then I engrave the outline of the mortice on the barrel. I find the center by placing the barrel upside down on a flat surface and keep it square to the surface. Then I slide a flat needle file under the barrel where the sight will go, and draw it out. It marks the center line perfectly. I outline the mortice with a square graver and then cut parallel lines within it to remover waste material.
Then I cut a smooth bottomed mortice with a 1/8" wide flat die sinker's chisel. When the mortice is at the right depth, I undercut the sides with a tiny flat on which the bottom flares out a little wider than the top. By cutting along the edges with that flat, it uncuts them.
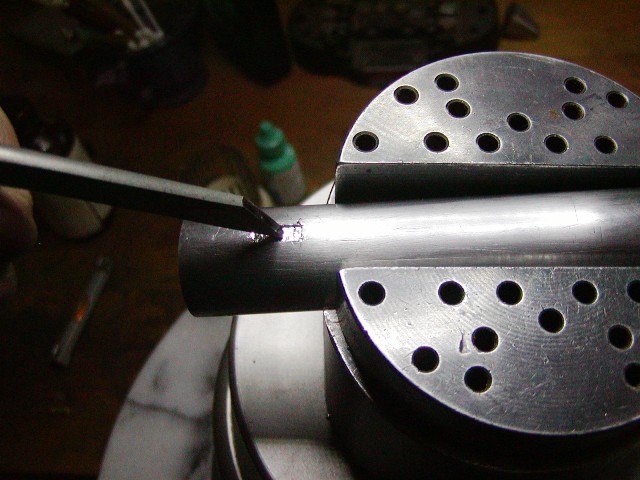
Next, I place the sight in the mortice and tap it hard with a small ball peen hammer. That usually locks it in place so I can take a punch and peen the barrel around the sight. That peens metal into the dovetail on the sight and permanently locks it in place.
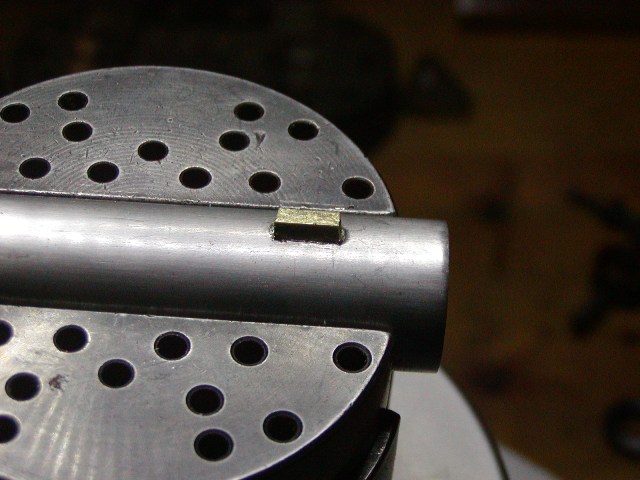
Finally, I clean up the barrel and sight and now have a neat and historically correct front sight.
dave
Thanks for looking folks. I thought some of you might want to see how I install a morticed front sight, which was a common way these sights were installed. Many horse pistols did not have any sights but many did and I wanted one. These were typically installed without any solder. The sight of gold, silver, brass, paktong, etc, was made with a tiny dove tail along the bottom edge. I cut a line with a jewelers saw and then file a dove tail on that line with a tiny triangular needle file.

Then I engrave the outline of the mortice on the barrel. I find the center by placing the barrel upside down on a flat surface and keep it square to the surface. Then I slide a flat needle file under the barrel where the sight will go, and draw it out. It marks the center line perfectly. I outline the mortice with a square graver and then cut parallel lines within it to remover waste material.

Then I cut a smooth bottomed mortice with a 1/8" wide flat die sinker's chisel. When the mortice is at the right depth, I undercut the sides with a tiny flat on which the bottom flares out a little wider than the top. By cutting along the edges with that flat, it uncuts them.

Next, I place the sight in the mortice and tap it hard with a small ball peen hammer. That usually locks it in place so I can take a punch and peen the barrel around the sight. That peens metal into the dovetail on the sight and permanently locks it in place.

Finally, I clean up the barrel and sight and now have a neat and historically correct front sight.

dave
JohnnieT
Percussion Enthusiast
This has been a fun read! You have quite a lot of talent and this pistol is beautiful so far. Can’t wait to see the finished product!
- Joined
- May 6, 2014
- Messages
- 17,786
- Reaction score
- 17,088
Hi Dave,
Sorry I'm late to the party on this one. Yet another of your projects that trips me trigger on SO many levels..........!! Grin.
This pistol would be a superb companion piece to an Officer's Fusil and very important to me personally, be of the same caliber to use the same ball in both pieces.
From my very first BP rifle in 1972, I always thought having a pistol in the same caliber would have been very desirous on the frontier and for militia duty. I bought a TC Patriot Pistol to match the caliber of my rifle, but the shape of the butt and other things made it too ungainly for me. Fortunately, others did not feel the same way, so I was able to trade it off reasonably.
My next venture into a long gun/pistol of the same caliber was after we made up some "faux" M1812 muskets out of Charleville kits and I purchased the Navy Arms "Charleville" Pistol in the same caliber. I don't know about the girth of the grip on original models, but I have pretty large hands and could barely grip due to the girth. Even with a horribly heavy trigger pull (I didn't know how to work the trigger pull at the time) and that huge girth of the grip and no front sight, it was surprisingly accurate at 25 yards, but it was just too difficult to shoot, so I lost interest.
However by the early 1980's, I was able to handle original flintlock Georgian pistols with the flared grip as on your pistol. Oh, my goodness how wonderful most of them feel in the hand!!!! Of course I'm referring to those of the P1756 and later pistols where the grip is "straighter down" than those of the first half of the 18th century. The Civilian Georgian pistols of the mid to late 18th century, even more so. So I bet your pistol will feel GREAT in the hand.
I was enthralled with your text and pictures how the butt plate was inletted and especially how the buttplate is held on. I had no idea it was that involved. I was also a bit amazed by your explanation and pics of how you added the front sight. I thought the originals were brazed in place, so that was quite informative!
I planned on bringing up the P1738 with the banana shaped lock, but I'm a bit too tired right now, so will bring that up later.
Thank you so much for the most informative pics and text in this thread. I am enjoying it immensely.
Gus
- Joined
- Nov 26, 2005
- Messages
- 5,361
- Reaction score
- 11,658
Hi,
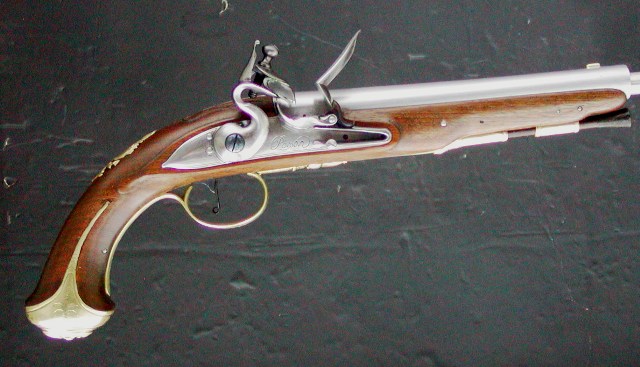
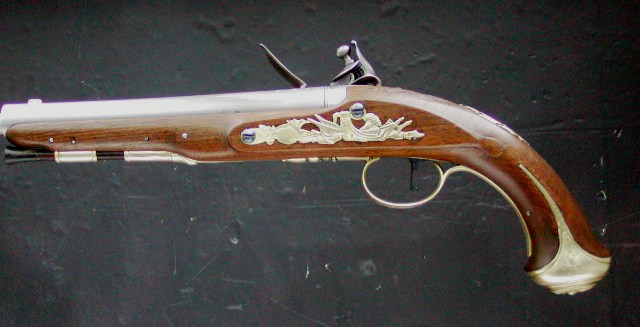
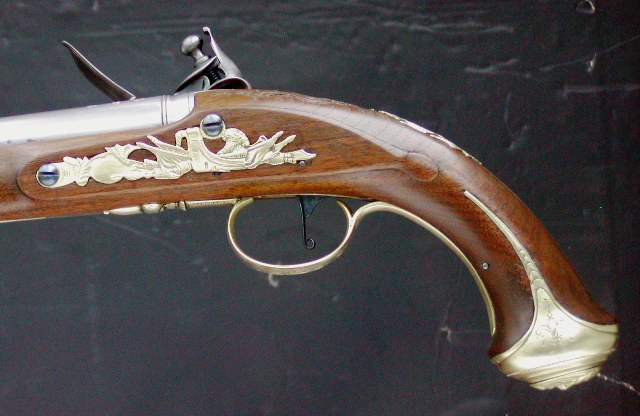
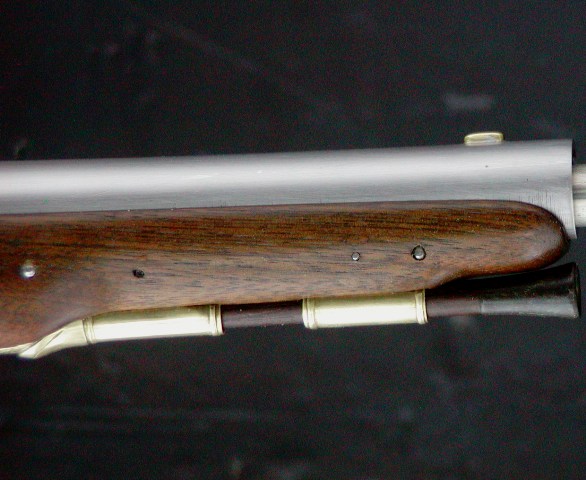
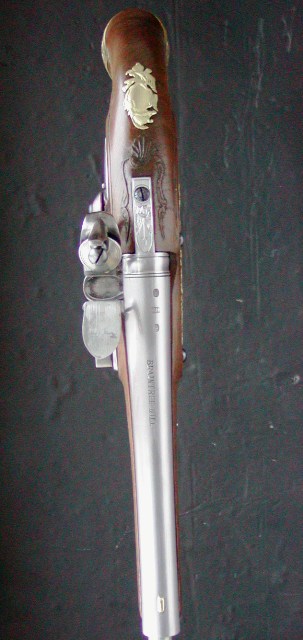
I haven't posted much on this project for a while. I had to put it aside for other work for clients, my eternal dilemma. I finally finished it and am pretty happy with it. It is an elegant gun that feels wonderfully balanced in the hand. I gave it the decorative bells and whistles that would be expected on a good quality private purchase officer's pistol. What that means is the fit and finish is very good and the engraving is better than average for the time. It is not a first quality gun because, for its time period, a first quality pistol or long gun would not have a round-faced lock. It is very difficult to get folks to understand that on British guns, by 1760, round-faced locks were considered cheap and almost exclusively on livery, military, and trade guns. At best, they were used on second quality export guns. Flat locks with decorative bevels were the fashion on almost all better quality guns by 1770. Of course, there were always exceptions and sometimes a wealthy client with very conservative tastes would have fine pistols made using round-faced locks. The acorn pistol trigger guard is from the 1770s so the pistol kit cannot be made into a high-end gun from the 1750s, when round-faced locks were still in high fashion, and it probably would not be a high-end pistol from the 1770s because of the lock. So the compromise I made was a good quality officer's pistol from the 1770s. It is the kind of product that Twigg, Wogdon, and Griffin made for military customers with modest means. These pistols were made in pairs and the barrels were forged, bored, and reamed as a single unit then cut into two pistols barrels, Thus, they had the exact same bores. I engraved the lock with a simple military-like border and my signature. It has a very elegant look. The pistol balances wonderfully and the trigger pull is 2 lbs. I turned the ramrod from a blank of Indian rosewood. The muzzle end is tipped with American bison horn and I made a sheet steel ferrule and spring steel tow worm for the other end. The black walnut stock was stained to look like English walnut and finished with Sutherland-Welles polymerized tung oil. The black walnut was a nightmare during the finishing phase because it kept chipping off sharp edges, particularly along the inlet for the butt cap. I really hate it unless you find a really dense chunk. It was the stock that came with the kit but if I did one again, I would trash the black walnut stock and work from scratch using an English walnut blank.
dave
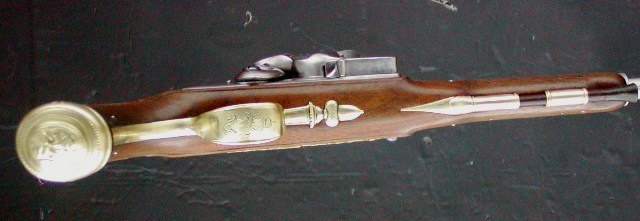
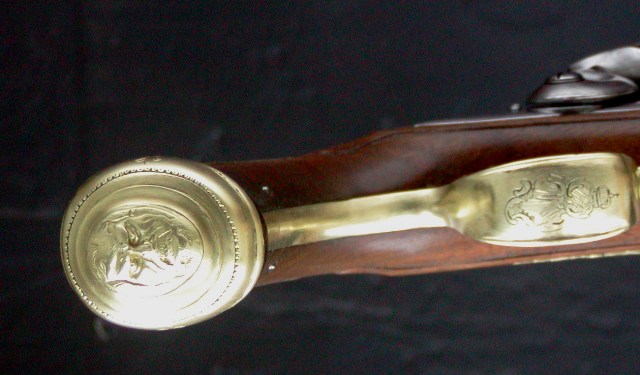
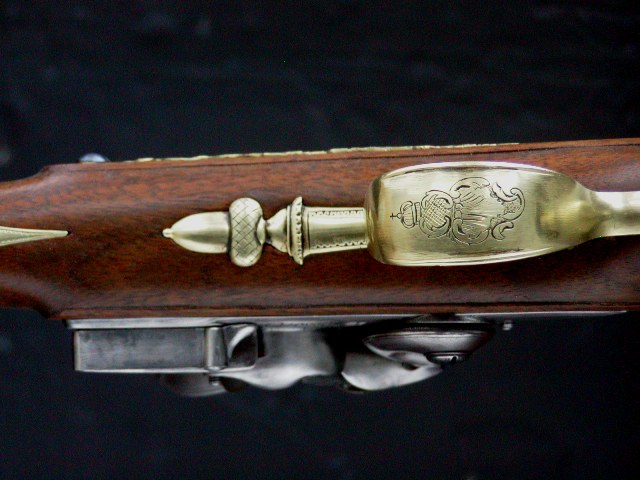
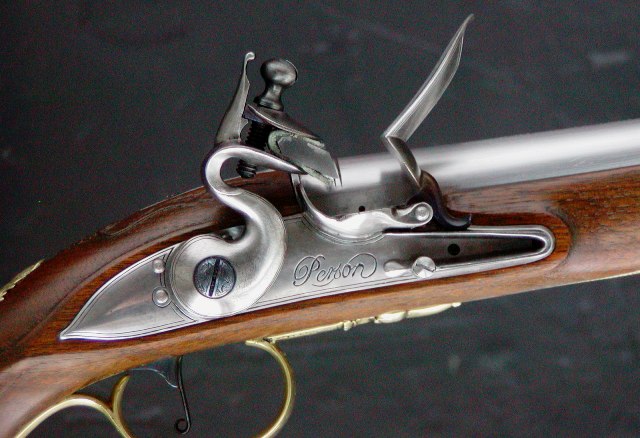
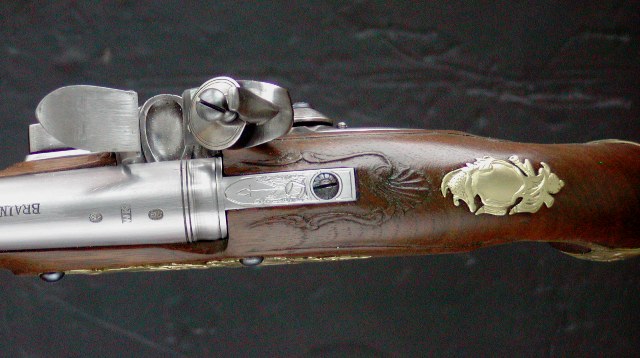
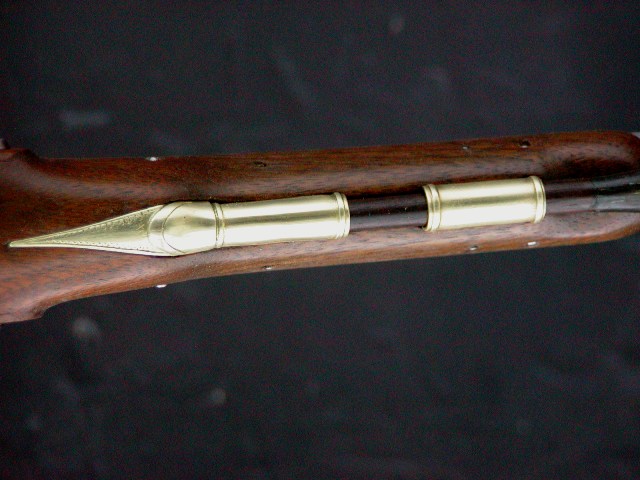
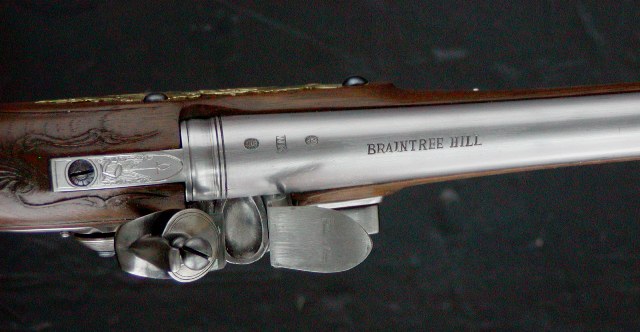
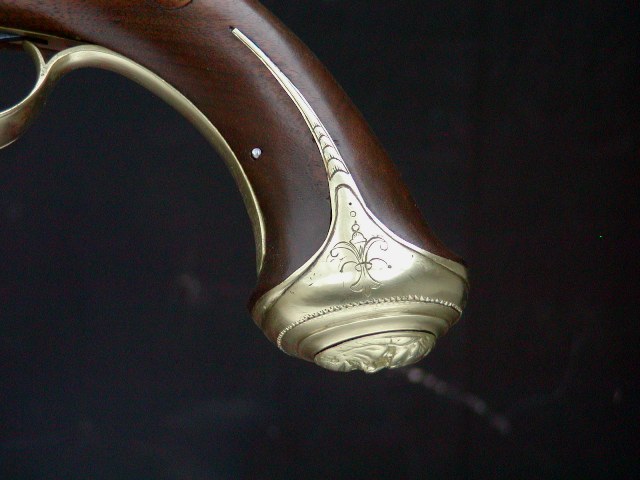


Beautiful job Dave. I have a question I am curious about. I have used Minwax Antique Oil for many years on my builds. With American black walnut it usually takes me from six to ten coats to get the grain filled properly. That is using thinned coats for the first two or three. After each coat I sand back to bare wood and start the next coat. This is a very slow process but I am usually not in a hurry anyway. What is your process for finishing?
Thanks, Barry
Thanks, Barry
- Joined
- Nov 26, 2005
- Messages
- 5,361
- Reaction score
- 11,658
Hi Barry,
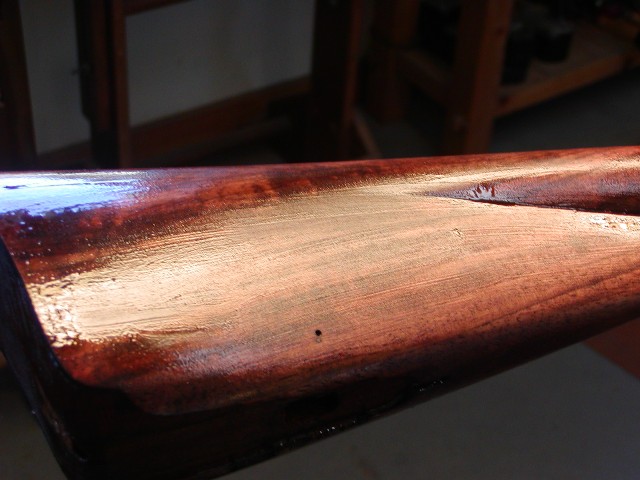
Thanks for the nice comment and question. On a gun with walnut stock that is supposed to represent a good or high quality gun rather than a musket or trade gun, I apply finish with 220 sand paper. I dip the paper into the finish and then start sanding the stock until I develop a slurry of finish and sawdust on the surface. I let that dry into a hard crust over night. Then I sand it smooth. Sometimes, I have to do it again to fill the grain, however, once that is done it requires very little finish to achieve a nice sheen. It is a little tough to do if there is carving to work around but if you are careful you should be able to avoid damaging it. Here is an example where I am creating the slurry.
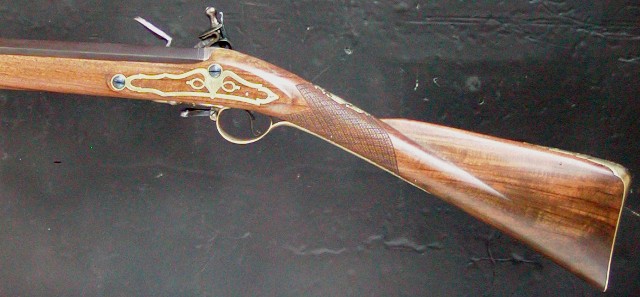
Here is the finished rifle.
dave
Thanks for the nice comment and question. On a gun with walnut stock that is supposed to represent a good or high quality gun rather than a musket or trade gun, I apply finish with 220 sand paper. I dip the paper into the finish and then start sanding the stock until I develop a slurry of finish and sawdust on the surface. I let that dry into a hard crust over night. Then I sand it smooth. Sometimes, I have to do it again to fill the grain, however, once that is done it requires very little finish to achieve a nice sheen. It is a little tough to do if there is carving to work around but if you are careful you should be able to avoid damaging it. Here is an example where I am creating the slurry.

Here is the finished rifle.

dave
Thanks for that information. I will give that a try on some scrap pieces and see how it works for me.
By the way, your help with the construction of a pistol box was a great help when it came to the interior construction of the partitions and cloth covering.
It certainly does not come up to your masterful craftsmanship or period correctness but I am happy with my first attempt. Thank you very much for all you do to help us with our continuing efforts to improve our work and gravitate into areas we are not familiar with.


- Joined
- Nov 26, 2005
- Messages
- 5,361
- Reaction score
- 11,658
Hi Barry,
You did a beautiful job on that case and pistol!
dave
You did a beautiful job on that case and pistol!
dave
Hi,
I haven't posted much on this project for a while. I had to put it aside for other work for clients, my eternal dilemma. I finally finished it and am pretty happy with it. It is an elegant gun that feels wonderfully balanced in the hand. I gave it the decorative bells and whistles that would be expected on a good quality private purchase officer's pistol. What that means is the fit and finish is very good and the engraving is better than average for the time. It is not a first quality gun because, for its time period, a first quality pistol or long gun would not have a round-faced lock. It is very difficult to get folks to understand that on British guns, by 1760, round-faced locks were considered cheap and almost exclusively on livery, military, and trade guns. At best, they were used on second quality export guns. Flat locks with decorative bevels were the fashion on almost all better quality guns by 1770. Of course, there were always exceptions and sometimes a wealthy client with very conservative tastes would have fine pistols made using round-faced locks. The acorn pistol trigger guard is from the 1770s so the pistol kit cannot be made into a high-end gun from the 1750s, when round-faced locks were still in high fashion, and it probably would not be a high-end pistol from the 1770s because of the lock. So the compromise I made was a good quality officer's pistol from the 1770s. It is the kind of product that Twigg, Wogdon, and Griffin made for military customers with modest means. These pistols were made in pairs and the barrels were forged, bored, and reamed as a single unit then cut into two pistols barrels, Thus, they had the exact same bores. I engraved the lock with a simple military-like border and my signature. It has a very elegant look. The pistol balances wonderfully and the trigger pull is 2 lbs. I turned the ramrod from a blank of Indian rosewood. The muzzle end is tipped with American bison horn and I made a sheet steel ferrule and spring steel tow worm for the other end. The black walnut stock was stained to look like English walnut and finished with Sutherland-Welles polymerized tung oil. The black walnut was a nightmare during the finishing phase because it kept chipping off sharp edges, particularly along the inlet for the butt cap. I really hate it unless you find a really dense chunk. It was the stock that came with the kit but if I did one again, I would trash the black walnut stock and work from scratch using an English walnut blank.
dave


What a gorgeous pistol. One like this is definitely on my ever-growing wish list.
Brokennock
Cannon
Fabulous pistol. Thank you for all you share with us.
Similar threads
- Replies
- 5
- Views
- 233
- Replies
- 2
- Views
- 253
Latest posts
-
-
-
-
-
FOR SALE Mike Adcock .62 Caliber Percussion Half-stock “Bear Rifle”
- Latest: Flintlock Fellow
-
-
-
-
-


