• Friends, our 2nd Amendment rights are always under attack and the NRA has been a constant for decades in helping fight that fight.

    We have partnered with the NRA to offer you a discount on membership and Muzzleloading Forum gets a small percentage too of each membership, so you are supporting both the NRA and us.

    Use this link to sign up please; https://membership.nra.org/recruiters/join/XR045103

Making first horn, Dyeing question among others.

Muzzleloading Forum

Help Support Muzzleloading Forum:

This site may earn a commission from merchant affiliate links, including eBay, Amazon, and others.

krecords

36 Cal.
Joined
Dec 27, 2008
Messages
66
Reaction score
0
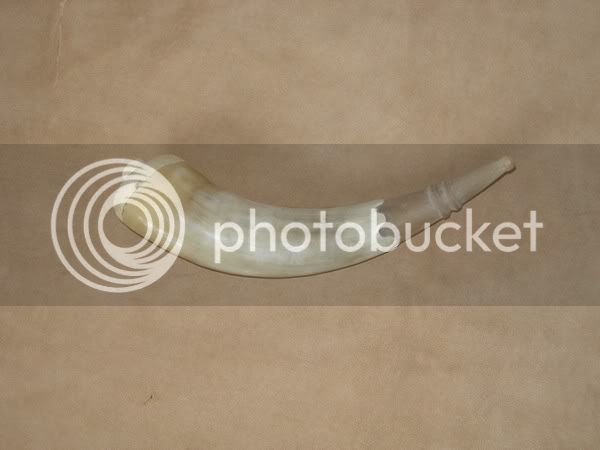
I an making my first powder horn. I bought two very nice polished white cow horns on line to start with. I have carved the first one and want to stain the reduced area to a dark brown similar to my gun stock.
Will the wood dye I used on the stock work on the Horn? Also what is used to antique the white area? Is antiquing done before or after scrimshaw is applied?

Thanks for the help,
Kirby
 
Get yourself a book called "Recreating the 18th Century Powder Horn" by Scott Sibley. It will have all your answers. Track of the wolf sells it. Alot ot Horners use RIT clothing dye for coloring their horns, both spout end and main body. I like to use dark brown with a little red for most of my spout ends. .... You can mix RIT dye to get the colors you like. One antiquing technic is to dye your horn and then apply a wood stain over it! There are many procedures for coloring powder horns! Engrave (scrimshaw) your horn before you dye the main body, then dye.

Rick
 
Rick,
Thanks, I do remember seeing that book and wanting it. I had just forgotten what with building my gun and all. I will order it today.

Here is my start,as inspired by all the pictures I have seen on the internet.

Horn001.jpg


I want to scrimshaw a map of my local hunting area on it or maybe of all of Eastern Oregon as it would have been in the 1800's or so. It will be my first scrimshaw attempt as well.

Thanks, Kirby
 
Horner75 nailed it! Sibleys book is probably the best for beginner horn builders. Shoot, just the color pictures of original horns is well worth the cost! Don't fergit to post some pics when yer finished!
 
Whoa! Nice!!! :bow:

A lot of people use rit. I would worry about bleeding with a alcohol based dye... so go slow. Otherwise should be fine but I'm not a real experienced horner.
 
Great Book. A buddy loned me his copy. Man, that is a good looking horn so far. I though I was doing a good job. :thumbsup:
 
Can't go wrong with Sibley's book. I stain the throat and neck of my horns with brown RIT dye with a pinch of black. You will want to do this first before dyeing the body. I use an asparagus cooker, fill with water, dissolve the dye in the water and heat the cooker on a hot plate (or your kitchen stove) I let the dye work on the horn for 30 - 45 minutes or so. When dyeing the throat and neck, I put enough water in the cooker to just cover this portion. Once out of the dye I let the horn sit over night (I usually do this in the evening). The lower part of the body will be stained (can't help it) so you will have to scrape the dye off. The dye will have penetrated just a couple layers of horn. I will use some painters tape (blue tape) wrapped around the horn at the juncture of the body and throat while scraping. This will protect the horn if you slip (been there, done that). Now, I usually dye the throat/neck before I scrimshaw, for the reason that I have to scrape the horn after dyeing. Once I've scratched in the design, I ink it, buff off the extra ink, then final dyeing. I've tried several combinations of dye for the body, but now I pretty much use RIT tan. I like the look of that color. Good luck and let us know how it comes out...
Scott
 
wrapping the horn body TIGHTLY with electrical tape beginning right at the engrailing and going up towards the base will help keep yer dye from staining the body.You'll still have to scrape it, but not as much! :haha: :thumbsup:
 
well I made the stopper for the horn this afternoon. I Ordered the book as well. I think I will wait for the book before I continue with the horn. I guess I will have to move onto a possibles bag. :)
Kirby
 
Taping works pretty good, but has anybody tried bicyle inter-tube sections? For the dying of the neck end, I just cut a 3' cross section of B/tube and stretch it down from the spout end, and over the main body of the horn JUST behind the engrailing. Then put the spout down in the dye to just slightly above the tube's edge nearest the engrailing. Later, when you remove the horn and everythings dry, just pull the tube off. You will only have a very small area to scrape near the engrailing, but just put you another tube section around your newly dyed neck and the stepped engrailing edge to help protect the dyed area spout while scraping....Then remove! Works like tape, but a whole lot more water tight and re-usable! ..... Just my 2 cents worth!

Rick :wink:
 
These are great things to know and try. I am looking forward to the dying process when I get the supplies.

Flint Hunter, I carved the plug with a dremmel. I pressed the end of the horn into some Styrofoam then cut out the impression. then I used that to draw the line on a piece of Juniper limb I cut off a bow stave I have. then I carefully carved it with a dremmel to just above the lines and finished with a file until the plug fit. I then shaped the end of the plug to what I was looking for. and sanded it smooth.

Kirby
 
Kirby, how is juniper to work with? I've been telling myself that the next time I make it over mountains I should scrounge some up...
Scott
 
Scott,
It is a lot harder than pine but not as hard as maple. It smells like cedar when working it. It is very white with a red/orange core that can make for a very pretty piece of wood. It usually has lots on knots and crooked grain. it is tough to make a bow out of because you are usually working around knots. I have yet to make a working bow out of Juniper. It worked well for the plug on the horn because it was hard enough to hold it's shape. we will see how good it stains when I finish the Horn. If you want to see a cool use of Juniper, there is a Book store in down town Corvallis,Oregon that has a large tree trunk make into a readers chair.

Kirby
 
:hmm: Ya know...the campground where my forge is at has LOTS of bicycles! :haha:
I believe I'm gonna give that a go!
 
Can't wait to see how that turns out Kirby. :thumbsup:
Do you remember the name of the bookstore? I'll have to swing by there next time I'm in Corvallis.
Scott
 
Back
Top