• Friends, our 2nd Amendment rights are always under attack and the NRA has been a constant for decades in helping fight that fight.

    We have partnered with the NRA to offer you a discount on membership and Muzzleloading Forum gets a small percentage too of each membership, so you are supporting both the NRA and us.

    Use this link to sign up please; https://membership.nra.org/recruiters/join/XR045103

My first Lyman 54 GPR kit...

Muzzleloading Forum

Help Support Muzzleloading Forum:

This site may earn a commission from merchant affiliate links, including eBay, Amazon, and others.

splinter84

36 Cal.
Joined
Jan 4, 2013
Messages
66
Reaction score
0
Hey guys,

Well it's finally here.... my Lyman 54 GPR kit. I opted for the percussion model since this is my first ML. I received a lot of positive feedback from you guys on my last post about choosing a make and model within my budget. At the last minute I ended up calling back MidSouth Shooters and going with the kit. Hopefully I made the right decision!

I am planning to dig into it a bit tonight. I'll post some pics of the stock tomorrow and keep you guy's up to speed on my progress. I am looking forward to the build.

I purchased a couple of files, exacto knife set, and plenty of sand paper (60, 80, 120, 160, and 220 gr). I am going to make some sanding blocks out of 2x4 scrap.

I am not sure about finishing solutions for the wood yet. I am going to take plenty of stain samples and take my time finding a good finish. I have heard good things about doing a simple oil finish and that might just be the way I go. Not sure yet.

I am thinking about the LMF browning solution or the vinegar solution for treating the metal. Vinegar treatment scares me a bit, because I don't want to ruin the barrel or any screw fittings etc. If anyone has a good step by step for doing the Vinegar treatment please fill me in.

I did take note about the fragile escutcheon screws that come with the kit. I am planning to change those out with some #3 or #2 wood screws. Will have to do some digging.

I have plenty of time to get the gun done during the backside of winter and this spring. No rush to get it in the field yet.

I will be on here posting questions as they come. Looking forward to fun ride!! :thumbsup:
 
Take, and post, lots of pictures. Take your time.
You are NOW the first step into the rest of your life!
 
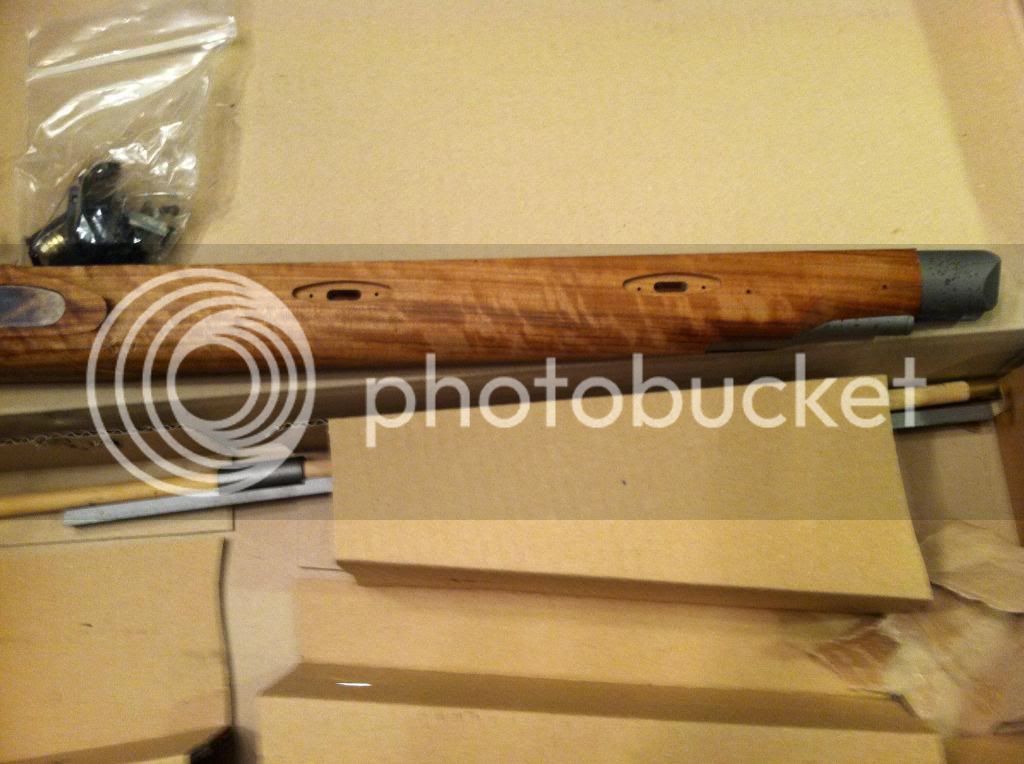
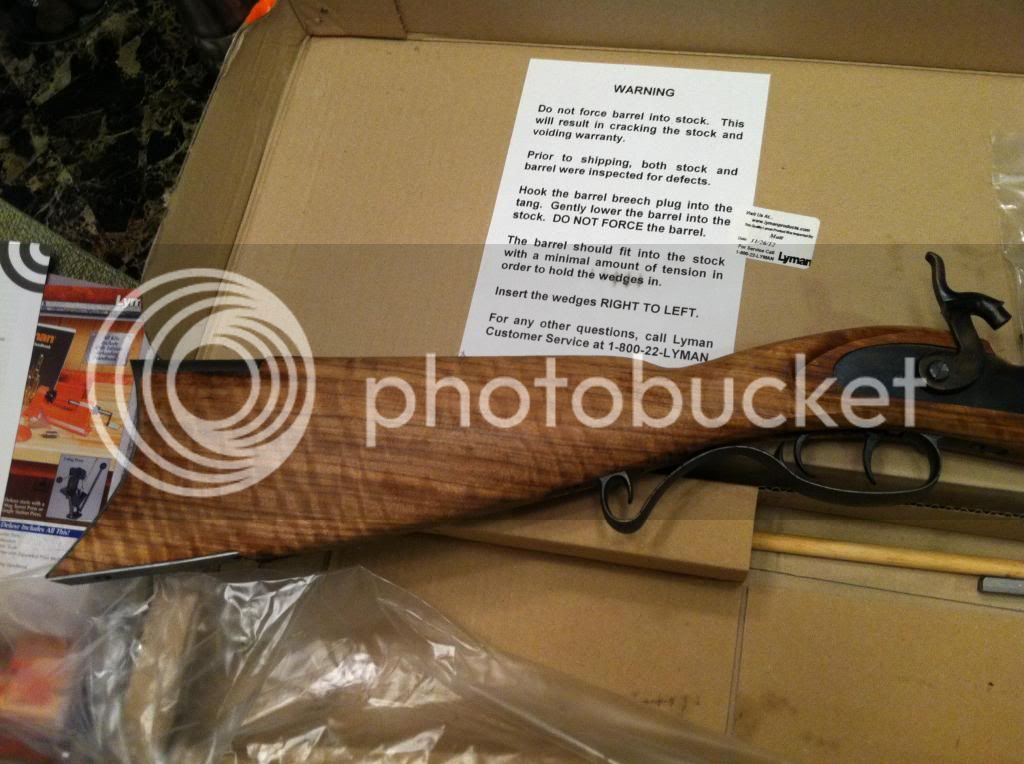
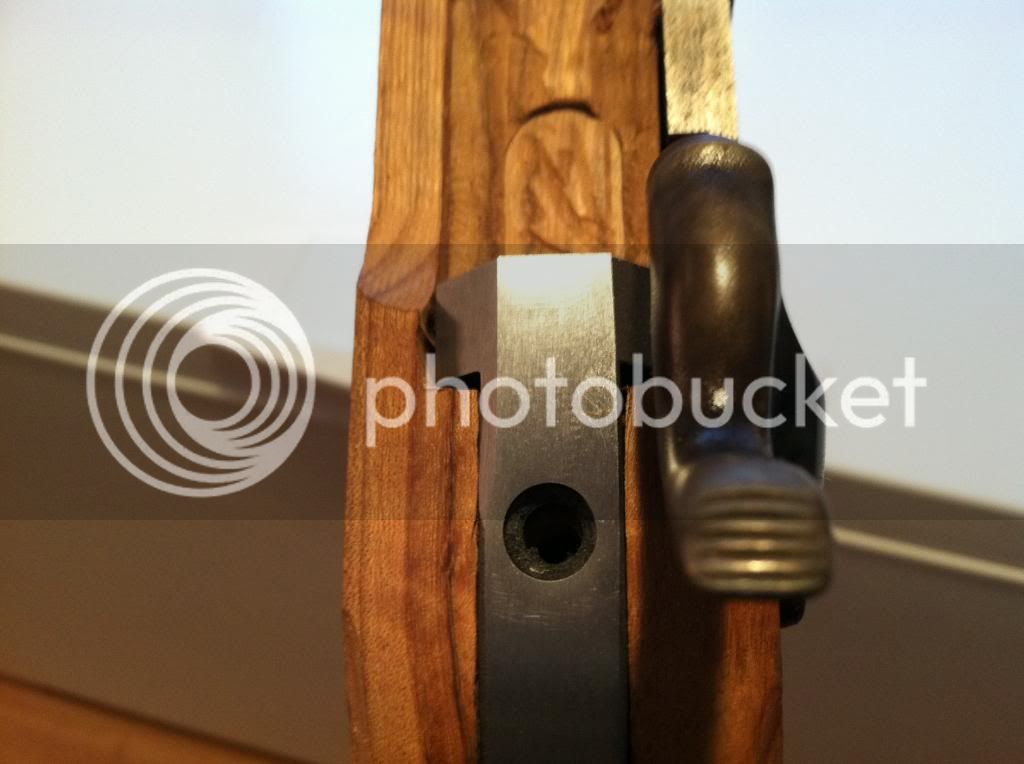
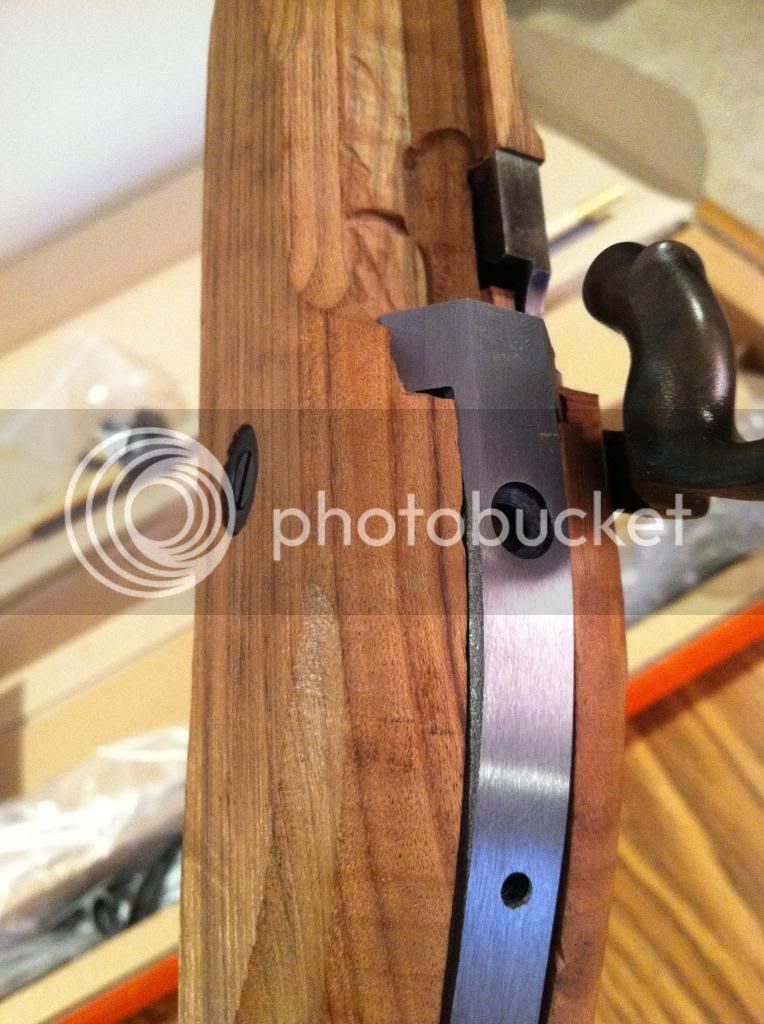
Here are few pics of the buck stock and forearm. I also included a pic of the tang where some incidental milling must of taken place at the factory. I am contacting Lyman to have the tang replace. I think the walnut looks pretty good!

All the pieces seem to fit alright except for the tang. The butt plate has some fitting to do, and there is plenty of wood to work and sand.

Forearm:
photo-1_zpsaa481c6f.jpg


Butt stock:
photo-5_zpsff882c8e.jpg


Tang with milling defect:
photo-1_zpsb55f3322.jpg


photo-3_zpsab16e580.jpg
 
Splinter, They sure did botch the milling job around the tang, but that is such an unusual figure in the wood, "quilting?" that I would be loathe to ship it back for a replacement. I have never put one of those together but I am sure I could somehow get enough wood from somewhere on the stock to make a fairly clean repair. Best of luck to you!!
Robby
 
Splinter,unless the measurements are off on the tang or you can visibly see it thicker on one side or the other I think your tang is fine.The bad milling is probably in the wood behind the tang.You are better off to just fill in those gaps with a bedding compound and also bed the tang.Whatever you do don't send that stock back,it will be a long time before you see another that nice.The last 2 Lyman kits I got had horrible wood.Good luck on the kit,take your time and if struggling walk away.
 
Beautiful wood. Before you stain the stock take it out into the sunlight and wet the wood down well, don't soak the wood, this is what the wood will look like when finished with oil. This way you can get an idea of what the stock will look like with an oil finish and if it would be dark enough for your taste................watch yer top knot................
 
Prairieofthedog said:
Splinter,unless the measurements are off on the tang or you can visibly see it thicker on one side or the other I think your tang is fine.The bad milling is probably in the wood behind the tang.You are better off to just fill in those gaps with a bedding compound and also bed the tang.Whatever you do don't send that stock back,it will be a long time before you see another that nice.The last 2 Lyman kits I got had horrible wood.Good luck on the kit,take your time and if struggling walk away.

I think the first pic of the tang helps to show what I am concerned about. The left side of the tang was filed or "milled" down a little too much. I was wondering if the tang should be replaced.
 
You need to start a thread just on that stock!!

Very rare for a factory piece...

Ask for input on how to bring out the curl and really finish it well.
 
I have seen quite a few GPRs and that wood is the best piece I have ever seen. Better to make the best of it. :thumbsup:
 
I started sanding the buttstock on Wednesday of this week. I am using 60 gr sand paper in hopes of getting the wood to within a 1/16" of my desired shape and then finish up with 80, 120, 180, and 220 for a final grit. The thing is, I have put about 2 hours of sanding into the buttstock and it seems I am making very slow progress. Should I jump to 40 grit or is there a more efficient solution to removing material in the early stages of shaping without getting to crazy with power tools? I have no problem with being patient but at my current rate of progress I could be sanding for several months. Any input would be very appreciated. I know there has to be a better way starting out.
 
Progress is slow because sand-paper is the wrong tool. Use rasps and files for stock shaping.... and then you are free to use scrapers and paper for your finishing.

You could likely buy a couple nice files with all the money you would be spending on paper and you will have the files a long time.

Why make dust when you can make shavings? Enjoy, J.D.
 
Yup, I completely agree. Your more likely to start a fire with all that rubbing of sand paper before you get it down to where you want and it most likely will not be level and flush where you want it to be. :grin:
I have even used a spoke shave when fitting brass butt hooks and pads that takes the wood off in a hurry and keeps it flat. MD
 
The wood in that stock is stunning. It is a rare day to find wood that good in a kit gun. I would not send it back. I never recommend filling places on a stock with wood filler or Plastic Wood but I'd sure do it on this stock before I would send it back. If you can find a piece of the same species of wood that is close in color, I'd try making some patches to fill in the gaps. Done right, these patches can become almost invisable once the stain and finish have been applied. You can probably steal enough chips of wood from your barrel channel to fix teh problem areas on your stock. Just fit the chip in place, glue it in and then cut and sand it to where it matches the surrounding wood. You need only small chips to do the neeeded repairs.

My personal opinion on working the wood down would be to keep working with sand paper. It is slower but you are less likely to make mistakes that are hard to repair. Slow is better. Of course if you are a highly experineced woodworker and know what you are doing, then the faster cutting tools might be the way to go. I do a lot of woodworking but when I work on guns, I take my time and, thereby, reduce the chance of making a bad mistake. As you work your wood down, you will need to start filing on the metal to bring it down to your stock. Do this just before the wood is worked down to where you want it. When you file the metal inlays, the tang, etc so that it is level with the wood, it is a gradual thing and you will sand the wood last so that everythign is nice and smooth and level. Patience, patience, patience and more patience. If you get frustrated, put down your tools and walk away. Come back to it tomorrow and start fresh.

For a stain, I like a darker stain something like a redish walnut. Alcohol based stains seem to give the best color to my notion. I have used leather dye on a couple of my rifles and they came out beautiful. I do not know the name or color of the dye, it was somethign that the folks at TVM gave me when I bought a kit from them. When I put it on, I was shocked by how black it looked. I thought I had ruined my stock but I remembered what they had told me about using the dye. They said to use 4 ought steel wool to rub the color back to where I want it. I took the steel wool and began rubbing and lo and behold the most beautiful color began to emerge from the darkness. As I rubbed and rubbed the color lightened until it was a beautiful brown with a very slight hint of red. I was extremely careful to rub all over and work the color to where I wanted evenly all over the stock. For my finish, I chose Birchwood Casey's Tru Oil. I apply extremely light coats with my finger tips I apply each application to a small area and rub until it starts to feel dry. Then I move on to the next small area. I continue this way until I have the whole stock coated with an extremely thin film of Tru Oil. I let each coat dry for 24 hours before applying the next coat. after 24 hours, I rub the stock lightly with 4 ought steel wool just enough to dull the finish. This levels teh finish and gives a surface for the next coat to adhere to. Do this for about 6 to 10 coats. The final finish will be a high luster finish and not what you want. This is okay. You can assemble your gun if you want but wait for about a month for the Tru Oil to completely harden. After a month, and teh stock removed from the gun, you can either gently rub your finish with steel wool dipped in soapy water (The soapy water will act like a lubricant to make the steel wool cut more gently) or you can buy a product made by Birchwood Casey called Stock Sheen and rub your stock with it. The Stock Sheen is both a very fine abrasive and a wax. If you use it, just rub your stock evenly all over until it gets to the sheen that you want. If you use the steel wool method, you will need to rinse the stock, let it dry thoroughly and then give it a coat of Johnson's Paste Floor Wax or Renaissance Wax and polish it out. In either case, you will end up with a nice soft luster that has an appearance close to an oil finish but much more durable.

The finish I'd use on your barrel would be Laurel Mountain Forge Browning Solution. It is a slower process but I like the finish much more. One thing to keep in mind when using the LMF browning, and they don't tell you this, the first coat will need to set for 24 hours. The second coat may need the full 24 hours, also. But, once you get a base coat of rust on your barrel the next coats will need only about 6 to 8 hours before being rinsed and carded. If you let the coats that you put on after getting a good base coat of rust sit too long, you will get light pitting in the surface of your barrel and a rough finish. Once the base coat is there, subsequent coatings will have a good surface to work on and will go faster. Do not apply a coat of LMF unless you know you will be there to rinse and card at the appropriate time. Done right, LMF will give you a beautiful brown finish. I have found that, like Tru oil on wood, it will take about 6 to 10 coats of LMF on your barrrel to get a nice even finish. Be sure to neutralize it like they tell you and then apply a good heavy coat of oil ans let it sit for at least 24 hours....more is better, to give the browning a chance to set up and harden.

Like I have previously said, the secret to a nice looking gun is patience, patience and more patience. Always walk away if you get frustrated or tired. When I build a gun, I will build it in my mind many times before I build it for real. What I mean by that is that I often just sit and think about what I am going to do and what could go wrong and how can I avoid it. Before I retired, I would often do these builds in my mind while I was riding to work. At times someone might comment that I was awfully quiet and I would tell them that I am in the process of building a rifle and am doing it in my mind before I pick up a tool this evening.

Good luck on your build and post lots of pictures as you go along. Also, ask lots of questions and let us help you when you need it.
 
Yup, I agree Zonie. But you know a 1/16" of wood is a lot of wood to remove with just sandpaper. :shake:

Enjoy, J.D.
 
hang onto that stock! i'd keep going slow with the sandpaper, but that's just one guy's free opinion, and no doubt well worth the price.

more pictures, please! :grin:
 
jdkerstetter said:
Yup, I agree Zonie. But you know a 1/16" of wood is a lot of wood to remove with just sandpaper. :shake:

Enjoy, J.D.
I know you already know this but you've opened the door for me to mention to the new folks who are just getting into wood working, a little about sanding.

It's pretty obvious that the course grained sandpaper removes wood faster than the fine grained papers but the direction that the sanding is done can have just as much of an effect.

When roughing the wood down to size with sandpaper, sand across the grain. That is, sand at 90 degrees to the direction the grain is running.

This will cut thru the wood grains and remove them fairly rapidly.
It also leaves large 'scratches' across the grain which will have to be removed before proceeding to a finer grit paper.

This cross sanding can be done with any grit of sandpaper but it must never be used when the wood is almost ready to finish.

When the wood is almost down to size or the shape your after change the direction of sanding so it is running parallel with the woods grain.

This parallel, finish sanding is the only way to make sure that no new cross grain scratches are being added.

If any cross sanding has been done it's a good idea while doing any finish "with the grain" sanding to look at the reflection of a bright light shining on the stock at a low angle.
Do this at many different angles looking for any rough spots or areas.

Sanding with a grit finer than 220 is a total waste of time. I usually stop at 180 grit.
I've heard folks say they spent hours working their way down to 1500 grit paper. :shocked2: :shake:

Remember, anything finer than 220 is a waste.
Not only is it a waste of time but it can actually prevent stains (including aqua fortis) from penetrating the wood resulting in a blotchy uneven color.
It can also pack fine sanding dust into the end grain curls of woods like curly maple and curly walnut, reducing their darkness and appearance of depth.

Have fun. :)
 
Back
Top