• Friends, our 2nd Amendment rights are always under attack and the NRA has been a constant for decades in helping fight that fight.

    We have partnered with the NRA to offer you a discount on membership and Muzzleloading Forum gets a small percentage too of each membership, so you are supporting both the NRA and us.

    Use this link to sign up please; https://membership.nra.org/recruiters/join/XR045103

My Lancaster 50cal build

Muzzleloading Forum

Help Support Muzzleloading Forum:

This site may earn a commission from merchant affiliate links, including eBay, Amazon, and others.

rigmarol

36 Cal.
Joined
Sep 26, 2009
Messages
57
Reaction score
0
Ok, I've spent hours reading this forum and searching the net for similar forums and I have to say this one is the one that has caught my eye and retained my attention the best. Thanks for being here guys.

I'm going to be a pest, no pretending not to be, let's be honest ok? LOL.

I have lots of questions and I'm not afraid of taking criticism and advice. I'm' not shy and have a really THICK hide so you don't have to worry about hurting my wittle feewings ok? :wink:

I've built one drop in kit a couple of decades ago and now I'm going to build a parts kit I picked out from Muzzleloader Builder's Supply
http://www.muzzleloaderbuilderssupply.com/index.html

I had the Colerain Swamped 50 cal barrel inlet for me as well as the siler flintlock and trigger.

There is a lot of wood left on the precarved piece of high grade (not top grade $$) curly maple and I have plenty of hardware to install. The owner (Ryan I believe) helped me pick out the hardware (furniture?) to make this period correct and uniquely mine. I'm excited.

After reading a little bit here, I went back to the computer and pulled out the credit card and ordered a few more books! I don't have the titles at hand but picked up some nice ones on building techniques and carving patterns and engraving patterns and a very good looking book on learning to engrave (I'll me a long time practicing with that book long after this rifle is built I'm sure!).

So, I would appreciate any comments, assistance, critiques and so on as I go. I'll try to keep my progress well documented.

My first question today is about tools.

It's obvious to me now I am woefully under-tooled.
Since inletting my breech plug is first on my task list I'll be using my hand carving chisels which I'm confident I have enough of, but files are lacking.

What are your suggestions for rasps and files? Both for wood and metal of course.
 
Last edited by a moderator:
You'll get lots of good advice here.
Among many things, get the Nicholson #49 and #50 cabinet makers rasps. Best price I found, 8 months ago was from Boggs Tool.
They have any and all metal files you might want too.
Good luck and have fun!
 
Before you anticipate carving and engraving, read some books or tutorials on inletting and stock shaping and the order of performing the various tasks of building a MLer......Fred
 
Before anticipating carving or engraving, build at least 3 to 5 rifles. Get the building skills down first, then work on the other stuff.

And remember, no matter how well you build one, a poorly carved & or a poorly engraved rifles is a poor looking rifle...... Nutherwords it could be the best piece of wood in the worsld, but if the carving & engraving is poor, it is still a poor looking rifle....... :shake:

So learn to build them good first, then learn to carve to get the skills to match the build. After that, learn to engrave to match the building & carving skills. IMHO.

:thumbsup:
 
Oops! I meant to say "breech" instead of "breach plug" but no matter, I'm with you and ready to begin.

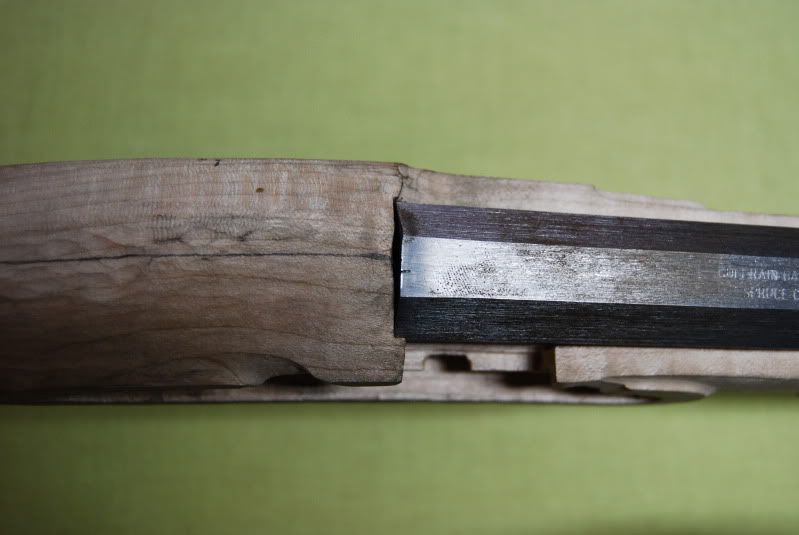
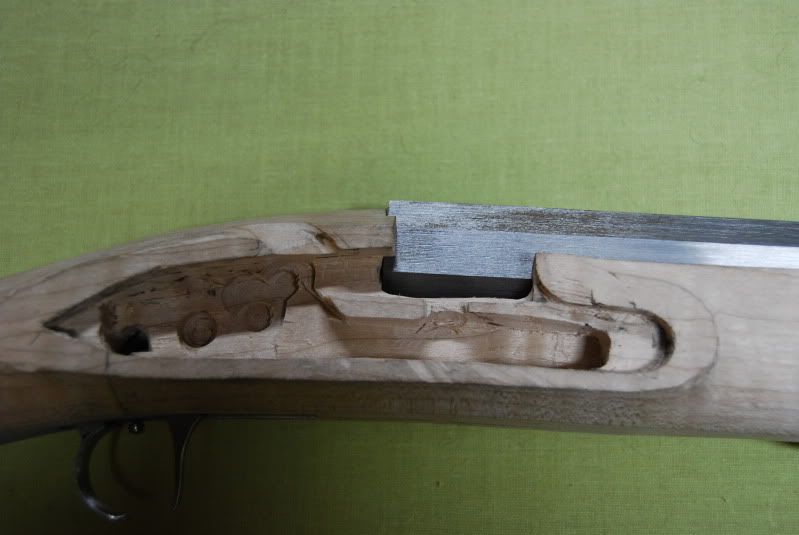
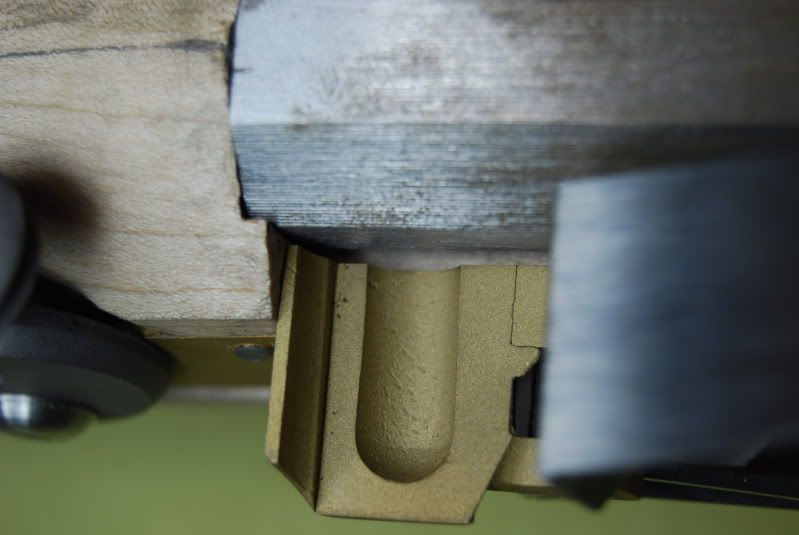
Here's a "before" set of pictures, comments are welcomed!

DSC_5754.jpg

The pencil line and the mark on the barrel came as is with the parts.

DSC_5755.jpg


DSC_5802.jpg

This is showing I have a lot of room to work with to get the pan to go against the barrel and I think you can see how high the breech is in the "Pre-inlet" channel.
 
Thanks, I'll check them out and add them to my shopping list as needed!!

I'm counting on the good advice and from what I've read in past posts, this should be a great experience!
 
Flehto and Birddog6,

I've done a bit of carving all my life. Usually art and holiday scenes and designs. I don't do animals or people but I have done good work on designs that were presented as gifts. I'm no pro but I've got some time behind the gouge.

Having said that, I'm going to put my pride aside and follow good solid advice and concentrate on building the rifle first. If (a BIG if) I practice and put out some test carves I'll be sure to run them by the group before attempting any work on this rifle.

Nothing worse than asking for advice then ignoring it to put the brakes on the help!!! :bow:
 
In case you haven't read all of the threads on starting a precarve build, find out where the face of your breech plug is located on the side of the barrel, then figure out where the touch hole is going to go. Inlet the lock 95% of the way, then move the barrel back so that your touch hole location is in the center of the pan. It looks like your barrel isn't seated all the way in the mortis, so you may have to do a little more fitting on the barrel depth.

A majority of the time with precarves, you will need to move the barrel back or else you'll run into all kinds of problems.
 
I've read all I can find here, and I still have been directed to others I didn't see. I'll be searching around for more.

I picked up a very nice book that goes into some good details that I'll be following too.

Thanks.

I will be picking up a set of cheap rasps and files to get started but will be upgrading to the better files soon. I am anxious to get some work started on this even if it's a little bit.

Question:
On my barrel, the maker's name and caliber are stamped into it. Where do you folks normally position this mark? On top? on the lock side? or on the lock plate side? or, do you hide it under the stock?

I have no cuts yet for pin lugs or sights so I'm going to have to decide soon.
 
Bioprof is right first you need to determine where the touch hole will be located. To do this reinstall your breech plug, run a dowel or ramrod down the barrel till it bottoms on the breech face. Using an knife blade scribe the rod/dowel at the muzzle.

Take a black or blue sharpie marker and mark the flat of the barrel where the pan touches from the breech end up 1". Now lay the rod/dowel on the side of the barrel aline the scribe mark with muzzle (you can tape the rod fast with a stip of masking tape at the muzzle only!) Where the end of the rod/dowel is the face of your breech plug. Mark this on the barrel using a scriber, this is the location of the face of the breech plug.

If your using a touch hole line mark a line 1/2 its diameter in front of this line (example 1/4" liner mark 1/8" ahead of breech face). This is the location of your touch hole.

Now reistall the barrel and lock and see where the touch hole is in relationship to the pan. Even with a swamped barrel you can move it back some. If its too far you may have to grove the face of the breech plug (I don't like to do this).

Also don't foget to check the fit of the bottom three flats of the barrel in the inlet.
 
Isn't the breech plug installed? The stamping should be on the bottom flat of the bbl as installed in the stock and it seems the little chisel mark is for breech plug orientation?....Fred
 
ehoff said:
Bioprof is right first you need to determine where the touch hole will be located. To do this reinstall your breech plug, run a dowel or ramrod down the barrel till it bottoms on the breech face. Using an knife blade scribe the rod/dowel at the muzzle.

Take a black or blue sharpie marker and mark the flat of the barrel where the pan touches from the breech end up 1". Now lay the rod/dowel on the side of the barrel aline the scribe mark with muzzle (you can tape the rod fast with a stip of masking tape at the muzzle only!) Where the end of the rod/dowel is the face of your breech plug. Mark this on the barrel using a scriber, this is the location of the face of the breech plug.

If your using a touch hole line mark a line 1/2 its diameter in front of this line (example 1/4" liner mark 1/8" ahead of breech face). This is the location of your touch hole.

Now reistall the barrel and lock and see where the touch hole is in relationship to the pan. Even with a swamped barrel you can move it back some. If its too far you may have to grove the face of the breech plug (I don't like to do this).

Also don't foget to check the fit of the bottom three flats of the barrel in the inlet.
I will make this the very next operation. Thanks.
 
flehto said:
Isn't the breech plug installed? The stamping should be on the bottom flat of the bbl as installed in the stock and it seems the little chisel mark is for breech plug orientation?....Fred
No, it came un-installed. But when I ordered it, I as told it would be ready to go (fitted?) but I'll double check with you guys first for sure.
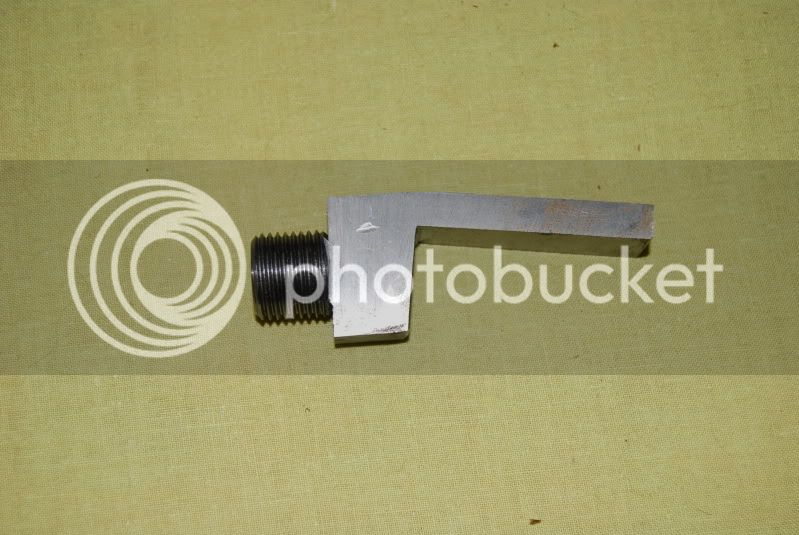
DSC_5781.jpg


DSC_5784.jpg


I didn't notice any mark on the plug, but I wasn't looking for one either.

I've read recently that leaving the tang square has been known to create or allow cracking or chipping. And that a nice pointed or curved shaping of the tang is period correct and eliminates this chipping and cracking upon occasion issue.

What do you guys say? After doing the proper fitting of the plug to the breech, is this the proper time to do any tang shaping? I'm thinking a simple rounded point would be nice.
 
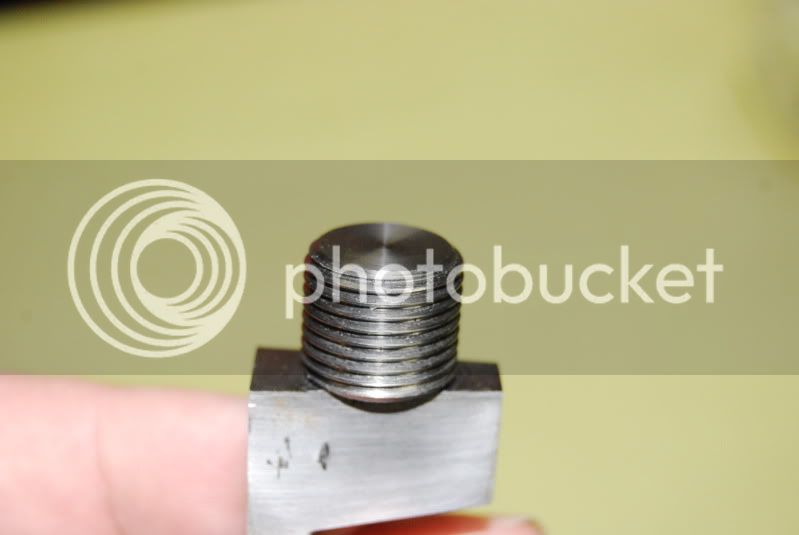
That plug is fitted to the barrel, that is why there is a witness mark on the bottom flat of the barrel. If you look at the bottom of the breech plug you will find a corresponding mark. Match these up when you screw it in and you're set to go.
 
rigmarol---Did the barrel come at least TAPPED for the breech plug?
 
Mike Brooks said:
That plug is fitted to the barrel, that is why there is a witness mark on the bottom flat of the barrel. If you look at the bottom of the breech plug you will find a corresponding mark. Match these up when you screw it in and you're set to go.

Sounds good. I didn't notice the mark on the bottom of the breech plug but at the time, I was thinking the maker's mark was supposed to be on top so I didn't look on the bottom of the breech plug. I'm sure it's there based on what I'm reading.
 
If leaving the tang square means leaving the rear of the tang square as I think it does there is not going to be a problem with splitting the stock if you remember one thing.

There must be a small open space between the rear of the tang and the wood.
Put another way, when your inletting the tang the sides should be tapered some and you should use a very sharp tool like a pointed Exacto knife to cut the wood away using the sides of the tang as a guide.

At the rear of the tang, use a chisel to remove about 1/64 to 1/32 of an inch extra leaving this gap.
This gap will allow the barrel to compress the wood over the years where the breech of the barrel meets the wood, as it is fired without trying to shove the end of the tang against the mortice.

If this is done, no cracking will occure.

Actually, this gap is needed even if the tang has been filed to a round shape or a fingernail shape.
This gap at the rear should be on every muzzleloader.
 
The other way to deal with wood splitting behind the tang, is to file a "Draft", or angle, to the underside of the rear of the tang, so that if the tang moves rearward, it will move UPWARD, too.

The Tang should never be inletted with the idea that its the "recoil Lug" for the barrel. Instead, the wider portion of the stock at the back of the barrel is your recoil lug in a MLing rifle, or shotgun. Part of annual maintenance should include some checking of the marriage of the tang to the stock, to see if recoil has elongated the hole for the tang bolt, or if there is any other evidence that recoil has moved the tang rearward. Is there evidence of crushed wood at the back of the barrel mortise? At the back of the tang? I know lots of builders today who use Epoxy resin to bed their barrels at these points, so that the wood will not be compressed or damaged as as result of firing and use. A well fitted and inletted stock goes a long way to keeping this kind of thing from becoming a problem, whether the barrel and tang are bedded with epoxy resin, or varnish and newspaper, or simply inletted so closely that the wood to metal contact is almost perfect. I have yet to meet a serious gun builder who is not still seeking that ultimate, " perfect " inletting on his gunstocks. If you get a chance to visit Dixon's Gunmaker's Fair some July, or get down to the Contemporary Gun builders show in Lexington, Kentucky some time, you will see extraordinary works of art that represent the best is skilled workmanship in inletting metal to wood in guns. It can be, and Is being, done. :hatsoff:
 
Back
Top