• Friends, our 2nd Amendment rights are always under attack and the NRA has been a constant for decades in helping fight that fight.

    We have partnered with the NRA to offer you a discount on membership and Muzzleloading Forum gets a small percentage too of each membership, so you are supporting both the NRA and us.

    Use this link to sign up please; https://membership.nra.org/recruiters/join/XR045103

My Lancaster 50cal build

Muzzleloading Forum

Help Support Muzzleloading Forum:

This site may earn a commission from merchant affiliate links, including eBay, Amazon, and others.
If that is a Colerain barrel, good chance the breechplug is NOT fitted properly..... The last 5 I used were not properly fitted. It may have a index mark, but on a Colerain that apparently means nothing except that is where they stopped & stamped the barrel name & put an index mark... It dang sure doesn't mean it is fitted......

Clean the end of the plug off.

Take a Q'tip & clean the face of the barrel breech, inside the hole the breechplug goes where the barrel will butt to the breechplug.
Now take a black permanent marker or some blue layout dye & color the end of the breechplug.

Screw the breechplug in & take it to the index mark.

Take the breechplug out & look at the face of it.

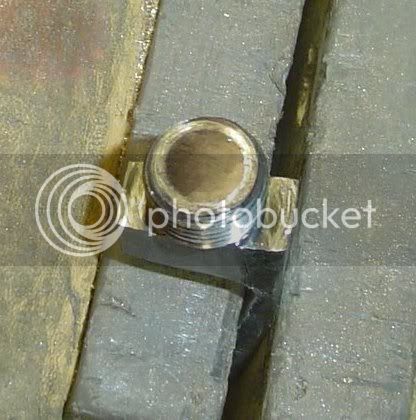
It should look similar to this. I just smugged mine with inletting black, but you get the idea.
Dsc08621.jpg


If it doesn't have the obvious ring marked on it where the barrel seated to to the plug, it needs to be refitted to the plug.

I suggest you get a new breechplug & refit it.. Believe me, that is MUCH easier than going all the way around with the old one & refitting it, unless you are experienced at doing this task. IMHO. And whatever ya do, don't grind on the end of the barrel. :shake: Plugs are cheap...... barrels are not........ Filing the end down on a straight barrel with a square is one thing. Doing it to a tapered or swamped barrel is a whole nuther can of worms...... These particular worms are notorious for eating into your wallet.....
:(
 
Before I set my breechplug I wanted to mark where the breechface was going to be and how it lined up with the lock since it was already inlet as was the trigger and barrel.

What I'm seeing isn't matching what I think I should be seeing based in what I've read.

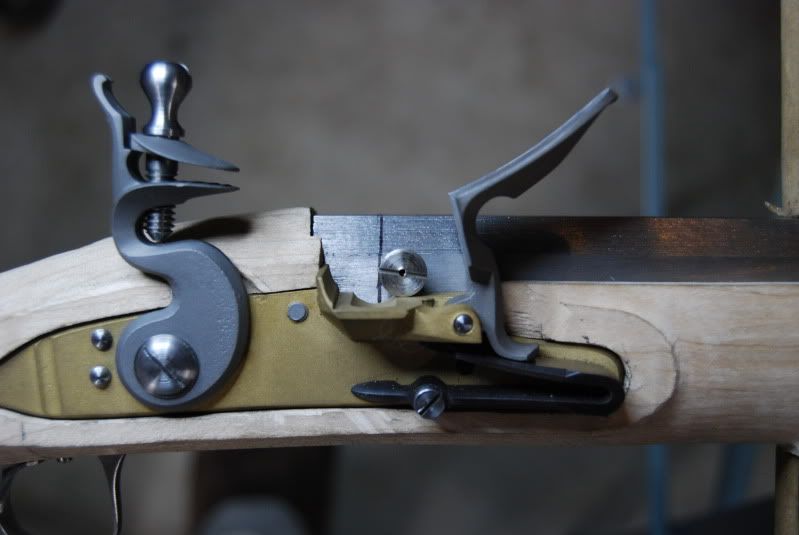
Here is a picture of my lock in place and barrel in place and a line drawn showing where the breech face will be and I've placed my liner where I think it should be placed (not drilled yet) and it's way off.
DSC_5808.jpg


So, do I inlet the barrel back more? if so, how is this going to effect my inletting for the swamped barrel?
 
I'd recommend moving the barrel back a bit. You just about always have to do this with precarves. It shouldn't affect the fit of the barrel in the barrel mortis much even though you have a swamped barrel. You only need to move it about a quarter of an inch or less.

If you just drilled a touch hole, you could get it closer to the breech face and then you wouldn't have to move the barrel back so much. You could then cone the inside of the touch hole which isn't hard to do. This would achieve the same results as using a touch hole liner.

Using a smaller touch hole liner would also achieve the same purpose of moving the touch hole further back.
 
Thanks for the quick reply!

I'd like to use the liner so I'll go ahead and begin moving the barrel back a bit. I was worried about messing up the fit of the swamped barrel, it fits so nice right now.

Thanks again.
 
The barrel definitely needs to go back. IMHO. And it won't hurt anything as far as the inlet, as you are only moving it back a little.

The tang in not inlet..... :confused: Right ??

For some reason that vent liner looks Big ? if it is I would go to a 1/4" one. Several reasons.

1: With a big vent liner in a .50 bore, when you run the jag in the patch catches on the vent liner hole.
2: By starting with a 1/4" one, you have room for error, should one occur. You can go to the next size up (5/16") if need be.

Also, if you do go with a 1/4" vent liner, use a Ampco bronze allow vent liner & cone it on the inside & ever so lightly on the outside. Bout a .070" vent hole in it. Just a tad of Neverseize on the threads & just Barely snug it in...... You will always be able to get it out by doing so & easy to replace.

:thumbsup:
 
Birddog6 said:
The barrel definitely needs to go back. IMHO. And it won't hurt anything as far as the inlet, as you are only moving it back a little.

The tang in not inlet..... :confused: Right ??

For some reason that vent liner looks Big ? if it is I would go to a 1/4" one. Several reasons.

1: With a big vent liner in a .50 bore, when you run the jag in the patch catches on the vent liner hole.
2: By starting with a 1/4" one, you have room for error, should one occur. You can go to the next size up (5/16") if need be.

Also, if you do go with a 1/4" vent liner, use a Ampco bronze allow vent liner & cone it on the inside & ever so lightly on the outside. Bout a .070" vent hole in it. Just a tad of Neverseize on the threads & just Barely snug it in...... You will always be able to get it out by doing so & easy to replace.

:thumbsup:

The tang has not been inlet yet, I wanted to get the breech location correct first.

The touchhole is 1/4"-28 Stainless.
The picture may make it look bigger because the hole hasn't been drilled and tapped yet, I have it setting on the outside of barrel to show the position.

After looking at it a bit closer, the outside diameter where the slotted portion is, measures out at 3/8" Where the threaded portion is actually 1/4", so I could actually move the touchhole liner in the picture a little bit over the line marking the breech face and still clear the threads.

I'll begin moving the barrel back a little right away.

Just to be clear, my goal is to end up with the touchhole centered horizontally with flash pan, but I'm reading a mix of opinions on how high or low the flashhole should be vertically.

I thought lower was better but some are saying it should be level with the top of the flat part of the pan.

I read that a flintlock flashhole doesn't have to be positioned nearly as exact as a percussion drum does but while I'm here, why not do it the best way?

I'll work slowly on the set back of the barrel in case I get some good advice.

Thanks all.
 
"Inletting Black" or whatever you use, I can't find anything like it in any of the hardware stores around me.

Could someone give me a brand name I can search for or to use to make phone calls to try and find?

I need to mark both metal and wood for high spots.

Also, is anyone using anything like "Dykem" if so, where can I buy it other than mail order?
 
http://www.trackofthewolf.com/(S(qw...Id=9&subId=54&styleId=193&partNum=INLET-BLACK

That is a link to the inletting black that Track of The Wolf sells. Some guys use lip stick and some use the soot from an oil lamp. I've even used a carpenters pencil. You just need something you can put on the part that will mark the wood anywhere the part is touching. If you use inletting black use it very sparingly as it takes very little to transfer all you need to know.
 
Last edited by a moderator:
rigmarol :

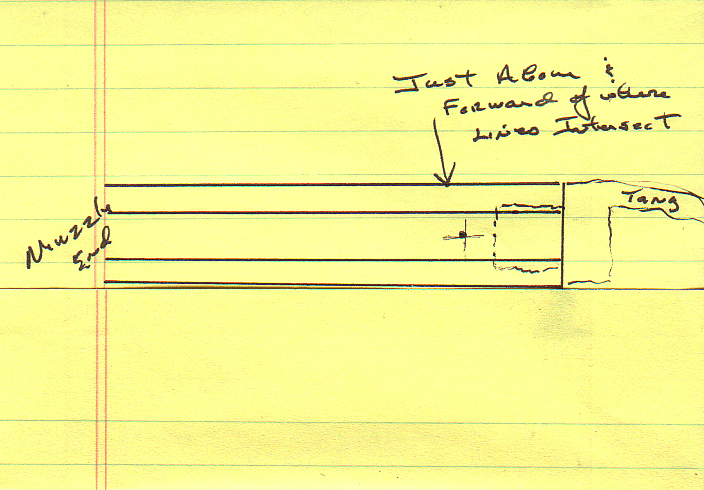
You want the vent liner hole Center of the barrel flat, or ? just barely above center. Similar to this. I prefer my vent liner threads Not intersect with the breechplug threads, as that just makes a place for moisture to stay & fouling to accumulate.

Image1.gif


This is LH but just reverse the image.

Lay the breechplug up on the barrel outside where the flat is the vent liner will go, mark a line on the barrel flat right in front of the breechplug face to show the depth it is in the barrel.

Set the vent liner on the barrel & move it 1/16" away from your breechplug mark. Scribe a line on the flat where the center of the vent liner is, so now you have 2 parallel lines scribed on the barrel.

Now scribe a line in the center of the barrel lat parallel with the barrel flat. Now you have that + mark on the barrel & know where you put the punch mark for your drill pilot hole.

Now put the lock in the inlet, put the barrel in the inlet, look straight across top of the flashpan & You can now see where the barrel needs to go to make a correct vent hole location.

:thumbsup:

Keith
 
I like the lipstick method of inleting. Cheap red lipstick and an old tooth brush to spread it and even it out on the part. If you don't even it out you will get false high spots. I tried the inleting black and had a little trouble controling it. Hard to get off the fingers too. Could be just the brand I had,don't know.Anywho,thats my 2 cents.
 
If you decide to use lipstick, just get some color that your wife wouldn't be caught dead using.
Something like bright orange or fluorescent pink. :grin:

Nothing like the wrath of a woman who thinks you've been using "HER THINGS". :rotf:
 
Thanks guys on the the inletting black and lipstick and soot and pencil ideas.

I tried using the carpenter's pencil but it just doesn't transfer will for me.

I should have thought about the soot idea, I use it in my reloading modern cartridges.

I'll try the lipstick idea next. I'm sure the wife or one of my daughters has something they are willing to part with... I just hope my Sone doesn't offer anything... LOL just kidding.

By the way, I finished up moving my barrel back about 1/8" or so this evening. It took me a good solid 3 hours and loved every minute of it.

I took some pictures to document my progress but I'm sure it's nothing special to you experienced guys. I have gap I may post a picture of if I can't solve it but I think I'll be ok.

Thanks for all the help on locating the flash hole, it was invaluable. I'm just stupid enough to have tried building it as it came if not for this forum. Great help.
 
Birddog6 said:
rigmarol :

You want the vent liner hole Center of the barrel flat, or ? just barely above center. Similar to this. I prefer my vent liner threads Not intersect with the breechplug threads, as that just makes a place for moisture to stay & fouling to accumulate.

Image1.gif


This is LH but just reverse the image.

Lay the breechplug up on the barrel outside where the flat is the vent liner will go, mark a line on the barrel flat right in front of the breechplug face to show the depth it is in the barrel.

Set the vent liner on the barrel & move it 1/16" away from your breechplug mark. Scribe a line on the flat where the center of the vent liner is, so now you have 2 parallel lines scribed on the barrel.

Now scribe a line in the center of the barrel lat parallel with the barrel flat. Now you have that + mark on the barrel & know where you put the punch mark for your drill pilot hole.

Now put the lock in the inlet, put the barrel in the inlet, look straight across top of the flashpan & You can now see where the barrel needs to go to make a correct vent hole location.

:thumbsup:

Keith

Keith, I did it exactly as you suggested (as well as others and what I've been able to read). I just took it very slow and eventually everything moved into place. I haven't drilled the hole for the liner yet but I am in the perfect location to do it when I get to that part. Thanks for the sketch, it was perfect for me and answered my question just right. Thanks.
 
I guess I'll be inletting the breech plug and tang next. I installed the plug and all looks good to go as far as I can tell based on what I'm reading here and in my books. I'm able to snug up to the witness marks perfectly with a vice and 10" adjustable wrench.

When you guys talk about putting anti-seize on the threads of the plug, are you talking about a lubricant so the plug can be easily disassembled later? I guess I assumed once it was installed it was there forever. Why would I need to take the breech plug back off later?

What product name are you using for this anti-seize "stuff"? I was going to go with a lock-tite product that allows for disassembly (not the permanent kind that requires heat to take apart).

Anyway, back to my tang, Is there an optimal length I should be looking at or can I use the whole length? I'm planning on cutting a typical point with shoulders but I'm not sure of the right length.

I have my coping saw and files ready but I'll wait on the group to comment first.

Thanks guys, you really are great.
 
Yes, it is a lubricant to prevernt rusting, gaulding, etc. that is also heat resistant. You can get Antizeize at any NAPA store & some other auto parts stores. Get as small a can as you can get & get non aerosol. Good stuff & a can will last you a lifetime. Don't know why they don't sell it in 1 oz cans. You may have that breechplug out 10 times before ya a re done. You will have it out again to finish the vent liner installation on the inside of the barrel. Just a dab IN the barrel will do it.

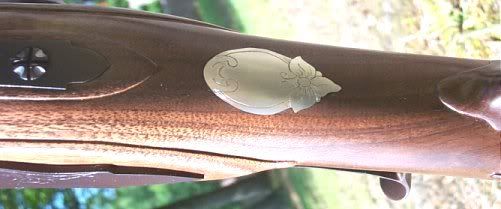
Length of the tang & shape is to emulate what style you are building. I personally don't like pointed tangs, as I have seen many of them split the wood at the point. I do like thumbnail tangs & other shapes, just don't care for a pointed one. If I were to use a pointed one, it would be a .40 cal or under to keep the recoil down. But the tang shape should fit the style of the rifle. This is on a Jaeger rifle I built a few years ago.

Thumbpiece11.jpg


And I glass bed all of my tangs & breeches. You can't see it & it gives you a 100% full breech fit at the most important place. If you are going to glass bed the tang/breech, do it before you drill any holes in the stock or barrel at the breech. Then when done on the rear of the tang towards the comb you want to shave just a tad of relief there, maybe .010 just to be safe.

:thumbsup:
 
Birddog6 said:
Yes, it is a lubricant to prevernt rusting, gaulding, etc. that is also heat resistant. You can get Antizeize at any NAPA store & some other auto parts stores. Get as small a can as you can get & get non aerosol. Good stuff & a can will last you a lifetime. Don't know why they don't sell it in 1 oz cans. You may have that breechplug out 10 times before ya a re done. You will have it out again to finish the vent liner installation on the inside of the barrel. Just a dab IN the barrel will do it.

Length of the tang & shape is to emulate what style you are building. I personally don't like pointed tangs, as I have seen many of them split the wood at the point. I do like thumbnail tangs & other shapes, just don't care for a pointed one. If I were to use a pointed one, it would be a .40 cal or under to keep the recoil down. But the tang shape should fit the style of the rifle. This is on a Jaeger rifle I built a few years ago.

Thumbpiece11.jpg


And I glass bed all of my tangs & breeches. You can't see it & it gives you a 100% full breech fit at the most important place. If you are going to glass bed the tang/breech, do it before you drill any holes in the stock or barrel at the breech. Then when done on the rear of the tang towards the comb you want to shave just a tad of relief there, maybe .010 just to be safe.

:thumbsup:
The shape of your tang (in the picture) in exactly what I was going to go for. I just wasn't sure how long the tang should be. I guess the location of the tang/trigger screw will factor in and probably should get an idea of where that is going to be first huh?
 
I use choke tube lube on the threads of my touch hole liners. The reason that you want to use lube is in case the touch hole opens up and it needs to be replaced. You are right in that it shouldn't ever need to be removed for cleaning.
 
I think I'm spending as much time reading this forum as I am working on my rifle!!! great stuff guys, thank you.

I'm almost ready to start getting my trigger into position. Almost done with my lock and barrel and breech inletting.

What builder's tips can you offer to get this right? I'm putting in a small siler with a set trigger. I've got it inlet so the small adjuster screw falls directly below the sear leg (arm?) and when both triggers are manipulated I am perfectly lined up with the "crotch".

Do I just simply keep inletting deeper and deeper until I get the trigger feel I want? or is more complicated?
 
Some guys do just that, sink them to where they work. And I will add, by doing so they usually work about as well as they look...... :barf:

I don't sink my triggerplates in past the wood, cause I want the triggerplate even with the wood on the bottom of the stock. Thus about 9 out of 10 triggerbars I have to add meat to them to make them taller & reach the sear arm. Also, I don't like 14# of pull on the front trigger, I want about 3#. To get this you have to move it back & get the fulcrum closer to the lift. Well that has it's consequences as well, as when ya do that you just made the set trigger miss the sear arm, etc.

The only way I have overcome all of this is to add meat to the top of the triggerbars & then shape to make the front one light & the rear one reach & etc.

What it boils down to is they don't make a trigger asm. for every stock contour & thickness & etc., so ya take what is avail. & adapt it to work. 95% of the time I use a Davis trigger of one style or another & I like them, they are a good quality for the price, and have been a consistent quality for me. Have used probably 50 of them & no function problems, unless I caused it. My only gripe is they need to make ALL of the triggerbars taller & I have had allot of builders agree that they should be taller, but apparently Davis could care less what the builders think, as I have told them repeatedly.... Chambers does have one made for him by Davis that is taller, but even it is not tall enough at times. Just depends on the rifle.
It's easy to cut a trigger down, & would cost them what ? 10 cents to make them taller ? It is a PITA to build one up & have screwed several up doing it too. Now have a lil jig I made to hold them flat & etc so I can silver solder a piece of 01 tool steel to them. This I can harden & it won't wear.

You have to bend the triggerplate first of all to the shape of the wrist.... ALWAYS bend the triggerplate with the pins & screws in the holes. If you have to bend at a hole or cut area, Heat it first........

When you do bend one, this at times changes allot of things such as where the bars hit the sear now, depth of the bars, tension of the spring for the set trigger, etc. So you have to do some adjustments after ya bend one usually.

I have had them where I put them in & they worked great from a few hrs work. I have also have them where it took me a week of evenings to get one to where it would satisfy me. Now I will admit I am picky as H, but I build it like it is for Me & that way when it goes to a customer, I know it will work properly & consistently & no backlashes on it..... :wink:
 
BD, thanks.

I am installing this in a rough precarve and paid for the initial inletting as an extra. I've and to do a lot of finish inletting on both my barrel and my lockplate (also paid extra for the initial inletting) so I'm thinking, I'm expected to take more wood off and inlet the trigger then bring the wood to the trigger plate. I can't see any other way to make it work. I don't mind this, and in fact if it's by design, I like the fact I have to bring it all together. I just didn't want to make a major mistake by assuming too much or not enough.
As it sits now, the set trigger sets (of course) but the trigger will not even trip the sear. Carefully looking at the locations of the parts shows the trigger is just too low.

I still have plenty of wood to remove I'll try to post a picture of what I'm talking about later.
 

Latest posts

Back
Top