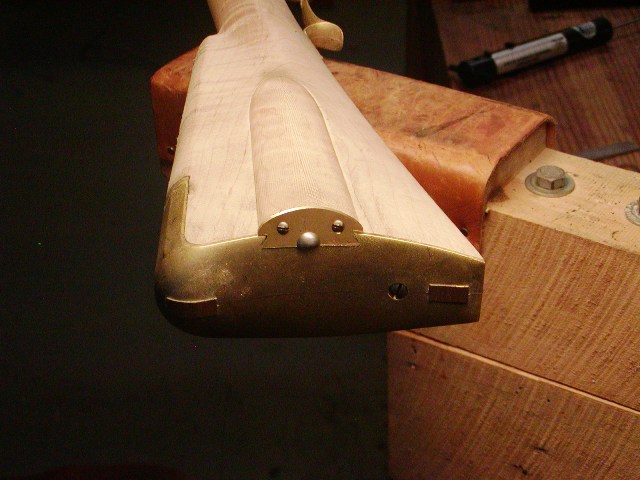
Patchbox on Kibler Woodsrunner

Muzzleloading Forum

Help Support Muzzleloading Forum:

This site may earn a commission from merchant affiliate links, including eBay, Amazon, and others.
Joined
Jan 19, 2017
Messages
56
Reaction score
57
Help please on patchbox. I can't get the spring to lock in behind the buttplate. I sanded the back of patchbox slightly so spring moves freely. When I slide the patchbox on, I don't think its going forward enough for spring to drop down behind buttplate and catch.

Should I file the spring to move the notch closer to the screw? Should I attempt to file a notch in the buttplate?

Any suggestions on this please?

Thank you
Yes, how about a photo so the boys can see what you have or don't have.
Larry
 
Help please on patchbox. I can't get the spring to lock in behind the buttplate. I sanded the back of patchbox slightly so spring moves freely. When I slide the patchbox on, I don't think its going forward enough for spring to drop down behind buttplate and catch.

Should I file the spring to move the notch closer to the screw? Should I attempt to file a notch in the buttplate?

Any suggestions on this please?

Thank you
Try taking a couple of swipes with a piece of sandpaper on either the front of the box cavity or the front of the lid.
 
We are talking about about a one T-shape spring and latch that is driven in like a nail? Check it in a vice to be sure it has reasonable spring tension
I drill a small pilot hole the is even with the edge of the patch box. The top of the hole in the stock needs the wood relieved front and back of the spring part so it can move. Deep down it is of course tight. I make the underside of the catch at a slight angle so it pulls the lid tight. I make the edges of the nail part smooth at first. I usually pull it out a couple of times to make adjustments. Use a putty knife to protect the stock when you pry. . Once I am happy I make some teeth on the side of the spring and set it in a little super glue.

Truth be told, I think it is a mickey mouse system for making a patch box catch. IT is easy though.
 

Attachments

  • KIBSMR.JPG
    KIBSMR.JPG
    1.4 MB
  • catch.png
    catch.png
    3.8 KB
Last edited:
We are talking about about a one T-shape spring and latch that is driven in like a nail? Check it in a vice to be sure it has reasonable spring tension
I drill a small pilot hole the is even with the edge of the patch box. The top of the hole in the stock needs the wood relieved front and back of the spring part so it can move. Deep down it is of course tight. I make the underside of the catch at a slight angle so it pulls the lid tight. I make the edges of the nail part smooth at first. I usually pull it out a couple of times to make adjustments. Use a putty knife to protect the stock when you pry. . Once I am happy I make some teeth on the side of the spring and set it in a little super glue.

Truth be told, I think it is a mickey mouse system for making a patch box catch. IT is easy though.
The Woodsrunner is not like that. Latch sits in an inlet in the lid and held in with a screw. It's also a sliding dovetailed lid.
 
Proud of everyone trying to provide answers without help from the OP adding pictures.
This is one of those jobs, at least for me that I have to see and touch in order to figure it out. Very easy to do, very hard to teach.
 
Like others I took a tiny bit off the front of the lid with a safe-edge file to get it to go that last 1/16". It's a nice feature being slightly oversized because it lets you position the lid exactly where it needs to be and won't be too loose unless you file the wrong thing or overdo the adjustments.

Don't get too crazy with clearances as the lid will shrink when finished. You can always sand a touch later to make sure it's free, but you can't put the wood back if it rattles.
 
In my case, the metal fit just needed a slight de-burr. More of a slight polish. It was the wood dovetail fit that required very careful sanding. The amounts were very small and I had to touch it up a bit more once I added finish, and then refinish.

Use fine sandpaper instead of the file. Although, someone more experienced than myself may use a fine file.

You did watch Jim's video? It's #2 of 3 you want.
 
Last edited:
On my Woodsrunner I needed to smooth out the buttplate a touch. Following that I just slowly sanded the bottom of the lid till it “clicked”. I am sure yours will go in with a little work.

SR1
 
Like others I took a tiny bit off the front of the lid with a safe-edge file to get it to go that last 1/16". It's a nice feature being slightly oversized because it lets you position the lid exactly where it needs to be and won't be too loose unless you file the wrong thing or overdo the adjustments.

Don't get too crazy with clearances as the lid will shrink when finished. You can always sand a touch later to make sure it's free, but you can't put the wood back if it rattles.
Correct! You can’t put the wood back. But if a bit too much is taken off the front bevel you can glue a thin strip of leather on the front bevel of the patch box lid. Just enough compression to work well, no rattles and snug secure ‘click’ of the spring. Useful also if the wood shrinks as it ages.
 
Back
Top