• Friends, our 2nd Amendment rights are always under attack and the NRA has been a constant for decades in helping fight that fight.

    We have partnered with the NRA to offer you a discount on membership and Muzzleloading Forum gets a small percentage too of each membership, so you are supporting both the NRA and us.

    Use this link to sign up please; https://membership.nra.org/recruiters/join/XR045103

Phat girl slymm - A CVA Kentucky build

Muzzleloading Forum

Help Support Muzzleloading Forum:

This site may earn a commission from merchant affiliate links, including eBay, Amazon, and others.
Joined
Mar 12, 2020
Messages
1,197
Reaction score
1,345
Location
New South Wales , Australia
Well things being what they are with it damn near impossible to import anything and gun building supplies few and far between in the great land of Oz I snapped up an old 50 cal CVA Kentucky kit.
A 1987 kit still in the box and kinda close to all there.
This is an attempt at the story of the build.

Now I know half of you are cringing and I know that the old CVA Kentucky is not exactly the pinnacle of Long Rifle builds but I thought what a great piece to practice the craft.
This is what most nice ones look like. k7f4xbaq91671.jpgThey are chunky at best.
Well this is a gift to a freinds 2 teenage boys so I decided to trim er down a smidge.
Well I am finished now but here are the photos along the way.
P1100224tn.JPG


20220522_085233tn.jpg


Progress:
- Firstly I decided the brass spacer was not an option so just left it out.
- Took about an hour to get the buttplate nice and tight to the wood
- Inlet the lock in about 10 minutes
- Inlet the barrel so it sat well at the back and most of the way along (slight warpage in front end couldn't be helped).
- Had to set the barrel back to get the nipple to line up and play a little with the nipple and hammer.
- Put the corner in the tang and bent it
- Set the tang down in the wood and relieved the back of the barrel for the rear lock screw.
- The Lock screws were missing so I rethreaded a couple of others.
- Fitted the trigger. Had to bed it out and recut the threads and countersink to line up.
- Inlet the trigger guard ever deeper
- Cut the barrel off
P1100227tn.JPG


- And the stock
- Inlet the rod thimbles
- Took to removing wood
- narrowed the grip maybe 6-8mm
- Narrowed the comb right down
- Rounded the rear forend
- Went to town on the forend such that it is about 3mm fatter than the barrel and fluted.

Before and after of forend
P1100231tn.JPG


P1100234tn.JPG


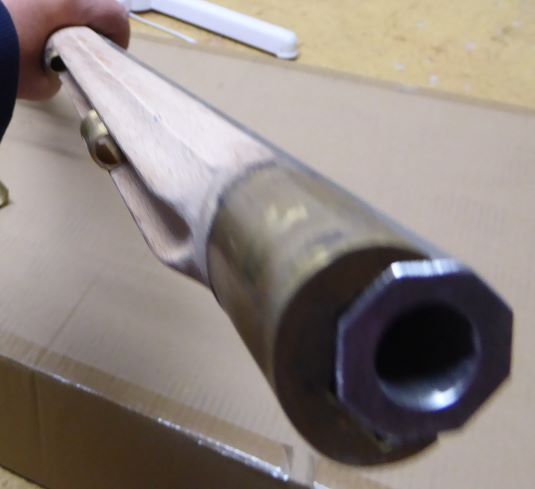
- Recut the muzzle and crown
- Shaped the muzzle end
- Made a forend cap (took a coupla goes). Waiting on the rivets to rivet it on.
- Shaped the lock panels
- Attempted carving
P1100229tn.JPG


And here is the result. Missing a few bits like sideplate but I like it and light as a feather.20220828_120144.jpg20220828_120322.jpg
 
Well things being what they are with it damn near impossible to import anything and gun building supplies few and far between in the great land of Oz I snapped up an old 50 cal CVA Kentucky kit.
A 1987 kit still in the box and kinda close to all there.
This is an attempt at the story of the build.

Now I know half of you are cringing and I know that the old CVA Kentucky is not exactly the pinnacle of Long Rifle builds but I thought what a great piece to practice the craft.
This is what most nice ones look like.View attachment 158807They are chunky at best.
Well this is a gift to a freinds 2 teenage boys so I decided to trim er down a smidge.
Well I am finished now but here are the photos along the way.
P1100224tn.JPG


20220522_085233tn.jpg


Progress:
- Firstly I decided the brass spacer was not an option so just left it out.
- Took about an hour to get the buttplate nice and tight to the wood
- Inlet the lock in about 10 minutes
- Inlet the barrel so it sat well at the back and most of the way along (slight warpage in front end couldn't be helped).
- Had to set the barrel back to get the nipple to line up and play a little with the nipple and hammer.
- Put the corner in the tang and bent it
- Set the tang down in the wood and relieved the back of the barrel for the rear lock screw.
- The Lock screws were missing so I rethreaded a couple of others.
- Fitted the trigger. Had to bed it out and recut the threads and countersink to line up.
- Inlet the trigger guard ever deeper
- Cut the barrel off
P1100227tn.JPG


- And the stock
- Inlet the rod thimbles
- Took to removing wood
- narrowed the grip maybe 6-8mm
- Narrowed the comb right down
- Rounded the rear forend
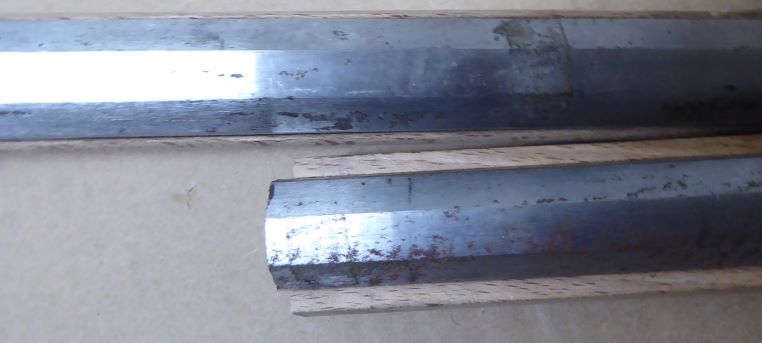
- Went to town on the forend such that it is about 3mm fatter than the barrel and fluted.

Before and after of forend
P1100231tn.JPG


P1100234tn.JPG


- Recut the muzzle and crown
- Shaped the muzzle end
- Made a forend cap (took a coupla goes). Waiting on the rivets to rivet it on.
- Shaped the lock panels
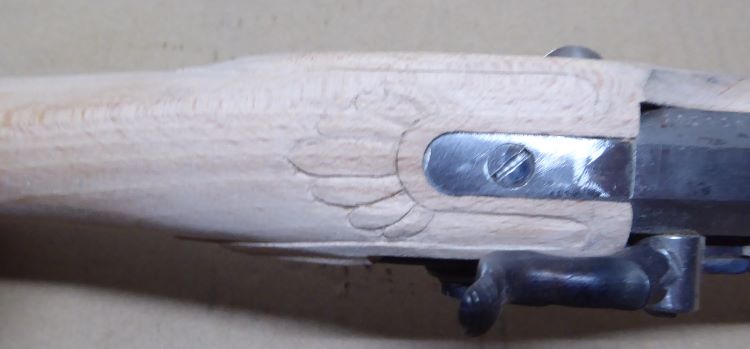
- Attempted carving
P1100229tn.JPG


And here is the result. Missing a few bits like sideplate but I like it and light as a feather.View attachment 158808View attachment 158809
Great job! What stain and sealer did you use? I'm getting everything together to do a Traditions kit for a fall project.
 
I like it. Have a look at this. https://www.youtube.com/channel/UC2GpAxhEDhFQG7eOVZaBMYA/videos He builds guns without bothering about being able to get parts.
Thanks Bill
I have watched his stuff. Damn he can work at speed!:)
I don't have his skill or confidence.
And you have a better eye for sure

Also not into getting jailed. I am not allowed to get Parts and build a gun and get it registered or get the final part undertaken by an armourer (as was the case in QLD).
I must now find parts that are registered and turn them into a gun.
 
Last edited:
Great job! What stain and sealer did you use? I'm getting everything together to do a Traditions kit for a fall project.
Stain was thinned down leather dye topped with Tru oil which was taken back to a low sheen and waxed.
Just remember remove all the wood that is in the wrong place. There is plenty that can go.
 
Stain was thinned down leather dye topped with Tru oil which was taken back to a low sheen and waxed.
Just remember remove all the wood that is in the wrong place. There is plenty that can go.
Thank you for the help. The stock I have is Beech I think, so I hope it doesn't leave a bunch of bleached out areas.
 
Thank you for the help. The stock I have is Beech I think, so I hope it doesn't leave a bunch of bleached out areas.
Yeah, Mine is also beech. You need a water or alcohol dye. I did a few test bits on the bit of stock I cut off. On the basis you know what part of the stock you are going to take back you can do tests on the stock before the taking back or in the barrel channel.
 
Yeah, Mine is also beech. You need a water or alcohol dye. I did a few test bits on the bit of stock I cut off. On the basis you know what part of the stock you are going to take back you can do tests on the stock before the taking back or in the barrel channel.
I'll try that. I built another Traditions kit a few years ago and used a Min-wax stain with Tru-oil as the sealer, but I want a red stain on this one, like a cherry maybe.
 
Well things being what they are with it damn near impossible to import anything and gun building supplies few and far between in the great land of Oz I snapped up an old 50 cal CVA Kentucky kit.
A 1987 kit still in the box and kinda close to all there.
This is an attempt at the story of the build.

Now I know half of you are cringing and I know that the old CVA Kentucky is not exactly the pinnacle of Long Rifle builds but I thought what a great piece to practice the craft.
This is what most nice ones look like.View attachment 158807They are chunky at best.
Well this is a gift to a freinds 2 teenage boys so I decided to trim er down a smidge.
Well I am finished now but here are the photos along the way.
P1100224tn.JPG


20220522_085233tn.jpg


Progress:
- Firstly I decided the brass spacer was not an option so just left it out.
- Took about an hour to get the buttplate nice and tight to the wood
- Inlet the lock in about 10 minutes
- Inlet the barrel so it sat well at the back and most of the way along (slight warpage in front end couldn't be helped).
- Had to set the barrel back to get the nipple to line up and play a little with the nipple and hammer.
- Put the corner in the tang and bent it
- Set the tang down in the wood and relieved the back of the barrel for the rear lock screw.
- The Lock screws were missing so I rethreaded a couple of others.
- Fitted the trigger. Had to bed it out and recut the threads and countersink to line up.
- Inlet the trigger guard ever deeper
- Cut the barrel off
P1100227tn.JPG


- And the stock
- Inlet the rod thimbles
- Took to removing wood
- narrowed the grip maybe 6-8mm
- Narrowed the comb right down
- Rounded the rear forend
- Went to town on the forend such that it is about 3mm fatter than the barrel and fluted.

Before and after of forend
P1100231tn.JPG


P1100234tn.JPG


- Recut the muzzle and crown
- Shaped the muzzle end
- Made a forend cap (took a coupla goes). Waiting on the rivets to rivet it on.
- Shaped the lock panels
- Attempted carving
P1100229tn.JPG


And here is the result. Missing a few bits like sideplate but I like it and light as a feather.View attachment 158808View attachment 158809
that is very nice, and the energy you put into affection for a family member is exquisite the world should have more like you...
 

Latest posts

Back
Top