• Friends, our 2nd Amendment rights are always under attack and the NRA has been a constant for decades in helping fight that fight.

    We have partnered with the NRA to offer you a discount on membership and Muzzleloading Forum gets a small percentage too of each membership, so you are supporting both the NRA and us.

    Use this link to sign up please; https://membership.nra.org/recruiters/join/XR045103

re powder measures

Muzzleloading Forum

Help Support Muzzleloading Forum:

This site may earn a commission from merchant affiliate links, including eBay, Amazon, and others.

scobrien

40 Cal.
Joined
Dec 20, 2009
Messages
197
Reaction score
1
I hope not to overload this section of the forum with more photos of measures, but I started this new topic in response to Beaverman. He requested some close up shots of the measure that was included in my earlier "new horn" post. Here they are along with some others.

The measure that accompanies the new horn
SANY0034.jpg


Top measure is for my Dickert rifle. Bottom one is a repeat of first pic
SANY0031.jpg


This one is for my Bucks Co. rifle
SANY0025.jpg


This little fella is for one of my pistols.
SANY0026.jpg
 
OK great and fine work from one O'Brien to another. I'm about to make some and am interested in the pouring lip. Could you post a close up of the pouring lip. Thanks OB
 
Steve, a couple of questions....how did you color your measure and what did you use to ink the scratching? I have heard that bone will "run" when inking the lines and wondered if the antler does also? If so, what do you do to prevent this? Thanks. Emery
 
horner75 said:
Very nice measures and photo's, but this is the Craftsman section! Tell us how you make them!

Rick :idunno:

Sorry about that :wink: Enclosed is a photo of the tools I use with the exception of emery cloth used to remove tooling marks. If I am feeling lazy, I also use a dremmel with a cutter bit to hog out excess material from the powder cavity after I have drilled it out with a 5/16 bit. If I am not, I periodically toss the antler for about 10 min. in low boiling water to soften it and then scrape away material with a pocket knife and a scraping tool I made (it is the piece of flat stock second from left of the antler).

All of the exterior shaping is done with assorted files. I have to card/clean them often as they clog up fast from the antler. I initially free hand lines onto the antler with a pencil to give myself a reference point to follow when I file the grooves.

I just wing it if I am filing flats. Some of the grooves are applied with a small v-gouge or u- gouge, the same for the dot patterns. The scroll pattern on the Bucks Co. and the "little fella" measures were done with a V-gouge.

The vine/flower pattern on the upper two measures was scratched in with the tool to the far left (laying next to the antler). It was made from an old circular saw blade from a lumber mill. The hook end is sharpened to a tapered point and has four squared flats. I re-sharpen it with an oil stone when needed. I also draw these patterns on with a pencil and then follow them with the tool the best that I can. Keeping on the line when making curves is the hardeat part.

Gents, all of this was just figured out through trial and error :grin: . I am always figuring out better methods and the quality has slowly improved over time. I also now try to use the small vise as often as possible to hold the antler in place. This saves fatigue on my left hand. I have tossed many pieces of antler in a junk pile because I messed them up :redface:

P.S. I will answere the staining/coloring questions and post a photo of the pouring lip in a second post.

Again, thank you all sincerely for the fine words!

Steve

The measure on the vice came from the tip of the main beam from the antler in this photo, i finished it last night.
SANY0053.jpg
 
mazo kid said:
Steve, a couple of questions....how did you color your measure and what did you use to ink the scratching? I have heard that bone will "run" when inking the lines and wondered if the antler does also? If so, what do you do to prevent this? Thanks. Emery

The four in the initial photos were colored with dark brown Rit dye. I put enough water in a pan to cover the measure and then pour perhaps a shot glass worth of dye in. I then heat the mix on the stove till it steams and toss the measure in. It only has to stay in for 20 seconds or so. Fish it out and check the color and if you want it darker, repeat.

I do not ink the scratching. The dye does it for me. I then buff the measure down with 0000 steel wool to lighten it up to my liking. The color will stay dark in any recesses.

Yes, antler will allow "run". I got a very splotchy effect on some that I inked in the past as well as some that I used leather dye on. Some antler is worse than others depending on how fresh/weathered they are. The Rit method was a result of experimentation on my part. It leaches through the antler as well, especially in the interior/pithy portion, but is not as touchy as the other two methods and not as critical on the outer layer of antler.

I also sometime color with potassium permanganate. I mix up a tiy bit with hot tap water and apply with a Q-tip until I get the color that I want. I also buff it back some with steel wool.

Here is a photo of one done with PP
SANY0045.jpg


OB--- here is a fine Irish pic of some pouring lips!
SANY0057.jpg


Steve
 
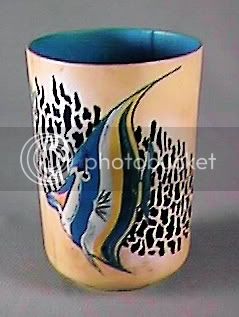
Great; Thanks Steve those are fine looking measures. I'll post some after I get started. I'm a woodturner and turn firewood down almost paper thin then paint it then pierce it with a dental tool. Here's a pix of one of my works. I'm trying to figure out how to use this technique for Blackpowder items? Any suggestions?

_157_Fish_and_Coral.jpg
 
Gorgeous stuff! Steve, could you give some more information on the little tool you used for scratching in the scrimshaw? Thanks.
 
Capt. Fred said:
Gorgeous stuff! Steve, could you give some more information on the little tool you used for scratching in the scrimshaw? Thanks.

I'll see if I can get a close up pic soon and perhaps a give a better discriptive run down.

Thanks
 
Capt. Fred said:
Gorgeous stuff! Steve, could you give some more information on the little tool you used for scratching in the scrimshaw? Thanks.

Capt. Fred; Hope these pics will help to explain more.

SANY0070.jpg


SANY0066.jpg


SANY0068.jpg
 
Back
Top