• Friends, our 2nd Amendment rights are always under attack and the NRA has been a constant for decades in helping fight that fight.

    We have partnered with the NRA to offer you a discount on membership and Muzzleloading Forum gets a small percentage too of each membership, so you are supporting both the NRA and us.

    Use this link to sign up please; https://membership.nra.org/recruiters/join/XR045103

Red’s Incredible Traditions Kentucky Build: Probably not what you would have done…

Muzzleloading Forum

Help Support Muzzleloading Forum:

This site may earn a commission from merchant affiliate links, including eBay, Amazon, and others.
Can you tell us if those flint versions have the same patent/false breech as the percussion versions?

I hate that design. I think I'd hate it more on a flinter.

Thanks.
Yes it does.
 

Attachments

  • Image_2023-03-15 14_51_14_962.png
    Image_2023-03-15 14_51_14_962.png
    325.5 KB
Yes it does.
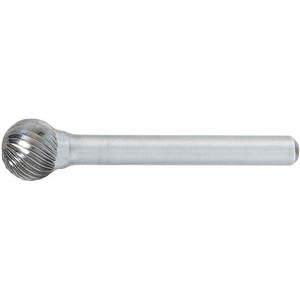
Mine both had that rough textured beveled area around the hole. Fouling clings to it and builds up; also can keep powder from funneling down the hole smoothly. I took a 1/2" ball burr , ground down the outer diameter and wrapped in tape so not to mare the rifling, and attached it to a 3/8" steel rod. Slid it down the bore and spun it a few times by hand . It cleaned the rough texture off and and produced a smooth shiny machined surface that is easy to clean and easier for powder to slide down.
218740-Image-2023-03-15-14-51-14-962.png


OSG-908-1000.JPG
 
The one I did for the customer was a third hand kit from a couple of deceased relatives. I scrounged the butt plate from a parts box along with sights and screws. I think I needed a couple thimbles too.
Then he wanted me to get him black powder, balls, caps, and teach him how to shoot it.
For free, on Sunday, my day off.
I apologized for being so uncharitable that I wouldn't miss church.
Grins
 
@Panama Red that lock panel shaping looks very good 👍
Thanks! And now that the barrel is finished, I’ll get to shaping the tang area. Apparently I have a lot more inletting to do, and some work on the breech plug… I just can’t get this to fit right.
-Red, upping the round count…
IMG_1138 Copy.jpeg
 
Last edited:
Thanks! And now that the barrel is finished, I’ll get to shaping the tang area. Apparently I have a lot more inletting to do, and some work on the breech plug… I just can’t get this to fit right.
-Red, upping the round count…
View attachment 219015
If you open up the left lock panel, you can make it belt fed.
 
Man… this is turning out amazing. Thank you for sharing this and showing what you can do with a little (occasionally a lot) of work.
I’m pretty happy with it so far. As long as it goes “pfff-boom” when I’m done, I’ll be tickled pink.
It’s not near as, umm, ambitious (?) as yours… lol!
Man, I don’t know if you’re just messing with people, or going to actually try it, but I will definitely be watching for the build. Hope it turns out exactly like you want it to!
-Red, smacking popcorn and watching…
 
Today I had a stump grinding job to make a little extra toy money, so I didn’t get to work on “Insert Name of Rifle Here” as much. I did start shaping that nose a bit, and did some shaping up if the tang area. No pic today, as there just isn’t much to show.
I’ve enjoyed reading all around this forum. There are some interesting characters. Reminds me of a fellow we had in our home town whose name was General George Washington Dees. He drilled wells for a living. If the man could have been himself in front of a camera, he would have been world famous. Made Jeff Foxworthy seem like he came from up north. Pure Florida Cracker. Funny as Jerry Clower. He died in his 80’s, working on his well rig. Was using a tree branch as a winch anchor, limb broke off, well rig fell on him… perfect ending for him!
Don’t know why you needed to know this, but now you do. Carry on, characters…
-Red, headed to dinner…
 
I’m pretty happy with it so far. As long as it goes “pfff-boom” when I’m done, I’ll be tickled pink.
It’s not near as, umm, ambitious (?) as yours… lol!
Man, I don’t know if you’re just messing with people, or going to actually try it, but I will definitely be watching for the build. Hope it turns out exactly like you want it to!
-Red, smacking popcorn and watching…

Yeah. I tend to go full frontal nerdity on things.
 
Yeah. I tend to go full frontal nerdity on things.
Now that’s funny!

That half round front half should be interesting. Have you ever done any machining like that, or is this a “jump in with both feet” kind of thing? One way it will be difficult. The other way, it will be just fun to watch, lol! I hope you pull it off either way!
When I renovated my AirStream, I blogged the whole thing on AirForum, a community a lot like this one. Mostly older guys, most of the pretty well off. A good bunch of them that knew what they were doing, and a large percentage that just enjoyed the trailers, but weren’t very, uh, how do I put this gently, handy? Anyways, if I had listened to the overwhelming amount of advice, I never would have even bought he camper, must less tried a resto-mod on it. But I went ahead and did it. Learned a lot.
So go buy that thing, grind it just the way you want to, and even if you burn the barrel in half with a blow torch, it’s your money, and your build. Do it how you want to do it.
And if we are real lucky, “PFF-BOOM”!
-Red, ready to light this candle…
IMG_0575.jpeg
 
Now that’s funny!

That half round front half should be interesting. Have you ever done any machining like that, or is this a “jump in with both feet” kind of thing? One way it will be difficult. The other way, it will be just fun to watch, lol! I hope you pull it off either way!
When I renovated my AirStream, I blogged the whole thing on AirForum, a community a lot like this one. Mostly older guys, most of the pretty well off. A good bunch of them that knew what they were doing, and a large percentage that just enjoyed the trailers, but weren’t very, uh, how do I put this gently, handy? Anyways, if I had listened to the overwhelming amount of advice, I never would have even bought he camper, must less tried a resto-mod on it. But I went ahead and did it. Learned a lot.
So go buy that thing, grind it just the way you want to, and even if you burn the barrel in half with a blow torch, it’s your money, and your build. Do it how you want to do it.
And if we are real lucky, “PFF-BOOM”!
-Red, ready to light this candle…View attachment 219188


Yeah, I’ve done woodworking and metalwork, machining and forging. I’ve always been a relentless tinkerer. My wife will gladly tell you I can’t leave a darn thing how I found it or bought it. So this whole hairbrained idea is pretty keeping in character for me.

Why keep it simple when I can ratchet it up to rediculous?

I blame my dad(an engineer) and my grandpa (a fabricator) for being bad influences.
I took apart every toy I ever got as a kid, so I could figure out how it worked. Sometimes they went back together and worked again, lots of times they didn’t. It was worth the risk to me.
-Red, learning through destruction…
 
IMG_1142 Copy.jpeg

My Southern Woods Colonial Kentucky Mountain Runner (tm) is getting closer! I’ve had her on a 100 grit diet all week, and did some reconstructive surgery on her nose. I’ve still got to install the barrel tenons, drill them, install sights, and fill the gap between the nose cap and the stock. Thinking on it, I used a piece of ply for the spacer to replace the brass that was the exact same thickness as the brass, so I just transferred the gap from the brass spacer to the nose cap. Oops.
I might find a piece of silver something to shim that spot. The contrast would probably look pretty good.
Tried a touch of stain in the barrel channel. The front half and back half definitely take stain differently from each other. Will try pre-stain on her when I finally do it… still have a lot of planning to do for that. I shortened the fore grip 2 inches, thinned down the fore grip push rod channel between the rod and the barrel, and had to relocate the push rod barrels.
Lots of final tweaking to do. A bit more sanding, then on to finishing. Going quite a bit quicker than I thought it would.
-Red, with apologies to Mr Kibler…
 
Back
Top