• Friends, our 2nd Amendment rights are always under attack and the NRA has been a constant for decades in helping fight that fight.

    We have partnered with the NRA to offer you a discount on membership and Muzzleloading Forum gets a small percentage too of each membership, so you are supporting both the NRA and us.

    Use this link to sign up please; https://membership.nra.org/recruiters/join/XR045103

Rust Bluing trough

Muzzleloading Forum

Help Support Muzzleloading Forum:

This site may earn a commission from merchant affiliate links, including eBay, Amazon, and others.

DrTimboone

40 Cal.
Joined
Jan 3, 2005
Messages
390
Reaction score
3
Anybody ever make one of these as described by Laurel Mountain Forge??

"Purchase a length of 2 ½ inch PVC pipe and two end caps. The PVC should be a few inches longer than the barrel you will be bluing. Cut the PVC pipe lengthwise, about 1/3 of the way down, leaving an opening of about 2 inches. Now glue on the two end caps. This will result in a trough long enough to accept the barrel and deep enough to cover the barrel when immersed in water. Now for the actual bluing process."

I am having a hard time visualizing this.... is there a 2" wide slit in the tube that runs from one end toa point about 1/3 of the length of the tube??
 
nahh, he just means about 1/3 the depth of the pipe. in other words, just cut off the top third of the pipe, along its whole length.
 
I believe they mean to cut 1/3 off of the full length leaving a U shaped container then cap both ends. I question the use of PVC, as the tube I use is heated to boiling to change brown to blue. I use a U shaped stainless steel trough and 2 coleman propane stoves.
 
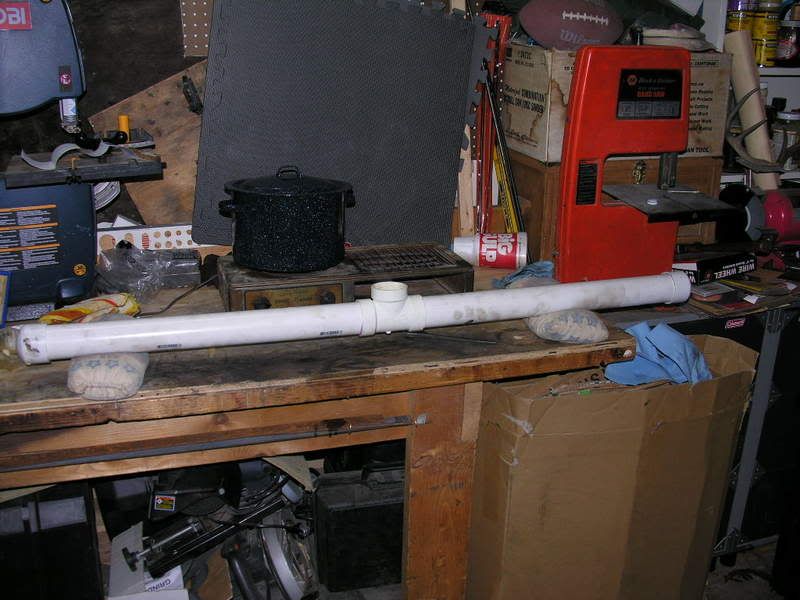
When I built mine, I glued the two ends into a "T" fitting in the middle of the pipe. I left one end unglued to get the barrel in and out, and pour the boiling water in and out through the "T". The unglued end doesn't leak, and it is alot easier to deal with the hot water than trying to pour it out of an open trough without spilling it or scalding yourself. I suspect it also holds the heat in the water better.

Another member posted this idea sometime ago, but I don't remember who to credit.
 
Just put barrel in trough and cover with scalding hot water and leave until water is cool. Once I had to do it twice to get the blue I wanted! I boil the small parts and that also works good.
 
You could also use CPVC . It wil hold up to boiling water ,I believe. That is what I was planning on doing. I was going to cap one of the end and have a valve of some sort. Just slide the barrel in the open end , pour the water in and when done drain out the capped and valved end. I was going to make just alittle stand so I could just stand it in the corner out of the way while it's not in use or even when it is in use.
 
BV, that may have been me, as that's exactly how I built mine and I did post it. The water needs to be scalding, but does not have to be boing to blue. The open T allows you to add the water and monitor the process. When the water has cooled, cap the T, open the cap on one of the ends and pour out the water.

DSCN2242.jpg
 
Rogue River said it.
I;m not sure there's a need to turn it into a major plumbing/boiler exercise.
I had about 3 troughs worth of boiling water going - that's not much if you keep your trough adequately small.
I poured in one trough full - the barrel cooled it pretty quickly; poured it out and immediately refilled it with boiling water, left it for a few minutes and repeated one last time.
I went from:
LMF5thcoat.jpg


to

BarrelBoiled.jpg


with one cycle like this.
I carded with denim once and repeated - the black got deeper and smoother, but I didn't get a pic.
 
I made mine out of the aluminum rain gutter they sell at lowes. It's about $5 for a 10' section.
I cut a piece 4' long, then jb welded gutter endcaps on it. It's watertight, and since it's metal, I can put it directly on my coleman camp stove i use for boiling the water.

Chris
 
I guess I'm not as advanced as everyone else, I made a bluing "pipe" rather than a trough.

I just used some PVC pipe and only capped one end. I ran a bent wire clothes hanger through the bolt hole on my tang and slid the entire barrel down into the pipe, keeping one end of the hanger outside the pipe as a handle. I propped the pipe up vertically using two bungie cords to hold it in place. The boiling water just gets poured right down the pipe.

I found that it wasn't necessary to actually boil the part in the distilled water. I just boiled the distilled water to a rolling boil, and then poured it into the pipe (which contained the previously browned barrel), and let everything sit for about 15 minutes. I ultimately did about 5 brown/soak in boiling water cycles on my barrel, and the results were excellent, IMHO. I just used a pyrex baking dish for doing the smaller parts, making sure they were covered with sufficient water.

The barrel was a .50 GM octagon, and it blued up like a champ. The smaller parts, trigger guard, butt plate, etc., took a few more cycles. I suspect the difference in bluing rate is probably attributable to the differences in the metal, but I am not certain.
 
I did the PVC trough as well and just poured in the boiling water. It took two Brown/Scald/Card cycles and I got a dark black/blue color I like.
 
I tried a search of rust blue on this sight, but it didn't yield good results, can anyone give me an idea where I can find good rust bluing instructions for the home doodler? Thanks in advance!
 
I thought that was to achieve that antique brown look, rather than a more blued appearance. Didn't even look there.
 
This is a good as any I have seen:
http://www.hobbygunsmith.com/Archives/Aug03/HowTo.htm

The gist of it is that you use LMF to rust the part per then instructions, then boil the rusted part in distilled water for a few minutes (although I have found soaking the part in boiling hot distilled water for about 10 minutes works fine), then card, then repeat the rust/boil/card cycle until you get the desired level of bluing.
 
Last edited by a moderator:
I take it this process won't work with any of the cold blues that I can easily access out there?
 
Nope, two totally different chemical reactions. You could probably use one of those bluing markers to touch up dings or scratches later on in life though.

But... I remember seeing a barrel or two that were done with cold blued over rust brown or something like that to get a deeper richer chocolately color. Nothing is stopping you from doing a cold blue over a rust blue. But I'm not sure how the cold bluing agent will work on the already chemically altered iron that makes up the rust blue. I would play on scrap before doing anything you're unsure of on an expensive barrel.
 
Yup, what Jimmmy said.

OxPho cold blue (by itself) works fairly well on smaller parts. I have used it on a few small parts that don't seem to take the rust blue very well. I wouldn't use it do an entire rifle barrel, but that is just me. I have never tried it over the top of any browning.

The rust blue process really isn't that hard compared to LMF browning... its really just an extra step in the process. I think you will like the results. My "boiling" pipe is just a length of PVC pipe with one end capped off. Distilled water is pretty cheap.
 
Back
Top