• Friends, our 2nd Amendment rights are always under attack and the NRA has been a constant for decades in helping fight that fight.

    We have partnered with the NRA to offer you a discount on membership and Muzzleloading Forum gets a small percentage too of each membership, so you are supporting both the NRA and us.

    Use this link to sign up please; https://membership.nra.org/recruiters/join/XR045103

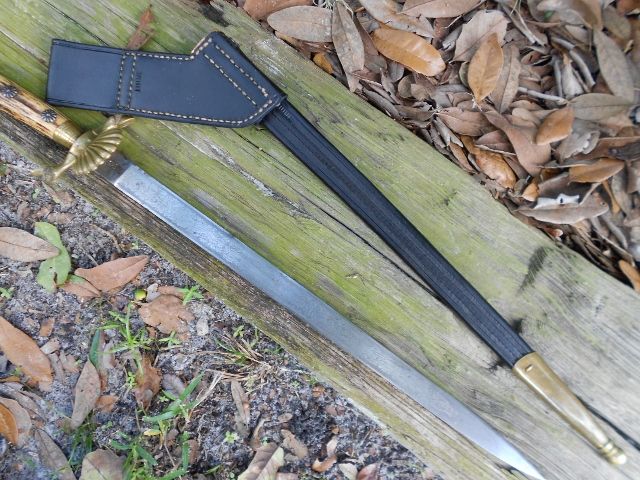
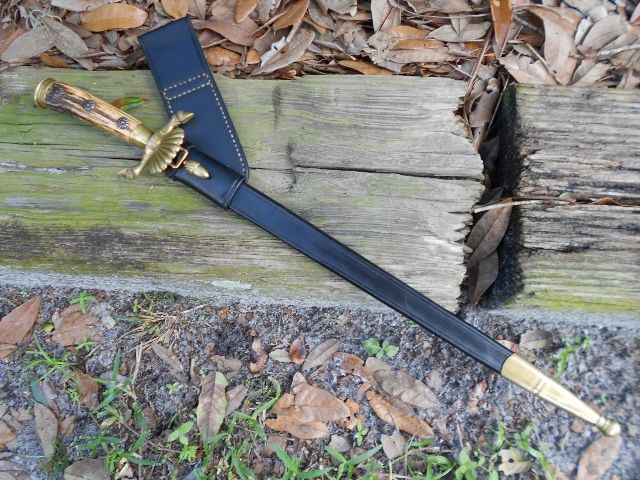
Scabbard and Frog For German Hunting Sword

Muzzleloading Forum

Help Support Muzzleloading Forum:

This site may earn a commission from merchant affiliate links, including eBay, Amazon, and others.

LRB

75 Cal.
MLF Supporter
Joined
Aug 25, 2003
Messages
6,504
Reaction score
1,440
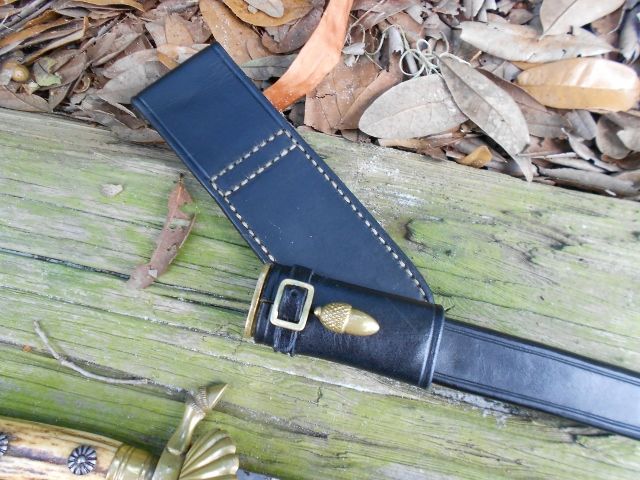
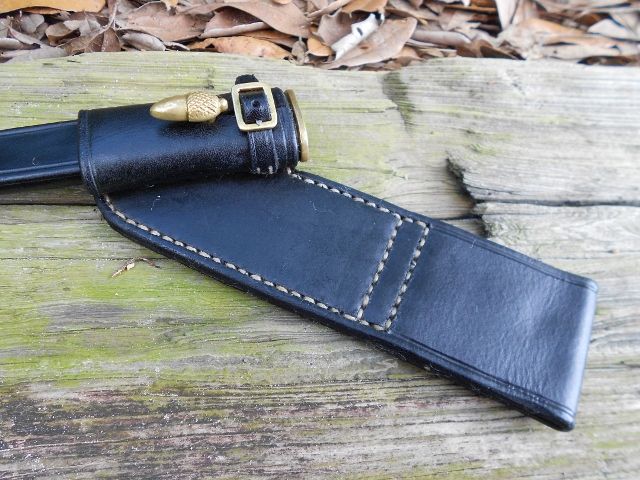
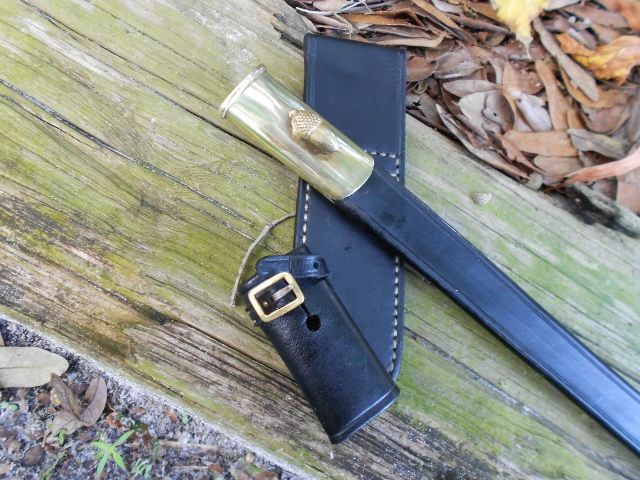
I only did the leather work, using the original scabbard mounts. The original leather was rotted and torn. The frog tube was made from 4/5 0z vege-tan. The belt loop base for the tube was from 7/8oz vege-tan. I made the security strap buckle above the throat locket from 1/16" sheet brass with a steel triangular tongue. The main scabbard body was from 7/8 0z leather that was thinned to maybe 5/6oz. The center seam was done as I do my scalper sheaths, sewn with 6 ply linen thread, then flattened to cover and protect the thread. I had to use very short modified needles and needle nosed pliers to sew the frog tube to the belt loop body. I used vinegaroon for the black stain. Hope you enjoy a look.


That looks great! I always wondered, how are the leather sheaths attached to the brass entry throat and end piece? There is little to no room to get my big fingers in there to make any attachments? If you don't mind a description?
 
If you look at the second photo, you can see a brass staple. The throat was done the same. The original staples were just a tad thinner, very soft, and their arms were bent outward inside for a secure hold. Both pieces were also originally glued with traces of, I assume cutlers resin, but had been re-glued with epoxy. My staples have no arms, but are epoxied in with the shafts having deep notches cut in them to anchor them in. The majority of original early scabbards were simply glued on, with some having a staple or rivet like pins for better security, but most with nothing more than glue to hold them. I have seen a couple of 18th c. English scabbards having a throat attached by a long tongue on the bottom front of the throat which was bent into a slot in the leather, and tucked under and upward. A very positive attachment, but I don't care much for the looks of them. I've seen more chapes/drags/tips with pins or staples than throats because the tips were easier to be lost when only glued.
 
As usual Wick your stuff is pleasure to look at. You Sir are a craftsman that I have always loved looking at your stuff.
 
Wick, that is some great work! You just never stop taking your craft to the next level.

Ron
 
Thanks for taking the time to explain the attachment. I think your work is absolutely amazing. :hatsoff:
 
Wow Wick that is great work. Your stuff has always stood out above many. I have yet to see anyone that can match your talents and as for the side seam sheath/scabbard work,..........well it is as good as it gets.
You are a master craftsman, and your knowledge of the era is kind of like pulling down the old encyclopedia! If Wick quotes it too you, it ain't worth looking to dispute it, cause he's right!!! :bow:
 
I really appreciate your praise Cliff, but I'm afraid you are way over rating me. I can't hold a candle to the work Chuck Burrows does, and his knowledge of history is also beyond mine. There are many on this board that out shine me, and in more areas than one, but thank you for your kind words.
 
Nice work, Wick.

David,

On NCO and Officer Militia Swords in the 1830's through 1850's, and more recently in similar swords, they also used a brass staple like Wick mentioned, but the loop was inside the leather and only the two wire posts came up through the leather and drag/tip. They had some kind of iron/steel anvil that went into the leather inside the drag/tip and they beat the wire posts down from the outside and then filed them off flush with the surface metal of the drag/tip. After the drag/tip is polished, it is VERY hard to see where the pins are. The link below shows the general kind of sword I refer to.
http://www.sailorinsaddle.com/product.aspx?id=998

The way I know this is at a gun show in Anaheim, CA in the early 90's, a guy had three good sized cardboard boxes filled with mixed military metal pieces and parts. Though he did not say where the stuff came from, they looked like stuff that had come from the companies who supplied Arms and Militaria to the Motion Picture Studios. He wanted $50.00 a box, but each box had clear plastic over the top and he would not allow anyone to tear open the plastic to see what was inside. He did allow others to shake the box a little to see what was inside. Now $50.00 was not a huge amount of money then, but it was still a good bit when one did not really know what was in the boxes. No one bought any of the three boxes when I came back on Sunday, so I shook them again and decided to take a gamble on one box. When I got back to my tables and opened it, it had a LOT of throats and drags/tips for this type of sword and similar regulation swords in the box. So I went back and bought one more box and it had more. Many of the drags/tips had broken off the leather scabbard and the leather was still solidly attached to the drags/tips. So it was a pretty solid and permanent way to attach a drag/tip.

When I decided to replace the old and really badly repaired leather portion of the scabbard on our family's M1850 Infantry Officer's Sword, I found the same kind of brass staple on the inside of the drag on that scabbard as well. So perhaps this was a common feature during this time period. I did not want to change the outside of that drag/tip, so I cut the loop of the staple off inside the drag/tip and then glued the drag/tip on with a really high strength black epoxy. Unless the leather rots away in future generations, that drag/tip won't be coming off.

When I assembled my M1850 Foot Officer's sword from Original dug or separate brass parts and NOS unmounted blade, I also used the high strength black epoxy to attach the original drag. (The repro M1850 swords were not yet being made in the early 80's, so that's why I put together one from pieces.) That sword drag took a lot of punishment at "Tacticals" (what we called war games) and never loosened a bit in a decade of use.

Like Wick, I have also seen just two small wires used on earlier scabbards and sometimes they had tiny washers (often copper) inside the leather of the drags/tips. On drags/tips that had iron throats and drag/tips, they used two small iron wires the same way, though I have seen brass or copper pins used in a couple of cases.

Gus
 
Last edited by a moderator:
Good to know Gus. On this one, the Mounts had been reset with epoxy, but there were plenty of traces of cutlers resin, or some other similar type of glue, and the drag was re-installed backwards with the staple on the face side. The leather was very dry rotted, and could torn with just finger strength. The arms of the staples, were longer than necessary and had quite a few kinks and bends indicating to me that they were possibly not the original, originals. The holes for the staples, both throat and drag, were exactly matched in spacing, indicating to me that they were drilled for pre-formed staples, and were set very square to the mounts. I don't believe the sword and scabbard are really all that old, maybe even 20th c. Other than a few spots, the blade is in near perfect condition, has no real edge, and was never sharpened. The finish of the steel is almost coarse with signs of being stone wheel polished, then decoratively etched.
 
That was interesting.

When I repaired our family's M1850 Foot Officer Sword Scabbard, I found it a somewhat similar confusing condition. The first time I got to handle it was in the early 60's.

Someone had replaced the leather a LONG time before that. Grandpa was a WWI Vet and he always remembered it that way, so the poor repair was pretty old and definitely looked it, but there was no way to document how old it was. The slide or lower ring band was on backwards on that scabbard. The way I figured that out was the throat and slide both had little brass screws on one side. Since then I have seen other M1850 swords with leather scabbards and those little screws on the throat and slide, but not the majority of the ones I've seen. That seemed to be more common with the sheet iron/steel scabbard bodies. The throat had the screw head on the side that was closest to the body and the slide had the screw head pointing out from the body. The slide was also a slightly smaller oval shape on the end that faced the drag.

Since this scabbard was not the original, there was no glue or any other way of holding the throat and slide other than that one small screw on each piece. So they probably also were glued onto the leather on the original scabbard. This is not surprising as the sword blade has no maker's marks of any kind on the blade. It may have some on the tang, but since the sword was solid, I did not take the sword apart. This also suggests the sword and scabbard was Non Regulation or maybe imported.

We don't know where the sword was purchased or came from as my Ancestor in TWBS was not the original owner. My Ancestor was a Southron Sergeant who blew the original owner out of the saddle. The sword was presented to him by one of his Officers and he carried it for the rest of the war and brought it home, afterwards.

Gus
 
How many applications of vinegaroon did it take to get the rich, even color? I've found that getting a good color really varies with the leather you use, but my results are seldom that nice and even. beautiful work in every respect!
 
Not Wick but if you're having troubles getting a nice even color with vinegar blacking apply a coat of strong, cheap black tea first - this adds extra tannins with which the iron reacts to get the color. First also clean the leather good with alcohol or acetone to make sure no oily/greasy spots.
At the end do a quick rinse with baking soda and water (about a 1/2 cup to 1/2 gallon) and then rinse well with plain water. This helps set the color. Then while still damp apply a coat or two of your favorite oil (neats foot, mink, EVOO,etc.) or other conditioner (dubbin, Mt Pitchblend, Lexol, etc.). Finish up with a beeswax based finish if desired for a bit more shine.
 
colmoultrie said:
How many applications of vinegaroon did it take to get the rich, even color? I've found that getting a good color really varies with the leather you use, but my results are seldom that nice and even. beautiful work in every respect!

I used my latest batch of vinegaroon in which I was more careful about the steel that went into it. No steel wool. Mostly chips from the bandsaw and drill press of sheet steel, 01, and hot roll, and lots of them. It had set for over a month to 6 weeks. I just skimmed the floating foam crud off the top and bypassed the tea treatment because I was out of tea. I used only one heavy coat. This batch was turning the leather black in seconds as I applied it. Best I ever made. The leather may have had a lot to do with it, but I tested on a few pieces from other leathers and got the same results. I let it air out and dry well for 3 or 4 days before applying oil.
 
Back
Top