Scrimshaw Class

Muzzleloading Forum

Help Support Muzzleloading Forum:

This site may earn a commission from merchant affiliate links, including eBay, Amazon, and others.

Hawken12

40 Cal.
Joined
Oct 22, 2007
Messages
345
Reaction score
0
I've had some good interest ,and I have a first lesson,would like to post a lesson at lest one a week,and then take questions and listen to what other peoples points of view,Questions can be on anything you want,linework,shading....etc.Here goes.

Gittin Picture to horn

This is a method that works for uneven surfaces, round ,whatever,once you find a picture you want to copy,I use this for maphorns and potraits,when I want to be precise,and the bonus for maps ,they are to scale,and getting features precise (Nicloe kidman doesn’t come out lookin like prince charles)
you got yer picture,now you’ll put a grid on it ,pick a spot just below the bottom of the pic and to one side,perpendicular to the first line.then just make a series of lines across and up.
Ok size of squares for the picture keep em even1 in 2 in.
Lets use one inch squares,now number the bottom ones and letter the sides,a,b,c,....this’ll help when you do the transfer.
Yer done that part,now for the horn.....for this you’ll need a flexible strait edge,could be a piece of plastic ,cardboard,I use a flexible plastic ruler,you can pick up atta drafting store,they have a ruler along the edge

Once you have it figured where you want the piece on the horn,put a line across the bottom and to the side,gits a bit tricky here,count the lines you have going up on your master lets say you have 6,that will equal 6 inches in my example and the area you have on the horn is only 3 inches.So 3divided by 6=0.5 half in.So now yor lines on the horn are going to be 1\2 inch wide.same for the lines going across.thats yor grid.
Now you start drawing,I use an hb pencil or a 2h pencil,sorry back to the drafting store ,or art store,2h is harder sofiner lines ,just not as dark,you can also git 4h harder again,keeps a better point.I just keep my hb sharp,gives me a break ,so my eyes don’t go squirrly lookin at thos friggin lines..
Now looking at yor master ,pick a start point ,say A1,wherever a line in yer picture crosses the grid ,look at the relationship of the line you want to copy in relation to the gridline and follow it to where it crosses the next line,thats all there is to it.I ”˜m sorry my printer here sucks so don’t have examples yet,will print them off at work tomorrow and post them .


Well this is first try ,not sure how they’ll post ,we’ll see.Any questions on this lesson or about whatever,will probably lead to another lesson.
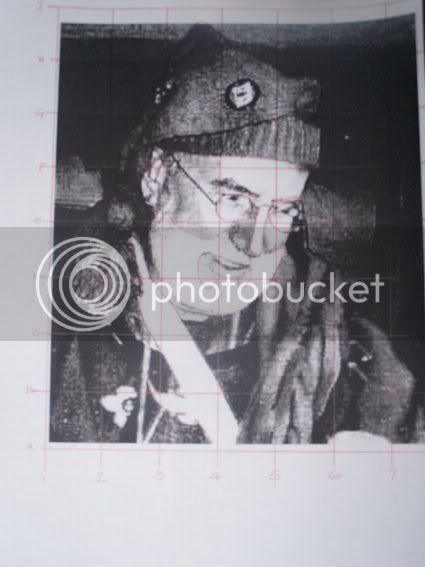
class1.jpg
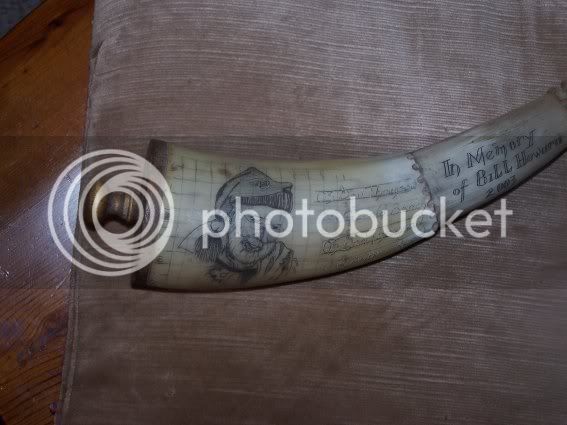
bill3.jpg
 
. Just one question (for now ) Do you use the same type of pencil (hb) for the grid lines that you use for putting the actual picture on the horn?
Soggy
 
While being able to draw is nice ,its not necessaryOne way is ,if you have a picture in mind,reduce it to the size you want and tape it too the piece you want to scrim,this method is good on flat pieces,not so hot on horns,but it will work.
Anyway,once in position ,take a needle and poke thru the paper into the horn,all around for an outline,I'll post some pictures later ,just gittin this class fired up and they haven't figgered where to put it yet.I don't think the classified section will work.
Next thing to do once you have as much detail as you want.remove the paper and dab a bit of ink on yor design ,wipe it off,with a damp paper towel(spit is the best to remove the ink),the ink will now be in the holes and ten connect the dots.Keep a larger picture of what you are doing ,so you can see the details that you want to fill in.
Regards Peter
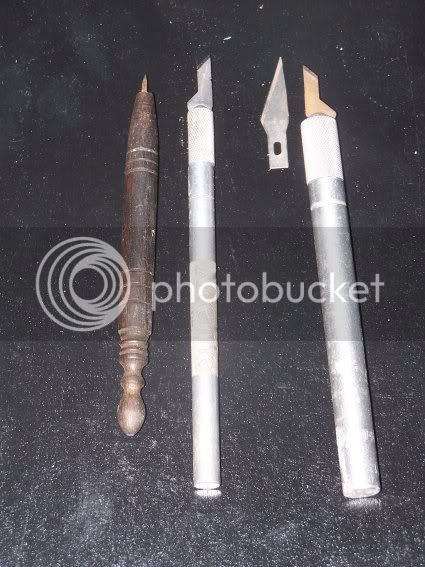
P.S. these are some tools I use for scrimshaw.Left to rite,sail needle(triangle blade),exacto knives,for clean cuts turn blade backwords so you have two cutting edges ,workin for you,if you use the knife edge ,it will tend to follow the grain in the horn.It is good for doing fine lines(hair,ships riggin...etc)
lesson2.jpg
 
the tools I have shown are cutting toolsThere are different modes of gittin ink on horn,one is called line scrim(cutting) and another is called stipple-one dot at a time,both are good and can be used together.
Line scrim is more direct,stipple is more subtle.both can be used in shading .
When I have to do a section deep black,such as a cannon muzzle.I do the outline and then do a crosshatch,sometimes many different layers,whats left over are tiny specs of white (horn thats never been touched),then I do the stipple technique,to individually ,eliminate them,other times you have an intense black fading off,stipple will do this (such as smoke ).
Facial features are not hard and fast,they are shades of gray with scrimshaw.Animals Have hair ,still to git the dark into small places stipple is supreme ,directed fire for maximum effect,as they say.
Now stipple,what tool do you use,some use a needle,that will do the job,but it is really just piercing ,not cutting in(holds less ink),this can be beneficial also as you only want to give a bit of colour to the area.(Like I said subtle).
I see a lot here about Politically Correct,While I have never been and never will aspire to be PC,
My method of scrim is PC I have seen stipple used in old pieces,the line work is obvious.Exacto blades turned backwards? same as a knife turned so (ya don't cut yerself).I have dun some work with a knife ,it works the same ,just cruder an thats what some want(just sharpen the back of yer blade)just a big exacto ,thats where they come from.finer lines,pocket knife is all required.,Turnin blade in an out .
Sailors sat on ships between whales ,boredom plus ,same as Army in camp,somethin to do ,scrath yer name or where yer at,natural to me ,Some was bettr'n others and were sought after,thats PC,far as I'm concerned.
Its been a while since I bot blades,I'm thinkin #11 are the real sharp babies(points tend to break off if yer goin to fast,stipple) #17 is stiffer ,no waverin and solid one of my favourites for outline ,can beat the grain in a horn.Horn is pretty soft and ya haveta take care on the grain,the blade will wanna take off on ya,so go soft on yer first cut ,and then go in agin and make it deeper,its easy to follow a cut.
Well thats more a lesson than I was plannin on,tryin to keep things easy to follow,let me know what ya think and what ya wanta know.
 
Well,I'm learnin from my pupils,thot that would happen,turns out my first lesson shoulda been # 3 er so.
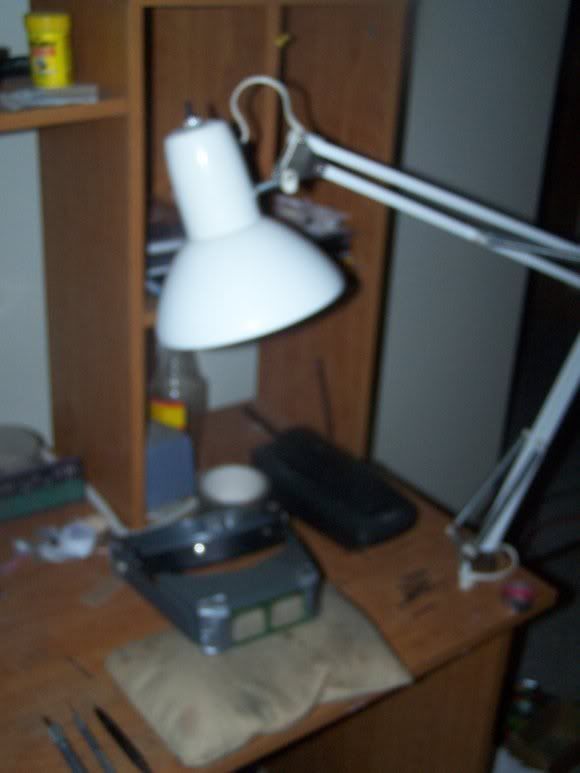
I was asked bout my setup and whether I used magnifier or no ,didn't used to ,do now.Probly cuz I didn't before.
I use a lite also,I like a strong lite that comes from the side ,not direct ,I find direct washes out detail,where the sidelite ,I kin see where I'm cuttin.,This is a short one but should help y'all out .
setup.jpg
 
Thanks Hawken I'm looking forward to giving this a try one day Keep the info coming. That is some great work . :thumbsup:
 
Yes, thanks, Mr. Hawken, I've been doing it for awhile but I've a lot to learn and I've learned some new things already.
 
Holy,I'm up to MR,is that a step up from 32 cal.just playin now,Thanx ,I'm learnin here too.If I kin give some back,thats some good to this lad.This is a great site,fer like minded folk
 
:hatsoff: Thank you Mr. Hawkin..... Sir :grin: I agree with the rest of the fellows. I've scratched a few horns in the past but I've learned several tricks from your post already. Never too old to learn. Keep 'em commin'
Soggy
 
I love checking in on this post every day. Every day I learn something new.
I have a couple of questions though. Am I correct that you are laying down your pattern and then covering the horn in beeswax so that the dye doesn't get all over everything?
Do you use a dye or something like India Ink to bring up the schrimshaw?
I have a horn I built and the color is right for schrimshaw but the horn had alot of gouges in it when I got it. Someone had had roughed it with a grinder is suspect. Even after finishing down I was unable to get all the gouges out short of making it to thin. Some one suggested incorporating the gouges into a schrimshaw scene. What do you think about that or should I just wait and find another?
Love this post keep up the great informative work!
 
Hey 50,if I kin callye by yer first name,
First to the finish,not sure how deep the grind marks are,but if ya git the deep scratches and edges smoothed out ,ya kin scrim over them,and they won't be noticeable.I've worked on horns and where they meet the skull can be pretty crusty,an knarly,I smooth em,and work em in,they give a diff look then them smooth shiny ones.
After I git my drawing done,I spray the horn with a fixative,up here its called Krylon,its clear ,art stores have somthin similar,to protect,pencil work.Not PC,never tried beeswax.floorwax ,dries hard that mite work too.They had floor wax,way back.
Just a lite coat,one quick pass,will do ,let it dry,then go to work.
I use ink it is a form of india ink to put in the cuts.Drafting stores ,art stores stores where they sell caligraphy sets,will have the ink.I work in the engineering field ,so I steal it from the draftsmen.
I use the spray,because india ink is an abrasive ,and putting on layers of ,ink,and rubbin it off,will make yer work disappear,and that sucks.Pieces that require many wipings will actually take yer first lines out(takes off the edges and the ink won't wanna hold in the cut.
Don't fret too much ,it takes a bit o rubbin for this to occur.
When I ink,the lines ,I've cut( I usually cut for 1\2 hr er so ,and take a break,so I ink the lines I ve cut.I use a Q tip,dipped in the ink,Ya can use a quill to follow the lines too,less ink to take off,let the ink dry and wipe off,with wetted cloth \paper towel...etc,I wet with spit,ink comes off better than water(enzymes in spit,cuts the ink better than water.
When yer all done yer work,git a cloth and dip ,it in nail polish remover and wipe off the coating,hold it on the scrim for a bit and then wipe,the ink'll stay.
Hey I think that was another lesson,thank 50 cal
 
I'm just finishin makin a horn for someone I'm thinkin of goin thru everything I do step by step ,with pictures.Start of the week,I hope.
Long as I can git quality piture,I think this'll help
 
No, thank you sir! :bow:
Very informative and the idea you just mentioned of showing the whole process sounds great! Keep up the gret work!
 
I'll be following this thread real close, thank you for taking the time to walk us through it and sharing your experience!

Billy
 
Am really enjoying this post. Please keep it coming! :hatsoff: :hatsoff: :hatsoff:
 
hey bluenoser an y'all's,thanx for the notes,still huntin,the huntin 's good ,killin tis a wee bit shaky,but I git at go huntin agin.scorew so far,deer 4 hunter 0.gotta shutout goin.have one fer Mon,I'm thinkin
 
http://i236.photobucket.com/albums/ff118/northernluck/scrimbill.jpg
Another lesson,lets talk about shadin,
Thars different ways ta shade and shadin is what gives the drawin depth.As we’re scratchin on flat ,sorta,shadin gives the depth or things look flat,no life to em.
In scrimmin,there are at least 2 ways to go about this one is simple lines close together for darker and farther apart for lighter ,next is x-hatching -lines crossing yer first ones at an angle,this can go on for ever ,the more times a line is crossed the darker it gits
I try an start out with an outline of my project an then fill in the shade ,best I’ve found is to git the dark stuff first,and let the lines fade out.

This is new let me know about graphics.Bills hat shows shading first are the lines horizontal,note that they have a flow to them not strait,you can define a shape ,with this letting the lines define the shape.On the tassel you can see where I made more cuts to make the image darker,still following the flow of the tassel
There is a band across the bottom that shows crosshatching,at its deepest ,well not really that is just 2 hatchings ,want deeper then cut in between at another angle.the idea is the cuts will fill with ink,so the more cuts in an area the more ink ...therefore more depth..I’ll expand on this as there is a lot more to it,not sure on the graphic,let me know and I will correct
Peter
 
Last edited by a moderator:
Back
Top