• Friends, our 2nd Amendment rights are always under attack and the NRA has been a constant for decades in helping fight that fight.

    We have partnered with the NRA to offer you a discount on membership and Muzzleloading Forum gets a small percentage too of each membership, so you are supporting both the NRA and us.

    Use this link to sign up please; https://membership.nra.org/recruiters/join/XR045103

scrimshaw

Muzzleloading Forum

Help Support Muzzleloading Forum:

This site may earn a commission from merchant affiliate links, including eBay, Amazon, and others.

dweeble

32 Cal.
Joined
Nov 24, 2004
Messages
27
Reaction score
0
I was wondering if anybody can help me on scrimshawing on a powder horn. I have the horn that i have smoothed down myself and now i what to add some scrimshaw to it. i have never done this before. need some advice please. plus i all so what to know if there is some way to give the horn the shine you see on other horns.

thanks for any help

dweeble
 
1) Sketch out what you want in pencil.
2) Apply hairspray (outside). This protects the drawing.
3) Drill a series of small dots. It should be done with one of those small drills bits no wider than the blade you'll be scrimshawing it. Just touch it deep enough to make a dent and don't drill through the horn.
4) With a sharp blade, connect the dots.
5) Apply India Ink.
6) 0000 steel wool.
7) Admire.
 
Dweeble if yer interested in scrim n making powder horn I suggest purchaseing Sibley's new book for about $20 bucks. Best investment you'll make IMHO. Plenty pictures as well as written directions. It will save ya tons of time n frustration trying to reinvent the wheel. YMHS Birdman
 
I couldn't agree more, the Sibley book is excellent! I'm starting on the scrimshawing on my grandson's horn today. One suggestion I might offer would be to use your sand filled rifle rests that you use at the range. The two of them used together makes for a pretty sturdy work surface, and it saves the surface of the dining room table! :thumbsup:
 
i want to thank all of you for the info. i am a beginner at this and need all the help and the luck i need. lol

thank you very much

dweeble :hatsoff:
 
...a couple of tips: get a good smooth finish on the horn before you apply ink--it will go into every scratch whether intended (ones you put on in your design) or not (ones left from horn making, etc.). There are several ways to transfer the design: if you are a good freehand artist, just draw it with the needle or exacto blade--even if you are its best to sketch it out first in pencil on the horn--lay it out. Some folks ink the smooth surface first, then scratch/cut the design ("white on black"), then reink, then rub-off the excess ink, leaving ink in the grooves of the design. This only works well on polished surfaces. If you are not good at freehand, you can 'trace' the design by pinholes or something like that from a paper drawing. The hardest part (for me) is gettign a steady hold/drawing position for fine work. Lately I have wedged the horn with sandbags and made a hand rest too. My arthritus keeps me from the fine detail I used to do. Good ol' artists India drawing ink and a heavy needle mounted in a handle are what I use.
 
BTW, you can buy the book direct from them $23 postage paid. I sent my check last week. You get an autographed copy and support the writers that way by giving them more profit.
 
Howdy,
Built and scrimshawed my first with a lot of of info from this site. There is a lot of knowledge here!
After doing some reading and whatnot, I filed the horn smooth with a fairly agressive file and then sanded and sanded staring with 100 grit and progressing to 400. looked real good. I squared the large end and made a plug by tracing the base onto a piece of mohogany that is 3/4", set a jigsaw to 10 degree and cut it out. sanded inside to remove bumps, checked fit and figured out how to arrange my brass tacks. Drilled base with tiny bit to eliminate cracks, epoxied and put her on.

Do lots of research on how to drill the pour end!
Made a plug resembling a violin tuning peg.

I sprayed the horn with KRYLON clear, artist's grade and transfered my drawings using carbon paper. etched using a fine awl (found that my napa auto parts little blue bodied 12volt power checker worked real good) and etched away!
I then wiped the etchings with black india ink and removed the balance with a clean rag, leaving only ink in the etching. this step with the krylon worked well.
I was then left with the option of having a very shiny horn or dull it up with 4-0000 steel wool, which I did.
Results were very pleasing to me, better than lots I have seen!
as far as the base cap,I left the horn in its natural shape, since I knew the history of the animal it came from!

worked for me, lots of other methods and ideas out there!

Brett
 
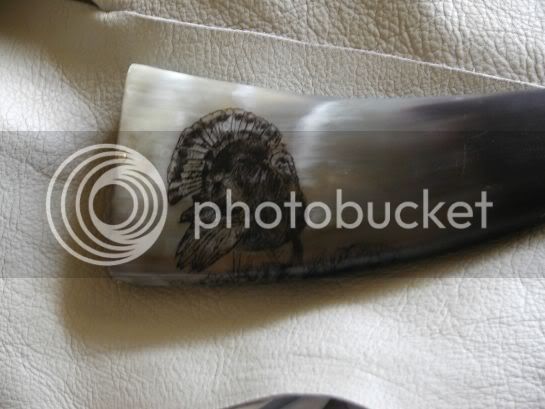
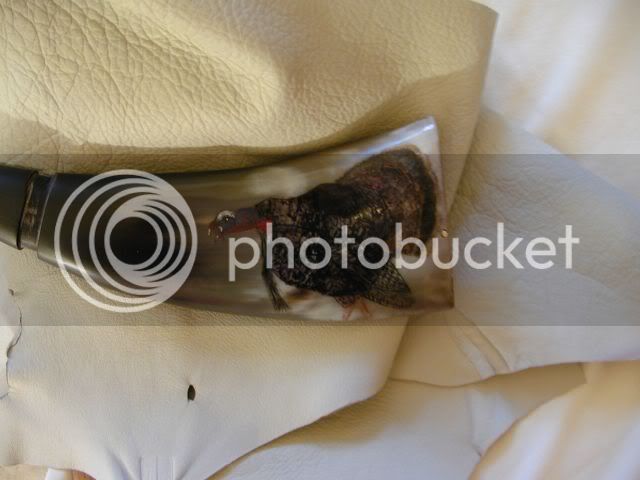
I tried my hand at it one time and what I did was buy a flat horn from Crazy Crow I think it was. It was buffed so smooth and shiney I thought it was plastic. I drew my picture with a very sharp point pen and then went over it with an exacto knife. I then blotted on India Ink and wiped off the excess. I used water colors on the color side.
gobblerhorn.jpg


colorgobbler.jpg
 
CrackStock and anyone else who is interested in getting that horn book. I won't post the email addy over the net as I'm not sure if they'd be pleased about it. However, if you private message me, I'll PM you back.

Gary
 
Some beautiful work in the pictures onm this thread. I personally prefer a scraped horn. I just scrape them with a sharp hunting knife. I don't use india ink any more. I found that when I stain the horn with ferric nitrate or dye it with Rit dye the stains settle in the lines and look great. sure is easier. I have a couple of very old horns that were scraped. I figure that other than the artists and powder horn factories, most frontiersmen just scraped their horns with the knife they carry... just another style.

I second the Sibley book it will save you a lot of time and headaches.
 
Dweeble,

Some ideas you might want to consider when scrimshawing a horn:
paint the scraped, smooth horn with a white, water based tempera paint as a base coat. Not to thick. This is the surface that you will transfer the pencil drawing to. The next step Is to have your image on a piece of paper, to scale, that you want to draw on the horn. Flip the paper over and using a soft lead pencil or charcoal, color the entire back of the paper. This is the transfer medium that will go on the horn. flip the paper back over and position it where you want the image to be scrimshawed. Using a 2H or 3H pencil trace around the image on the paper. Make sure you use a good steady pressure on the pencil. You may have to cut the paper and reposition the parts to accomodate the curve of the horn. The graphite on the back of the paper will transfer to the painted surface when you do the tracing. You will have the most accurate drawing of your image on the horn ready to scrimshaw. I generally do my carving and then ink the horn with paint still on it. This gives me the entire image on the horn and I can continue carving where I need to. Once you feel comfortable that you have enough of the image carved and inked, wash the horn with soapy water and continue carving and inking until you are satisfied. This is not a period process but in this day and age I don't have the luxury of time or money to redo horns and the results are very satisfying.

smokeydays
 
DrTimBoone said:
Some beautiful work in the pictures onm this thread. I personally prefer a scraped horn. I just scrape them with a sharp hunting knife. I don't use india ink any more. I found that when I stain the horn with ferric nitrate or dye it with Rit dye the stains settle in the lines and look great. sure is easier. I have a couple of very old horns that were scraped. I figure that other than the artists and powder horn factories, most frontiersmen just scraped their horns with the knife they carry... just another style.

I second the Sibley book it will save you a lot of time and headaches.

Old Dan Boone was seen late in life scraping a new horn he was making with a piece of broken glass. But I bet he didn't use RIT! :winking: :blah:
 
Ole Dan'l didn't use RIT because the local dry goods merchant didn't carry any. Furthermore, internet shopping didn't reach St. Louis for anlmost 200 years and so they had to make do with what they had. Times were rough, were'nt they?
 
WOW!!!!!!!!!! I can not believe the response i am getting and all the info. Thank you so much for all of it. Now i can not wait to start on my horn, i still need to do a little more work on it before i start the scrimshaw on it. but i did a little pratice run on it though. i thought since i have to work on the horn some more what the heck and try a little scrimshaw. i was really surprise how it looked, then bye bye it went. LOL

thank you all so much for the help, when i get it done i will post a pic for all to see

dweeble :hatsoff:
 
Back
Top