• Friends, our 2nd Amendment rights are always under attack and the NRA has been a constant for decades in helping fight that fight.

    We have partnered with the NRA to offer you a discount on membership and Muzzleloading Forum gets a small percentage too of each membership, so you are supporting both the NRA and us.

    Use this link to sign up please; https://membership.nra.org/recruiters/join/XR045103

Some silver wire inlay on an English rifle

Muzzleloading Forum

Help Support Muzzleloading Forum:

This site may earn a commission from merchant affiliate links, including eBay, Amazon, and others.
Joined
Nov 26, 2005
Messages
5,153
Reaction score
10,572
Hi Folks,
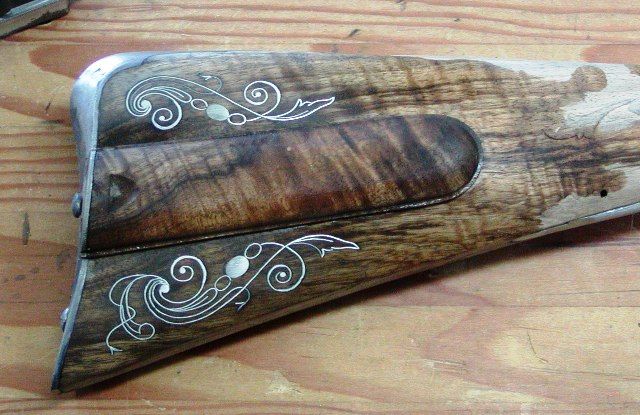
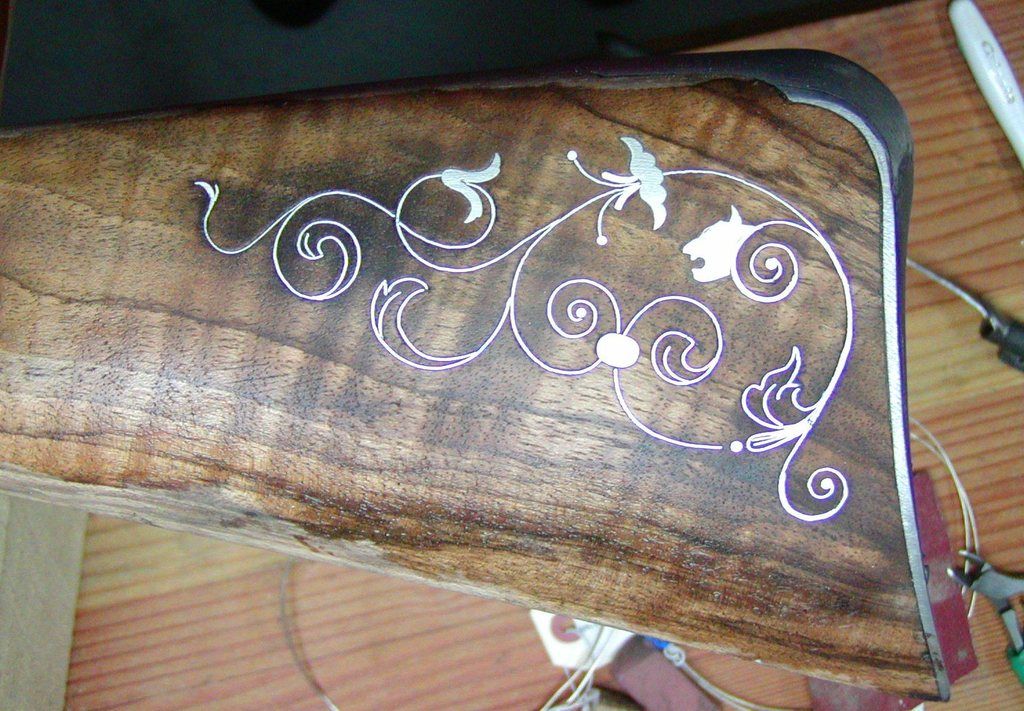
Thought you might like to see some wire inlay work on a mid-18th century English rifle. It is based on French pattern sheets at the time but I designed the work. The silver inlays will all be engraved.

dave
English%20rifle%20wire%20inlay_zpskl1arflr.jpg
 
Dave, I am planning a build that will include wire inlays (have played around with them on a test stock but never on a rifle that I actually finished).

Have a question for you. Do you glue them in or do you rely on them staying in place on their own? and secondly, are you using round wire or the flat wire that can be tapped in?
 
Very nice work indeed. I wish I has that ability to do that...Congrats. Look forward to seeing finished pics.
 
Hi Graham,
The wire is actually a flat ribbon tapped in on edge. Round wire would never hold. I use fine silver ribbon that is about 1/8-3/32" wide and from 0.006-0.013" thick. Some ribbon is purchased as ribbon, other thicknesses I cut from sheet silver. Some folks prefer sterling silver, which is a little springy. I prefer fine silver that is dead soft and it tarnishes much more slowly than sterling (less copper content). I get my silver from www.riogrande.com. Folks have different ways of doing wire inlay. Some stab in the lines using small flat chisels and curved gouges. I mostly use small stabbing flat chisels made from hacksaw blades. The cutting edge varies from 1/16" wide to 1/4" wide and the blade is ground so there are shoulders on either side of the cutting part that set the cutting depth to about 1/8". More importantly, the cutting edge is football shaped in cross section so it does not make little jagged steps when stabbing around a tight curve. After stabbing in the design, I take the appropriate silver ribbon and using pliers, draw it between two coarse files pinched together. That creates grooves on the sides of the ribbon which help lock it in better. I may prebend the wire to match my design or just use the stabbed line to curve the wire. I place the wire in the design and tap it lightly in place with a hammer. When the piece is completely in the wood, I place a short thin and flexible metal ruler flat on the wire, and tap it in hard. That sets the wire, then I wet the wood with water, which swells and locks the wire in place. No glue is needed. Your stock finish will also glue it in place. Then file off the excess wire and polish it. Leave it slightly higher than the wood surface so it does not get covered over with finish. That way you can periodically clean and polish it. Where wires converge, I bevel the wire to make a smooth joint and I add thickness by adding extra strands of wire at points for accent. Wire inlay is not hard to do as long as you can draw a good design on the wood.

dave
 
Last edited by a moderator:
Thank you for taking the tame to generously share your work and knowledge.

Could you incise the line using a venier the way some layout carving designs or would that make too wide of a cut for the wire?

Also, is it difficult to prevent from staining it, or difficult to apply the stain to the wood evenly around the wire, with the wire left standing proud?
 
Dave, you do awesome work!!

Can you show us a picture of your chisels? I'm having a hard time picturing a "football" shape.

That looks awesome!!! Thanks for the lesson!!
 
Little Buffalo said:
Thank you for taking the tame to generously share your work and knowledge.

Could you incise the line using a venier the way some layout carving designs or would that make too wide of a cut for the wire?

Also, is it difficult to prevent from staining it, or difficult to apply the stain to the wood evenly around the wire, with the wire left standing proud?
I'm not Dave but IMO, no, a venier or anything that removes wood won't work.

The groove must be pierced and spread apart by the tool.

Only then, will the wood try to return to its former position and close down on the sides of the ribbon to lock it in place by pinching it.

Staining the wood after the wire (ribbon) is installed takes nothing special.

There is no glue or anything else in the area to cause problems with the stain(s).

If Aqua Fortis is used, be sure to fully neutralize it if silver wire (ribbon) was used.
Silver is a very reactive metal and any trace of acid will attack it.

If German Silver (nickle alloy) is used, neutralizing the Aqua Fortis isn't as important but it's a good idea to do it anyway.
 
Holy Ka-Moley!!! That is beauiful work. I wish I could do that. I tried doing some silver wire inlay on an old gunstock that I keep just for trying stuff on. It ate my lunch. It didn't want to go into the wood. I cut the lines with a fine chisel but the wire just kept popping out of the cut in the wood. :cursing: As I would tap it in place, the previously inserted wire would pop out of the wood. I decided that I didn't know what I was doing so I quit. :idunno: Besides, I was almost out of wire anyway. I guess I'd better leave it to artists like you. :thumbsup:
 
Hi LB,
No, you would not want to use a veiner or "V" chisel. When you incise the line by stabbing straight in, you are not removing any wood, simply compressing it on either side of the chisel. When the flat ribbon wire is inserted and then the wood wet with water, that compressed wood swells back and anchors the wire. If you removed the wood with a veiner, there wood be no swelling to lock in the wire. Staining around wire inlay is no problem and nothing special need be done. If you mistakenly use glue to hold the wire in, then you may have a problem.

dave
 
Wow Dave...You just dont stop...just keep getting
better and inspiring more and more. Thanks for
the explaination as well....Wulf
 
Hi JR,
I drew a diagram of the tool. I am having trouble with photobucket displaying it but here goes. The picture is self explanatory. Below the tool at the bottom arrow I show the cross section of the blade and the shape of the impression it makes in the wood. The rounded ends keep the tool from making stepped jagged cuts in the wood when going around a tight curve. I made several chisels with blade widths from 1/16"-1/4".

dave
Drawing%20of%20wire%20inlay%20chisel_zpscnlgfibo.jpeg


Something is wrong with the image because it shows nicely in photobucket cannot be copied successfully into this post.
 
Last edited by a moderator:
Back
Top