• Friends, our 2nd Amendment rights are always under attack and the NRA has been a constant for decades in helping fight that fight.

    We have partnered with the NRA to offer you a discount on membership and Muzzleloading Forum gets a small percentage too of each membership, so you are supporting both the NRA and us.

    Use this link to sign up please; https://membership.nra.org/recruiters/join/XR045103

summer project

Muzzleloading Forum

Help Support Muzzleloading Forum:

This site may earn a commission from merchant affiliate links, including eBay, Amazon, and others.

razorbritches

40 Cal.
Joined
Jan 10, 2012
Messages
116
Reaction score
3
Just finished my summer project, critique welcome I know i'm still learning, trade gun inspired, 62 cal, 48" barrel, black cherry stock, siler lock, and I am trying my hand at engraving
 
Can I have it ?
Pretty please ?
Pretty please with black powder on top ?
Really nice work; great gun... :bow: :thumbsup: :hatsoff:
thom
 
critique welcome

Firstly that's a real neat gun and I can tell you have a lot of talent. You show a lot of skill in a lot of areas. Your natural talent is obvious. I can tell you studied some original trade guns.

I'm not an expert by any means but I have studied originals and gun building for several years. To cut to the chase, do you want a real critique?
 
Do I want real critique, yes. I know that I am not completely accurate for a indian trade gun. I need more research before I can do that, and I also have to pay my dues so to speak (make enough guns to acquire the skills I need). This gun is part of that process, feel free to point out anything you see.
 
How did you engrave that sideplate? Did you make a small u shaped tool and stamp it? The scales look very small and difficult to engrave with a regular engraving tool.
 
yes it is a small "U" shaped punch made from a chainsaw file. In fact all my gravers were made from chainsaw files too
 
razorbritches,

I want to commend you on your effort. I also want to commend you for the courage in asking for a real critique. You have taken tools in hand and have made a fine accomplishment. You have created something you can be proud of and you know how much hard work is in building a gun.

For the hard work you have done, the great effort expended and the fact you asked for an honest critique so you can grow as a builder is why I post the following. Through this; hopefully you, other readers and I can grow in this craft.

You chose to build a gun based on the Early English Trade gun, known as Hamilton's Type G. I know you were making your own version but comparing yours to the original will help in this critique.

Lets start with the main components, lock, stock and barrel.

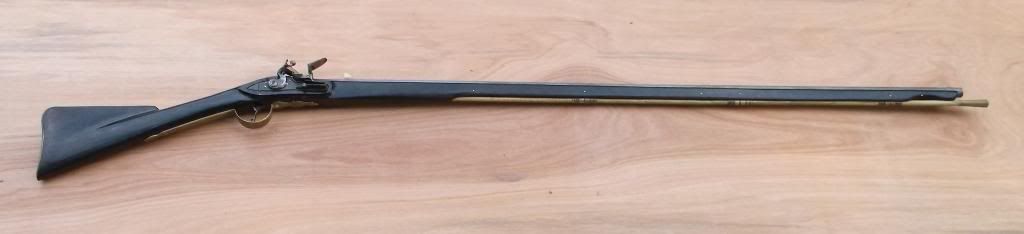
Lock You chose the medium sized Siler Germanic/American lock. This rifle sized lock is a good one but it is not the best choice for this build. It's mainly due to it's size. It's just too small for the context of this build.

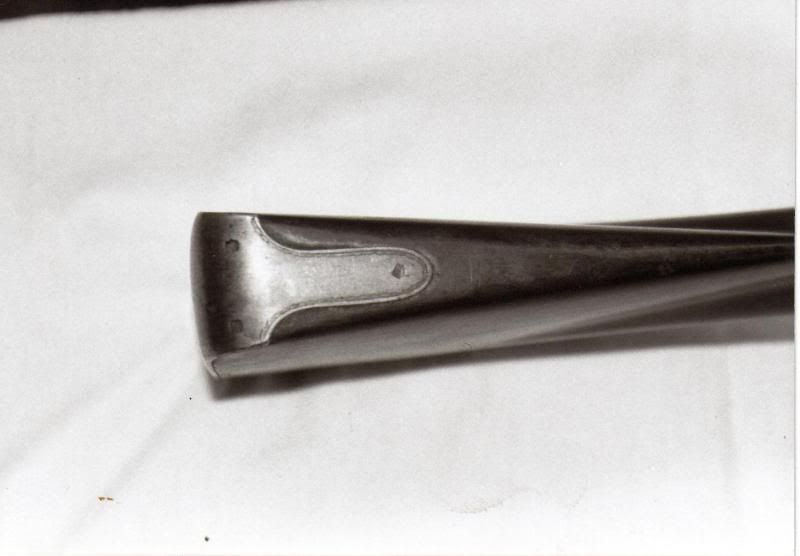
Stock You chose black cherry in the English trade gun pattern. What hurts you with this stock pattern choice is the lock and barrel. Another major factor here is web of the ramrod. It appears you are using a very thick rod. 7/16? 1/2? It also appears that the web of wood between the barrel channel and ramrod hole is very large.

Barrel You chose a barrel with a narrow breech and little to no taper.

These core components and their relationship to each other kind of cripples the architecture from the start.
The bottom line here is you built a large locked, large barreled gun with a small lock and small barrel with a stock built in the same scale as the larger components or even bigger considering the ramrod web.

So the choice of these hamstrings you from the start. This could have worked better if you had scaled down the stock to better fit the chosen components and had a very small web between the barrel channel and ramrod hole.


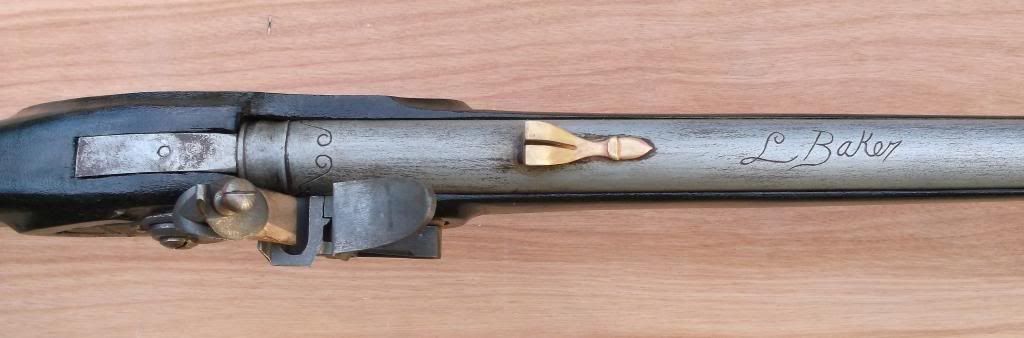
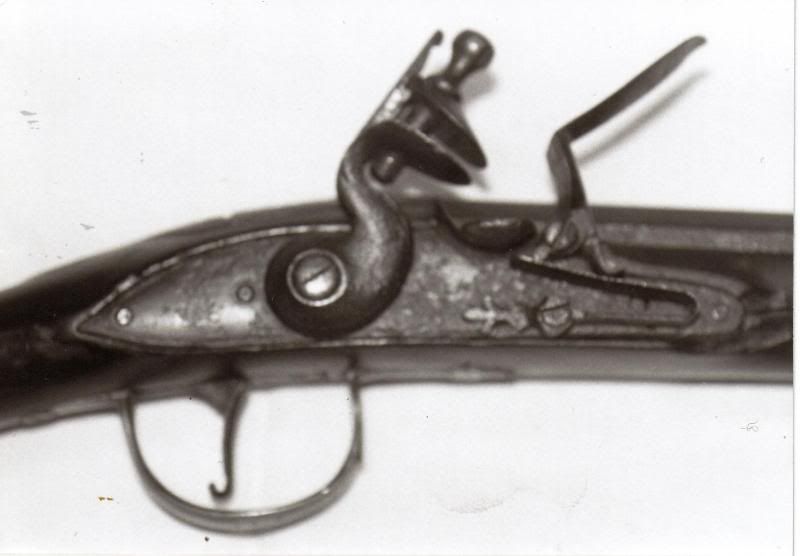
Above we can see that the barrel has no taper. Note the tang area behind the breech, notice how the light outlines a flat area on either side of the tang. Note too the wood directly behind the breech in the sideplate corner this area needs to be rounded better so it will flow into the wrist. If it was rounded better it would bring the top of the lock panels down. Note too how in the sideplate side of the stock the barrel appears to be buried. I'll come back to this later. The work is excellent in this view of the lock panels. The width of the forestock and how it meets the barrel is near perfect. Engraving very good.


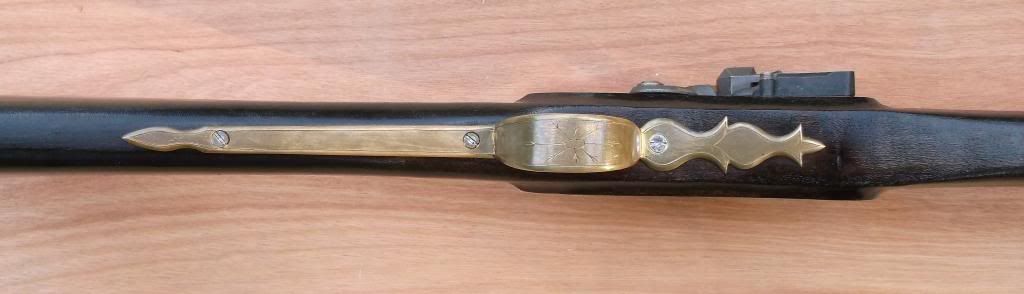
At this view the light really highlights the flat area from the bow of the trigger guard forward into the forestock this flat area appears to go on to a point of the the picture further down on the lower fore stock. This flat area will show up later.
What would have really helped here would have been to round the belly of the stock. The triggerguard finial could have been shaped to match the roundness of the belly. Rounding the belly could have reduce the size of the lock panels, we'll visit this in a moment.
I think the screw heads should be domed a little.
The overall view is good the size of the wrist, it's relation to the forestock and the size of the panels look good from this angle.
Engraving, good.
One thing that looks odd in this view that you might miss is the lock's relationship here to the triggerguard bow. Think on that for a moment.


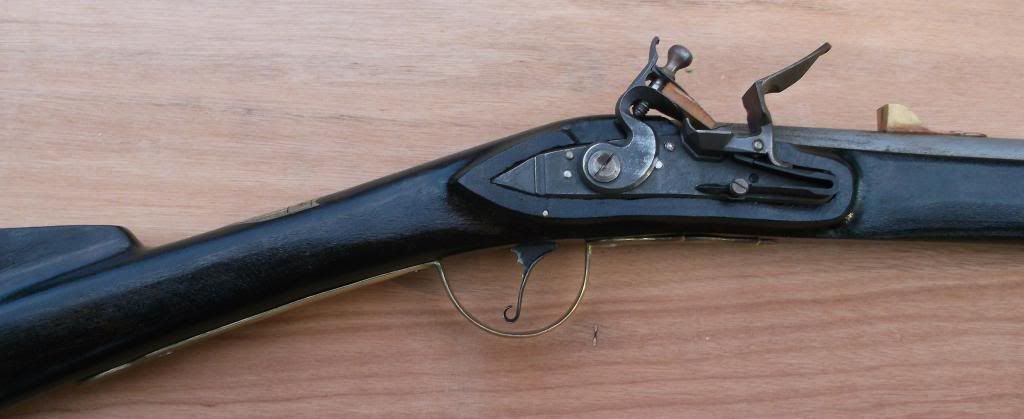
O.K. The reason that the trigger bow and lock looked odd from the bottom becomes apparent here. This is by far this gun's major flaw and it could affect function. The trigger is set too far to the rear. It also pinned too low It needs to come forward maybe even a 1/4 of an inch. Looking at the trigger it hangs in close to the pulled position. Trigger pull would be much better if it were pinned higher and forward. Of course this would mean moving the TG forward also.
This is where that small lock comes back to haunt.

But there is something else going on here. Even if the belly is rounded, the trigger moved forward, what's happening here?
The answer... This area of the stock is simply too big. Even with a proper trade or fowling lock it would still be too big. That's a large siler and it looks like a small one.
The reason, the web between the rod and barrel is too large for good slim trade gun architecture. The rod is very large too; that's one reason the trigger pinned the way it is. The lower forestock from ramrod entry is not like a slim trade gun, it's more like a heavy musket. The Siler just exacerbates that flaw of architecture. It would look much better if the lower forestock was rounded but, it is what it is.

Here is another architectural factor here in this area. Note how the tail of the lock panel where it ends in the wrist disrupts the flow. It actually looks higher than the tail of the lock. What happened here is the tail of the lock and the tail of it's panel are in the same level plane. The tail of the lock panel should be more to the center of the wrist. If it were it would flow a lot better.
At the very top of the stock straight above the cock bolt there appears to be a hump. If the tang was bent a little better into the wrist this hump would have been eliminated.
Another factor from the top, if the wood was rounded down to meet the top of the lock making the lock panel smaller it would look much better.
Overall here the lock panels are way too large especially for the mid 18th Century for which this gun is based.
WilsonG2.jpg


This is a Wilson Type G. Note how small it is from tang to belly. Note the trigger placement. Note how very small the lock panels are. It almost has no lock panels except towards the front and rear.
Note too how the wood at the top comes down from the tang to meet the top of the lock.


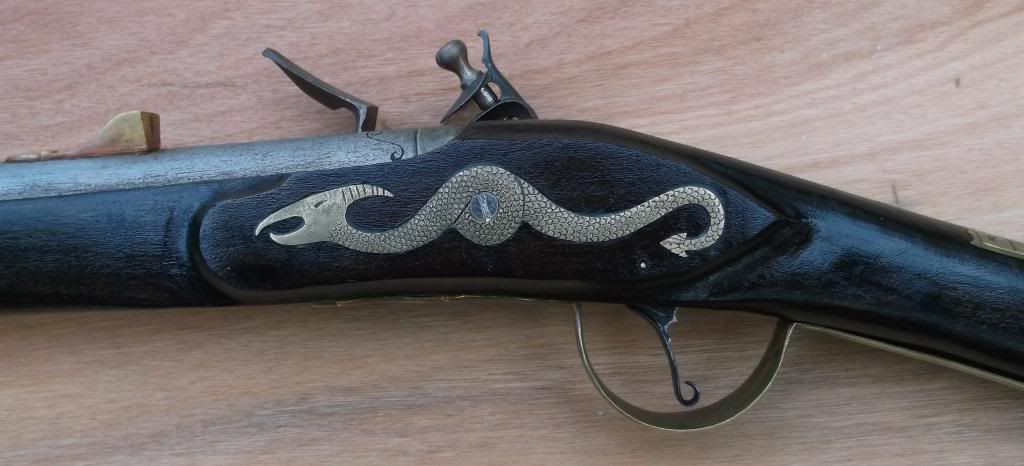
What stands out here is that cool a$$ side plate. I dig it and I commend you for it. It's fun and I like it. This is where your personality comes out, it's artsy in folk art way.
More of the same here. Note the hump behind the tang it's clearer in this view. Just above the trigger the light shows a flat area.
Here is a tip about architecture. Note how the barrel is revealed from the nose of the lock panel to the breech. More barrel is covered by the wood as it approaches the breech.

In original work the opposite is true. As the barrel approaches the breach in most 18th Century rifles and guns more of the barrel is revealed. Revealing more of the barrel here allows you to bring the lock panels down lower. It also allows you to shape the wood behind the breech to mimic the barrel eliminating the extra wood I mentioned in the first picture.
Another thing that stands out is the flat slotted screw. For a lock nail it should be a domed screw. It just looks too modern.

The single lock bolt says 1820 instead of 1760.

I like the side plate but think how well you could have pulled off the original serpent type.

WilsonG.jpg


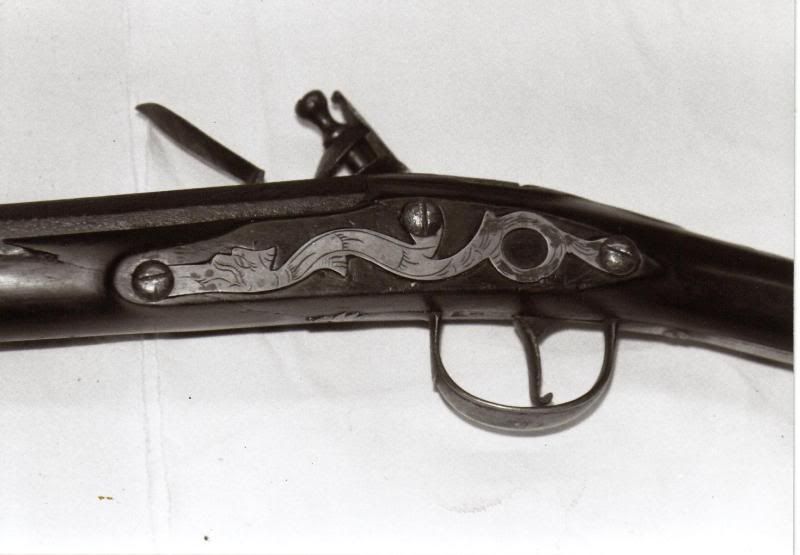
Look at how this Wilson Trade Gun's lock panel flows into the wrist. Note how it's in the center. See what I mean?
Look how the top comes down to meet the top of the panel. Note how tight the wood is at the breech of the barrel. Note the screws.

WilsonG7.jpg


Compare...
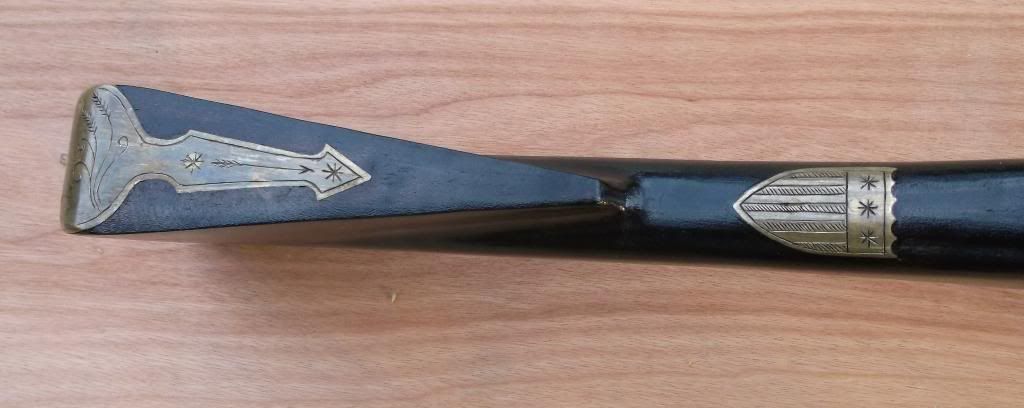
The shield is is Federal era, looks real good.
Engraving good I like it.
Where does this gun stand as a historical piece? Since it has a single lock bolt, and the federal shield I would say it could be a circa 1815-20 made gun a re-stock or possibly a talented blacksmith or apprentice made gun. It's fun.

It's obvious you have a lot of talent to build that one from a blank. I's raw but you have the talent.
It may have been a little unfair for me to compare it to an original Wilson. England at the time had the best gunmakers in the world and even their cheap trade guns were good.

IMHO you need to study and actually feel and handle original or good contemporary guns to get the eye. I can tell you did some study but pay closer attention to the images, note how the light reflects the curves and shapes.
The G is my favorite gun.

Cherry is my favorite wood. With that said my only real dislike of your build is the stain. Cherry is such a pretty wood it needs no stain at all. A lye treatment would have turned it red. Simply shellacked and varnished with an oil finish it would have turned dark on it's own.

If you can make the trip, in November come to Fort Toulouse Ft Jackson Park Frontier Days in Wetumpka Alabama just North of Montgomery on US Hwy 231. There you can see plenty of Type Gs. Maybe my son's will be in by then. I'll be in the 1814 Tennessee camp.
Travis Brown
 
Being the novice, I learned a lot from your Post. :bow: I have one question. Is that RR supposed to hang out that far, on this gun? I see this from time to time, and it really offends my eye. Am I wrong there? :doh:
 
Sweed,
I'm a novice myself we're all learning here. For instance closest I've come to engraving is scratching my initials in a rock with a nail.

To answer your question, you see many late Appalachian guns with long ramrods. It makes them easier to grip.

Since rifles and guns are custom made personal property and the ramrod was expendable requiring replacement from time to time, it depended on the owner.

As far as a standard thing such as in military issue guns and militia requirements, issue guns had standard ramrods. I know of no rules about ramrod length only material. Militiamen were required or strongly urged to have iron rammers.

IMHO the long ramrod though it could date to any period is really a late Appalachia thing, think Gary Copper in Sergeant York.

BTW if if have a gun with such a rod, do not ship it with the rod in the thimbles.
 
Well done Travis....especially to include pictures for reference.

Razor, Travis and I kicked this around a bit in PT. It's hard to critique guns in open forum because one is always concerned about the feelings of the builder and don't want to dissaude them from future endeavors.

But, you deserve the honest critique you asked for and you have some skill and the desire to do well so don't take anything personnally....we're just trying to help you get better.

Did you by chance build this gun from pictures, with no guns to physically examine? I suspect so from several clues in your post. That's hard to pull off, but sometimes that's all a builder has to go off of.

If that's the case, may I suggest that next time, or if you decide to rework this gun, that you look for pictures that are taken from different angles...the internet is full of 'em. Profile, top and bottom shots don't allow you to see how the different areas of the gun flow into one anther.

When you look at pictures look at how the light reflects. When you see a line of light along a panel or architectual feature, the light denotes the high spot normally and the wood will curve away from that in either direction. When you look at phots of guns you will rarely see a large bright spot denoting a flat area.....most guns curve and flow from one area to the next.

You have a lot of flat spots and angles on this gun. A lot of corners that need to be knocked off....rounded over....flow that needs to be imparted. The transitions are the hardest part of gun building....especially around the lock panels. If you go over to the ALR site and do a search for "lock panels" you will find some good instruction. Also, don't just look at pictures, look at parts of pictures.

For example, if you look at the pictures of the original Travis posted you will see that the from the rear of the lock panel the wood just flows off the panel into the wrist. There's no big concave area. That concave step is a trait of later guns, and normally rifles....and sometimes it's just an illusion given by the mouldings carved in after the stock was shaped.

When moving through the build try to focus on each area as a project unto itself. When you get to a transition point look for as many pictures from as many angles as possible to see how the old guys did it. When building, try not to look at the whole gun, just the area you are working on at that time. When planning try to figure out how each step will affect the next. Don't get ahead of yourself.

If you decide to leave the gun as is, I agree with Travis, it is representative of a gun of European origin, that was later restocked in America by someone who's primary profession wasn't gun building but was equiped with enough skill to put it together....a frontier restock, if you will....which happened with frequency.

The trouble with copying specific pieces, and I don't know that's what you are going for, is that they will always be judged against the originals. And that's why it's better for the novice builder to do an inspired-by piece and stay away from "copying".

Fowlers and other guns pieced together from recycled parts are fun and are historically correct, provided that all the components are from the period the gun is from or earlier. Many, many guns were pieced together by early American stockers to support the War for Independence. Some wore combinations or French, English and American parts....whatever was handy and worked.

You have plenty here to work with if you decide to rework this gun or you can leave it as is and as an example of a frontier gun done in a folk art style.....or you can move on to the next build incorperating what you've learned from this one.

Either way....Enjoy the Journey, J.D.
 
I avoid the long ramrod sticking out for fear of it catching on brush. It could just hidder progress, or worse, get broken, or worse yet, snag as you move quickly through the woods and rip off a thimble. :shake:

Tuck that thing in, is what I say. :thumbsup: Enjoy, J.D.
 
I prefer squared away also. My militia gun has a iron rammer with just the jag tip extending and that small amount gets caught on stuff.

These guns are kind of like babies. They're delicate but they're a heck of lot tougher than you think they are.

My dearly departed Gillespie was shipped with the Appalachian style rod. The Post Office must have dropped it of a building or something. That extended rod was broken between two thimbles. The forestock had a tiny crack at the entry. Hickory is pretty stout and it takes a heck of a lot of force to break it like that. Yet the thimbles held and virtually no real damage to the rifle. It nearly took a combined act of Congress and Parliament to get the remnant of the rod out of the stock though.
The more I think about it the extended rod is more of a chunk gun target thing than a frontier feature.
 
Thank you all for your comments, I will definitely use them to improve my next build. As to critique and feelings, this is a builders section dedicated to learning and improvement, I generally select my friends from the finest a#$holes I can find. I can at least depend on honesty anything else is deluding. You are right I only had the privilege of handling a type G repro for about 15 min you know just enough crack to set the addiction, and pictures. The ramrod is 3/8ths, the web between barrel and RR is 1/4th, the lock and lock panels really didn't catch my attention till I posted the pictures, screws are something I want to make myself that way I get exactly what I want, have made a few but nothing I want to put on a gun yet. You see my name on a post feel free to criticize I can take it my shoulders are broad, and my head not to hard to learn. As to reworking this gun, maybe I will but not now, I believe people should hang on to old projects for a while you then have a ready pattern of do and don't, and a reminder of how far you have come. I will try to make the event you mentioned but I won't know till we get closer to that time, work and all you know how it is
 
razorbritches said:
....handling a type G repro for about 15 min you know just enough crack to set the addiction....

:haha: That about sums it up! This is an ADDICTION!

1/4" web set you up from the beginning. You can never get the profile height down starting with it that thick.

As to "feelings"....I'm sure you've read enough posts here in the past to know what we're talkin' about. You have the right attitude to grow and continue to get better. :hatsoff:

Enjoy, J.D.
 
That little bit of fat all over is probably why I couldn't get the weight any lower she came in at 6lb 14ozs
 
A 3/8 ramrod and it weighs less than 7 ponds...

You see how deceptive pictures can be. Honestly it appears much heavier than that.J P Beck rifles are like that. In photographs they appear very robust, heavy looking but in reality they are dainty, almost fragile.

Part of my critique was going over technical flaws. I've saved the best for last.
That gun is special. It made me smile. I would love to have it. I really mean that. Now I might change a little on it color wise but not too much.
Studying that gun and all it's quirks let me see how you see it. That's special.

A long time ago a sculptor was working in clay. As he worked on his project,shaped it with his hands he took great care. He loved it. He put part of himself in his creation. As it was near finished he breathed his breath in it and it took on a life of it's own for good or bad.

Today when a man builds something with his hands, when he puts his heart and sweat into it; part of himself is built into it. Will it have flaws? Sure. As long as he trys to improve, strives for perfection and creates with a kind of love and care his work will be special and sometimes it's the flawed object that's the most special of all because in it there is a true reflection of the maker.

Once a man becomes lazy,once he rushes for no reason, once he loses the love of his creativity these objects become lifeless, just objects and it does not matter if they sell for thousands of dollars, they might as well be built by machine.
Don't ever loose that. Whether it's building a rifle or trimming a tree.
 
Back
Top