• Friends, our 2nd Amendment rights are always under attack and the NRA has been a constant for decades in helping fight that fight.

    We have partnered with the NRA to offer you a discount on membership and Muzzleloading Forum gets a small percentage too of each membership, so you are supporting both the NRA and us.

    Use this link to sign up please; https://membership.nra.org/recruiters/join/XR045103

Tips for carving spirals?

Muzzleloading Forum

Help Support Muzzleloading Forum:

This site may earn a commission from merchant affiliate links, including eBay, Amazon, and others.
Joined
Dec 4, 2021
Messages
128
Reaction score
175
I've been practicing both relief and incised carving in preparation for the Kibler Colonial kit I have ordered. I'm kind of loosely basing my carving ideas on rifle #87 from Rifles of Colonial America Vol II. Overall I feel like I'm making good progress and getting closer to the point where I would feel comfortable attempting it on a real stock, but one thing I still struggle with is carving spirals that curve evenly. I can draw them just fine using templates as a guide, but they always end up looking kind of lopsided when I actually take chisel to wood.

I know the real answer to my question is the same as "How do you get to Carnegie Hall?" but I'm wondering if there are any tips that might help me produce better looking curves. I'm using a v gouge and mallet to outline everything - I've tried stabbing in, but I have a harder time controlling the depth with that method. I do use it for certain areas as needed, though.

Here's an example I did on one of Kibler's practice stocks. I haven't cleaned up the scratches and chisel marks yet but you can see how the big spiral is kind of uneven.

spiral.jpg
 
It's a good way to check your own work! Look at originals, some were pretty crude. Yours is better than many of the old ones. Practice is the key! I do all of my carving and wire inlay with a single skew chisel.
 
:oops:
not trying to be an a** but sharpen your pencil and your chisels!!! your idea is good .. just need to improve your ability to cut what you
draw.. step back and use a digital camera ( phone works ) load the pic onto a full screen and enlarge.. You will see a ton of things you
can improve. Even on finished work you will find 'mistakes'

( I thought I had finished my carving and had things smooth..then I took a picture of it!!:oops: )

Respect Always
Metalshaper/Jonathan
 
I thought I had my chisels pretty darn sharp, but blowing up the image really shows the truth of the matter. I've been stropping them frequently while cutting but maybe they need a touch up on the stone.

Is there any way to touch up the rough edges, if I end up with them on the real deal? Maybe a light touch with a needle file?
 
Screenshot_20211230-182938_Chrome.jpg
To my eye the spot circled looks odd.
The large spiral may be a little uneven, but not horribly and doesn't pull my eye to it. The spot I circled keeps drawing my eye away from everything else like I'm trying to figure out what is going on there.
I'm looking at it on a smart phone screen so maybe there are problems that I am missing. But, I see good ideas and a lot that I like.
I'm not sure how to describe what my eye wants to see. I have a vision in my mind's eye how to correct this but can't figure out how to explain it.
 
Practice, practice and more practice, even then once you feel confident, be prepared for some miscues on the real thing, especially for the first couple of guns. It looks like you are practicing on one of Jim's practice blanks, if so, great, if not, get a blank and rasp it to the shape of a gunstock. I do most of my carving using a Pfeil 16-1 V tool. I approach every section with the mindset that once my tool is on wood, it is continually turning or creating a curve. Also, I try to anticipate the path of the tool as I move it along, this eliminates last minute corrections which lead to "elbows, hooks, etc.". Use a small carving mallet with light taps. Have a way to keep your tools SHARP. Stropping is great and I do it often, but eventually you will need to actually re-sharpen the tool. Chase carving (V tool/mallet) has it's advantages but takes a lot of practice as you are constantly changing tool direction and height as you move along your work. Finally, if it doesn't look right with pencil, it will not look right once carved. I try always not to carve on the same day as I draw the design as I always end up tweaking it a bit once it gets a second or third look.

Carved gun #4
P1000823.JPG


Carved gun #7
P1010607.JPG
 
Great advice from TommyG. Cutting incised carving or outlining relief with a v chisel is very much like engraving. It’s all about twisting your upper body as you go. Then stopping, re-positioning the stock or moving yourself around the work and going further until you’re uncomfortable again. Almost all “elbows” happen when the chasing engraver or chasing carver is no longer comfortable twisting the upper body and/or is losing good view of the chisel and line.
 
Thanks guys, that's helpful. I'm using a Pfeil v gouge so I have a quality chisel, I just need to get my skills up to par.
 
I have top grain leather glued to a piece of wood, and use Simichrome from the Harley shop to strop the chisels.

When I do need to take a chisel to the diamond stone, I use my engravers sharpening guide to maintain a flat plane.

https://www.gessweincanada.com/product-p/816-1000.htm

Another easy way to check your art, is to use a mirror. For some reason, it really jumps out at you if something isn't right.
 
Last edited:
Another easy way to check your art, is to use a mirror. For some reason, it really jumps out at you if something isn't right.
[/QUOTE]

I am not a wood carver...yet, or an engraver...yet, but the mirror trick is VERY GOOD advice. As an artist, I have used that trick for a LONG TIME and it works! It will show your imperfections and out of balance, symmetry, roundness... all of it. Kind of a right brain left brain trick. It never fails to point out areas that need work.
 
Practice, practice and more practice, even then once you feel confident, be prepared for some miscues on the real thing, especially for the first couple of guns. It looks like you are practicing on one of Jim's practice blanks, if so, great, if not, get a blank and rasp it to the shape of a gunstock. I do most of my carving using a Pfeil 16-1 V tool. I approach every section with the mindset that once my tool is on wood, it is continually turning or creating a curve. Also, I try to anticipate the path of the tool as I move it along, this eliminates last minute corrections which lead to "elbows, hooks, etc.". Use a small carving mallet with light taps. Have a way to keep your tools SHARP. Stropping is great and I do it often, but eventually you will need to actually re-sharpen the tool. Chase carving (V tool/mallet) has it's advantages but takes a lot of practice as you are constantly changing tool direction and height as you move along your work. Finally, if it doesn't look right with pencil, it will not look right once carved. I try always not to carve on the same day as I draw the design as I always end up tweaking it a bit once it gets a second or third look.

Carved gun #4
View attachment 111970

Carved gun #7
View attachment 111971

Thank you for the manner in which you articulated this; it really helped me and gave me some insight. I’ve been learning to wood carve and will one day move to a gun stock hopefully. These are beautiful.
 
one thing I still struggle with is carving spirals that curve evenly. I can draw them just fine using templates as a guide, but they always end up looking kind of lopsided when I actually take chisel to wood.

I know the real answer to my question is the same as "How do you get to Carnegie Hall?" but I'm wondering if there are any tips that might help me produce better looking curves. I'm using a v gouge and mallet to outline everything - I've tried stabbing in, but I have a harder time controlling the depth with that method. I do use it for certain areas as needed, though.

TommyG has given you some good advice on the use of a V Tool. For some, that is the most challenging tool and method to learn carving.

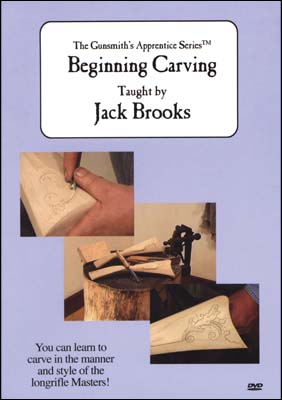
I would suggest you give stabbing in another try. I would also advise you get Jack Brooks video on Beginning Carving which is widely available.

Beginning Carving on DVD The Gunsmith's Apprentice Series, by Jack Brooks - Track of the Wolf

dvd-bc_1.jpg


The video covers:
  • Tool Sharpening
  • Stabbing in Incise Carving
  • Widening Incise Cuts
  • Accent Cuts & Modeling
  • Stabbing in Relief Carving
  • Paring the Background
  • Modeling & Accent Cuts
  • A list of recommended tools
You mention "I have a harder time controlling the depth with that method." The depth of the stab in not as critical as the depth of the angled cut for widening the incise cut and the depth of the paring cut in relief carving as long as the stab cut is deep enough. If you watch the video, you should see what I mean.

The most useful tip with Brooks method of stabbing in is using the correct size gouge to follow the curve on the volute and other design features. He actually lets the tool correct mistakes in his drawing of the design.

The major drawback to this method is that you will likely need to buy more tools.

I've attached another document from one of Brooks carving classes that list recommended tools. The video lists a few additional tools than on the pdf document, but both cover the gouges needed to make proper curves.

Here are some photos of my first ever attempt at carving. This is the practice stock I did in Jack's one day carving class. Both pictures are of the same carving. I just changed the angle of the lighting to bring out different aspects of the carving.

IMG_5080.JPG

IMG_5081.JPG
 

Attachments

  • Jack Brooks_decorative_gun_stock_carving.pdf
    213.3 KB
What I do is to stab in the design with gouges that match the curve I am trying to cut. Use the largest gouges that will work. The curves all come out very smooth with little effort. The major drawback to this method is that you have to spend a fortune for a full set of gouges.
 
Back
Top