• Friends, our 2nd Amendment rights are always under attack and the NRA has been a constant for decades in helping fight that fight.

    We have partnered with the NRA to offer you a discount on membership and Muzzleloading Forum gets a small percentage too of each membership, so you are supporting both the NRA and us.

    Use this link to sign up please; https://membership.nra.org/recruiters/join/XR045103

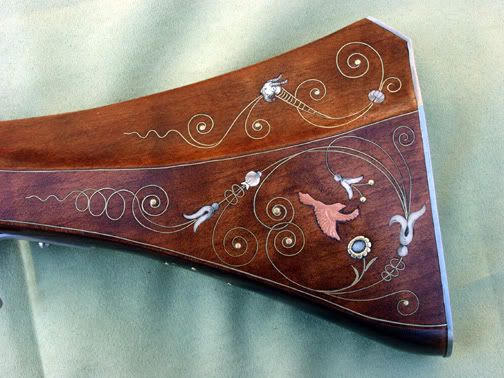
wire inlay

Muzzleloading Forum

Help Support Muzzleloading Forum:

This site may earn a commission from merchant affiliate links, including eBay, Amazon, and others.

BillAlvord

32 Cal.
Joined
Dec 23, 2012
Messages
10
Reaction score
0
I have built two muzzle loaders from kits. They both came out beautiful except for one thing. I tried to do some wire inletting and it came out pretty bad, mostly, I'm sure, because I had no clue what I was doing. In one rifle, some of the wire is actually coming out. Can anyone give me any advise---What kind of tools to use---do I build my own knife for cutting the inlay---are there books I can get to help me? Thanks for any help.
 
The Gunsmiths of Grenville County, Recreating the American Long Rifle, The Art of Building the Pennsylvania Long Rifle all have sections dealing with wire inlay.
 
If the ribbon (wire) is pulling out you can remove it and work a little Elmers (or similar) wood glue down into the slot and then reinstall the ribbon so it ends up flush with the wood.

I don't know if you did this and it's too late now unless you want to redo everything.

Next time you want to install some wire (ribbon) get a pair of leather gloves and a fine toothed flat file.

Lay the ribbon over the edge of the toothed corner and press down on it hard with a gloved finger.
With the other hand, pull the full length of the ribbon across the files corner.
Then, turn the ribbon over and repeat this on the other side.
The ribbon should end up with small sharp tooth marks on both sides.

When the ribbon is cut into lengths and installed into the grooves, throughly wet the wood to get it to shrink back down onto the toothed sides of the ribbon.
The small "teeth" will lock the ribbon into the wood.
 
The best book ever for wire work is by David Price. [www.davidpriceflintlocks.com]
Tell him Jerry Huddleston said high.
 
Hi,
There are several ways to do wire inlay. Dave Price's book describes a good method. You can use flat chisels and gouges of different sizes to stab in the line. I use those but also like to use a series of tiny chisels made from hacksaw blades. The blades have tiny tabs or cutting edges ranging 1/16" - 3/16" wide and a shoulder about 1/8" from the edge. The shoulder sets the correct depth of the cut. I set the blades in small wooden dowels, which form the handles. I tap the chisels with a light mallet. The ends of the cutting edges are slightly rounded giving the cross section a football shape. That allows me to stab in a tight curve without the ends of the chisel edge cutting a jagged line. I treat the wire ribbon with a file as Zonie described and tap it into the incised lined. I use a pair of curve forming pliers that I purchased from Rio Grande Jewelry Supply to preform curves in the wire before tapping it in a scrolled line. Fine silver wire (not sterling) is dead soft and only needs water smeared on it to swell the wood around it to hold it in place (along with the wood finish). However, brass wire is springier and I add some Elmer's glue to the water for a little extra insurance. When the water is dry, you simply file the wire flush with the wood surface. Below is a 17th century gun I did with brass wire using the tools I described. Wire inlay is not hard to do but design is everything. Badly designed wire inlay looks awful but well designed inlay can be the center of attraction or add accent and motion to inlays and carvings.

dave

earlyfowlerbuttsideplateview.jpg
 
I must be doing it wrong. I do very little. IAE I use a flat strip of brass- maybe 1/8" wide, and form it as desired and hammer it into an Exacto knife-made groove and then file off the excess brass- leaving what looks like wire.
 
I cut my wire from thin sheet brass and silver, sand one edge to sharp and draw it with a file like Zonie said.
These are some of the chisels I made from hacksaw blades and copper tubing, filled with lead. I polish the tips of the chisels so they don't pull out wood when working in a tight spot. Their easy to make. If I am working and don't have a shape For what I need, it only takes minutes to make another one.
DSCN1406.jpg

Beautiful work Dave!
Robby
 
I don't mean to be contentious but I wouldn't use any glue in the wire or on the wood unless you are using a wood such as walnut that won't need staining when you finish it. Just score it like Zonie said. You will end up with a very blotchy looking finish on maple or any wood that needs staining. There are good reasons to use pure silver but I prefer sterling because it is a lot easier to work with. I have used both. I use special tools and gouges both. One big mistake a lot of people make is using too thick of wire. I don’t use anything thicker than .008”. Some of the wire I use is only .003" thick. you can cut it with plain scissors. Dave Person does very fine work and gives excellent advise. Some of my tools are exactly the same as his.
ff-ls3.jpg
 
Hi Jerry,
Thank you for the compliment and let me pay you one in return. Every time you show us an example of your work (like that buttplate or the photo above) I am inspired to work harder, learn more, and raise my own standard of artistry and quality. In a very real way you are teaching and mentoring possibly without knowing that you are doing so. Thank you.

I use fine silver ribbon because the higher copper content in sterling silver causes it to tarnish faster. However, that may not be a valid concern because the finish on the gun may seal the wire and prevent or slow tarnishing regardless of the silver alloy. The slightly greater springiness of sterling might create tension that holds the wire better in scroll work. I'll have to try it. I used diluted Elmer's glue to help lock the wire in place on the gun I showed above. The stock is cherry stained to look like applewood from northern France and the diluted glue did not affect the staining. The secret is diluting it a lot with water. However, I am certainly not convinced that glue is necessary. Water to swell the wood and the stock finish may be all that is necessary, which is what Dave Price also recommends.

Take care,

dave
 
Dave .
There is some glue on that wire work. On some wood you can get away with it but I don't think one could on maple. It's almost impossible to do any large amount of wire work without using some kind of glue here and there. If I were doing it on maple I think I might try staining the wood prior to doing the wire work. That might help a lot. The darker the wood the easier it is to hide any flaws.
If you can't see it it isn't there --Right?
 

Latest posts

Back
Top