• Friends, our 2nd Amendment rights are always under attack and the NRA has been a constant for decades in helping fight that fight.

    We have partnered with the NRA to offer you a discount on membership and Muzzleloading Forum gets a small percentage too of each membership, so you are supporting both the NRA and us.

    Use this link to sign up please; https://membership.nra.org/recruiters/join/XR045103

Action shield

Muzzleloading Forum

Help Support Muzzleloading Forum:

This site may earn a commission from merchant affiliate links, including eBay, Amazon, and others.
That shield idea is one of Mike's mods I really like! Wonder if Colt ever entertained any thinking along this line?

Didn't see this till this morning ( don't know how I missed it!) but thanks and I'm sure somebody did the same thing back then. I'm not sure there's much of anything "new" that could be "thunk" up. I know of one other fellow that offered this mod but he's since moved to somewhere in Alaska.

Mike
 
If one is handy and has a drill press and Dremel then is fairly easy to install. I leave the brass just a tad longer and then adjust for clearance till just right. I like using the Irwin Cobalt tipped bits for this. Cuts into the hammer very easily. Mike goes deeper with this doing other adjustments.
I didn't drill my hammers. I just cut a slot with the dremmel and using a spot of soft solder, soldered the shields in place. On the curls I had to trim them for clearance where there is still a small opening at full cock but is very, very close to the frame when the hammer is down. For shields I used brass from .45-70 casings, which once annealed, was very easy to work.
 
I didn't drill my hammers. I just cut a slot with the dremmel and using a spot of soft solder, soldered the shields in place. On the curls I had to trim them for clearance where there is still a small opening at full cock but is very, very close to the frame when the hammer is down. For shields I used brass from .45-70 casings, which once annealed, was very easy to work.
Hopefully the solder won’t come loose from recoil vibration.
 
Thanks. I just ordered some .010 thick brass. I have an Uberti 1862 pocket police coming and I know I’ll be doing a couple things at some point to boost its reliability.
I have a Pocket Police model too. I highly recommend to file away any sharp edges on the hammer face, specially the safety notch and smooth out any file marks with stones or emery cloth to reduce cap sucking. I think my brass sheet is .010 from K&S and works great as the action cover. I also replaced the stock nipples with Slixshots.
 
Thanks, I’ll deburr and stone the hammer and notch also. I wasn’t sure if the Slixshots would be better than the Treso nipples. Did the slixshots help? I was thinking of installing a cap rake also. Looks like a simple thing to install that would probably help.
 
Thanks, I’ll deburr and stone the hammer and notch also. I wasn’t sure if the Slixshots would be better than the Treso nipples. Did the slixshots help? I was thinking of installing a cap rake also. Looks like a simple thing to install that would probably help.
You are welcome. The Slixshots helped at reducing cap jams but can’t comment on the Treso since I don’t have them in my pistol. Try the Treso first after defanging the hammer and see if it works for you. The cap rake is extra insurance against cap sucking so it may be a good choice.
 
Since I had the "Manhattan Conversion" done on my 4 1851s I use for cowboy action, I haven't had a spent cap fall back into the action...View attachment 222317Still get them in the web of my hand, tho'! ;)
So in this conversion the mod retains the spent cap on the nipple until it revolves and either stays put or comes off against the shield not allowing it fall down in the action via the hammer cut ?
Huh, that looks like a pretty good mouse trap as well. Love seeing new to me stuff I haven't been aware of before.
Looks like the lower hammer face would need modifying to fit the mod gap .
 
Last edited:
So in this conversion the mod retains the spent cap on the nipple until it revolves and either stays put or comes off against the shield not allowing it fall down in the action via the hammer cut ?
Huh, that looks like a pretty good mouse trap as well. Love seeing new to me stuff I haven't been aware of before.
Looks like the lower hammer face would need modifying to fit the mod gap .
What I've observed is that with the vented SlixShot nipples the caps usually blow out at the sides, staying on the nipple until rotated by the recess in the recoil shield. They're too wide to fit thru the narrowed hammer slot. Yes, the hammer nose is narrowed to fit thru the slot. Additionally, the slot in the hammer face has been filled, as there is no need to cap all 6 chambers in cowboy action. If there is a reload required, I carry all 6 chambers charged, and then cap the 6th after the beep and pulling the hammer to ½ cock. cap, then proceed to fire all 6 rounds.

DSCN1503[1].JPG
 
What I've observed is that with the vented SlixShot nipples the caps usually blow out at the sides, staying on the nipple until rotated by the recess in the recoil shield. They're too wide to fit thru the narrowed hammer slot. Yes, the hammer nose is narrowed to fit thru the slot. Additionally, the slot in the hammer face has been filled, as there is no need to cap all 6 chambers in cowboy action. If there is a reload required, I carry all 6 chambers charged, and then cap the 6th after the beep and pulling the hammer to ½ cock. cap, then proceed to fire all 6 rounds.

View attachment 224158
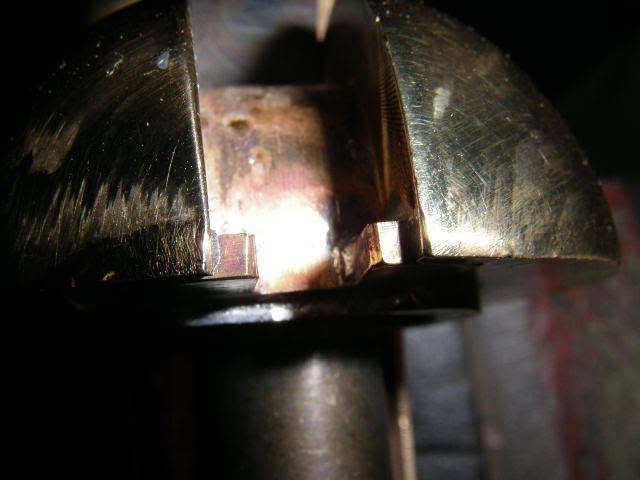
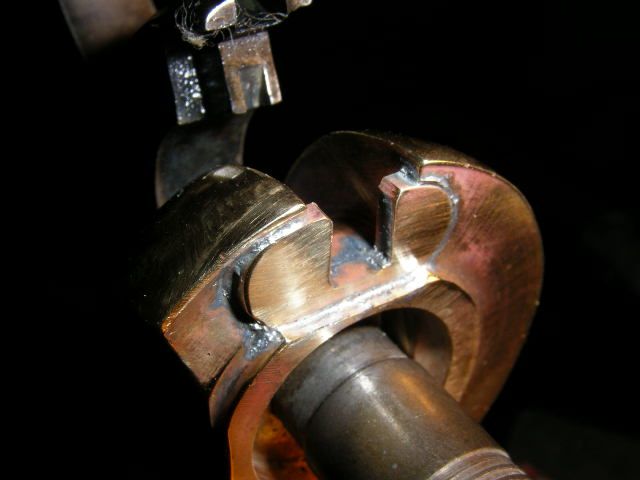
Could I get you to show a picture of how the cap shield is mounted in the recoil shield ? I'm wondering if there is a milled slot in the recoil shield face and the cap shield is brazed in flush fit ?
 
capshield012.jpg


capshield_007.jpg

(not pictures of mine, as I have the face of the hammer filled and hardened).
Thanks for the pictures, that's pretty much what I envisioned looking at your first photo. I like the mod very much. That mod still allows the use of the safety pins for six shot carry .
 
I recall seeing a “Manhattan“ conversion in which the blocking element was a very thin piece of steel inlet into the recoil shield and screwed in place on the left side of the hammers slot only. The nose of the hammer was shortened a corresponding amount and this thin piece of steel, something like a flexible hammer block, made contact with the cap upon firing. There was a hole drilled in this piece of steel for the pins so that when they lowered the hammer between chambe it would prevent rotation of the cylinder until the hammer was cocked for firing.
Unfortunately the percussion revolver era was short enough to preclude further experiments along these lines.
 
Back
Top