• Friends, our 2nd Amendment rights are always under attack and the NRA has been a constant for decades in helping fight that fight.

    We have partnered with the NRA to offer you a discount on membership and Muzzleloading Forum gets a small percentage too of each membership, so you are supporting both the NRA and us.

    Use this link to sign up please; https://membership.nra.org/recruiters/join/XR045103

Advice on finishing wood please

Muzzleloading Forum

Help Support Muzzleloading Forum:

This site may earn a commission from merchant affiliate links, including eBay, Amazon, and others.

Dross

32 Cal.
Joined
Oct 18, 2008
Messages
9
Reaction score
0
Hi,

I'm in the process of assembling a Pedersoli Brown Bess kit. I could use some advice on finishing the stock.

My plan-of-action is to stain the stock with Dark Walnut oil based stain then rub in some liniment oil.

So far, the gun seems quite dark, that's after 3 coats of stain. --possibly too much?

I'm concerned I didn’t sand it enough as well.

What do you think? Should I sand the stock down a lot more then just put a single coat of stain and oil on? Should I be stripping it and starting over or is it acceptable as is? If it’s acceptable or salvageable I’d prefer not to strip it down. Just so you know, it is smooth. I can rub a cheese cloth over it without it getting caught up.

Opinions are very appreciated.

Thanks!


IMG_0640-ms.jpg


IMG_0681-sm.jpg


IMG_0682-sm.jpg
 
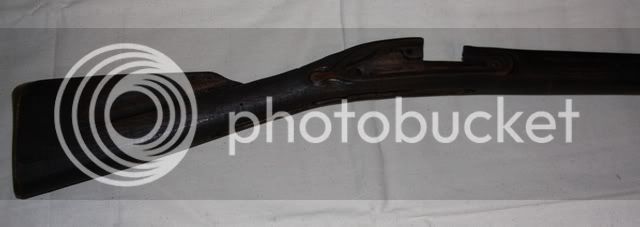
IMO, you should get out the sandpaper again.

I am seeing a number of marks that were left by the gunstock profiling machine and these should all be removed.

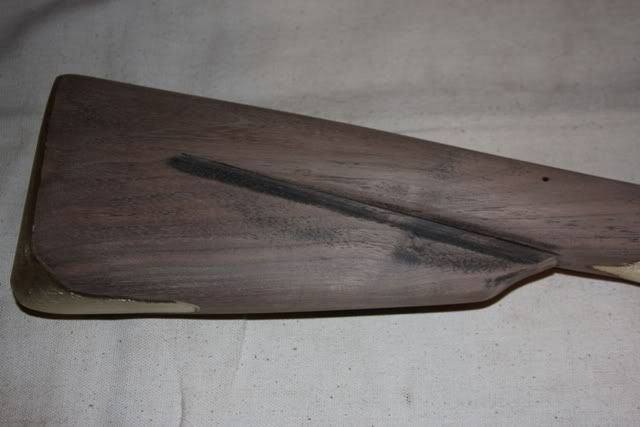
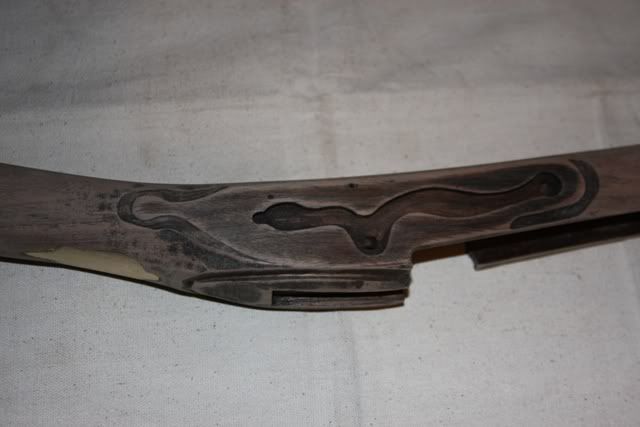
To clarify what I mean, in the lower picture I am seeing many vertical stripes. These were left by the cutter on the machine that formed the stock and they should not be at all visible.

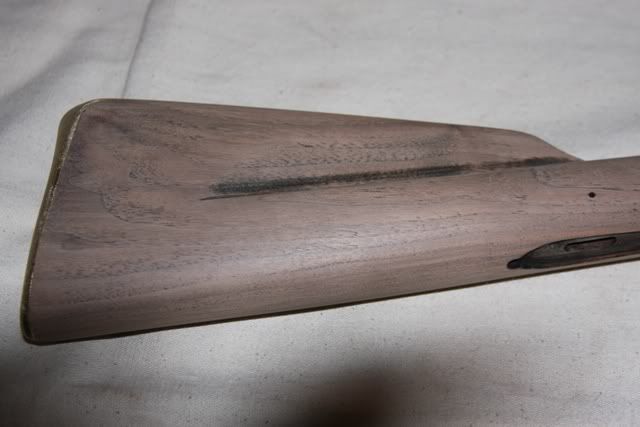
Some of these marks may have been left by your sandpaper too.
Are you sanding "with the grain"? That is, in the long direction of the stock?
Sanding "cross grain" will remove a lot of wood real fast but it also leaves a lot of visible marks.

The primary rule to remember when sanding is always sand "with the grain". The only time sanding across the grain is used is (as I mentioned above) when a lot of wood needs to be removed or when there is no other choice.

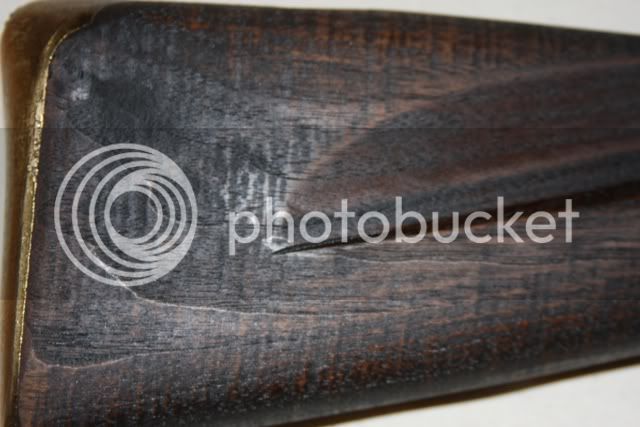
As I sit here looking at that picture, I also notice that the edges of the butt plate still look rough. They should not have a rough surface so, here is what I suggest:
First use a flat file and slowly file the edges of the butt plate so it is a smooth continuous surface. It may be slightly smaller than the wood.
When the metal part is smooth, then start sanding the wood down to match the butt plates size and shape. When you do this, do not sand just in the area of the butt plate. Continue your sanding at least 8 inches up the stock from the metal. 10 inches is even better.
What you don't want to end up with is a large chunk of wood with the ends tapered down to the metal size. You want a nice smooth piece of wood that doesn't change directions rapidly. It blends and fairs into the metal parts.
Yes, I know. This is a lot of work but if you put this work into your project when it is finished you will be real glad you did the extra work.

Now. Speaking of the stain, usually Walnut doesn't require any to look good.
Although it looks rather light colored it darkens a lot when it is finished. To see the actual unstained color just apply some water to the surface. That is the color and darkness it will be when it is simply finished with a finishing oil.

I do not and I can not recommend ANY oil based stain. I'm not saying they won't work at all but they usually tend to mask or cover the fine grain of the natural wood.
I do recommend the alcohol based or even the water based stains over any oil based stain made.

Walnut is called an "open grain" wood. This is because the pores of the wood are open at the surface.
Since you are building a Military arm, it is totally acceptable to leave these pores "open" when the gun is finished.
Actually to finish the gun after you have removed all traces of the stock cutting machine and blended its surfaces with the metal parts all you need to do is to apply several coats of Linseed Oil.

Linseed oil was used on the originals and it will work nicely on your gun as well.
It does not dry very rapidly. Plan on applying a generous coat and let it sit overnight. Then apply another coat and again allow it to sit overnight.
After about a week of this (or 6 coats) you will notice that the wood is no longer absorbing all of the oil. It is beginning to dry on the surface.
Yes, many of the open pores will still be open but that is the way it is supposed to look on a military gun.

Get out the sandpaper and give it another shot.
Most of all, don't get discouraged. Keep at it and it soon will be looking like a professional did the work. :)
 
I suggest using either a hard backing, or a flexible backing for your sandpaper that will allow you to remove the ridges without sanding the furrows left by the stock profiler.

Like Zonie says, blend the various surfaces so the lines flow cleanly between areas of the stock. Don't worry about removing the stain. sanding will do that as you clean up the surface of the wood.

I suggest beginning with 100 grit sandpaper to remove the machine marks, then progress to 180-220-320 then whisker with 320 a coupla times.

Wet the surface of the wood to see what it will look like after the finish is applied. Stain with an alcohol based stain, if necessary, and apply the finish.

I prefer to finish with Chamber's oil finish. Chamber's finish is an excellent finish that looks a lot like linseed oil, but dries faster and seals the wood better.

Good luck,
J.D.
 
Thanks guys, I understandnd what you are saying and feel this gun is worth the extra time it takes to finish properly. I have a small Black and Decker "Mouse" sander which I believe vibrates orbitally. Is it alright to use this? Could I use it to take out the machining marks then finish with a fine paper by hand, sanding with the grain, or should I sand strictly by hand?

About the Butt Plate, all the brass in the kit is very rough. I was planning on either using a brass polish or posting a question on how to finish it here.

Thanks!
 
I hesitate to recommend the use of any power sanders unless I have some idea of the worker's skill level. Powder sanders can take off way too much wood, and ruin a stock quickly if you are not careful. If you are not experienced using this oscilating sander, then leave it alone and use sanding blocks. ( ie. sand paper backed by various shapes of wood blocks.)

Stay away from OIL BASED STAINS. Walnut generally look terrific without being stained further.

If you do use Boiled Linsead Oil( BLO) to finish the stock, put the stock in the sunlight to allow the Ultra violet light to help cure, and dry the oil finish between coats. Otherwise, you get a gummy film on the surface, but it remains wet underneath and can take years to dry properly. I am using Birchwood Casey TRU-OIL to finish my stocks, because it handles well. I have done several walnut stocks with it over the years. Stratch and rub in the coats, and then let them dry in a lint free place. If you find spots where the finish begins forming a glaze on the surface of the wood, use some fine steel wool, or very fine wet/dry paper to sand that shiney sport down, and continue on with rubbing in coats of finish.

I find that nothing really appears to be happening until I get at least 7 coats of finish rubbed into the stock. Depending on the wood, and how much I want to fill those pores, it may take 15 coats rubbed in to get the finish I want.
 
The rough edges on your brass parts is due to the fact that they are just sand castings.
As I mentioned, the edges should be carefully filed to maintain the shape but to remove all of the pits so that you will have one unblemished surface.
After that don't polish them yet. They will get some sanding marks on them while you reshape the wood to match their edges.
After getting the wood down to match the metal parts, then a very light sanding using a wet/dry silicone carbide (black) paper will remove the scratches left by the wood sanding. Then you can polish them.
Use this same black silicone carbide paper to sand out all of the rough cast surfaces that will show when the part is installed.
This paper is a "wet/dry" paper that can be used with water and sometimes a little water will help to wash away the metal particles that are removed.
As with all sanding, start with the rougher grits and when the surface looks uniformly smooth then go to the next finer grit and repeat the sanding.

Yes, for the rough wood removal you can use your orbital sander but remember, you want to get rid of the machineing marks but you do not want to greatly change the overall stock shape.
The sander has a fairly hard flat surface and it will want to flatten out the areas that are being sanded. Because you really don't want to flatten the surfaces, keep moving the sander around so it does not dwell in one spot too long.
Also remember that even though it is an orbital sander you should work in the direction of the grain (butt to muzzle or muzzle to butt).

After the worst of the stock shapers marks are removed I recommend using the palm of your hand to back the paper. Apply a uniform pressure that will allow the sandpaper to follow the general contour of the wood including any convex or concave surfaces. Basically, let the paper do the work.

Because you have applied an oil stain, you will be using a lot of sandpaper. You may find that buying a whole package of the 100, 120, 180 and 220 grit will save you some money.
It is just my opinion but I think the reddish garnet paper for wood cuts better and lasts longer than the white flint or silicone oxide paper and it usually costs about the same.
 
I have been finishing gun stocks for a couple of years now and I like that red deep finish I see in most arms from 1700-1800's.

I would sand with 200 then 320 then steel wool or 600x paper by hand the stock you have.

Then I would use alcohol based or water based stain to gte your color. Oil base stains set too long and all the dust and lint in the air wil settle in it before it sets up tack free. Alcohol based stains dry very, very fast. Thin is better than THICK regardless of the stain you use. VERY THIN.

Then I would hand rub in multiple THIN, VERY THIN, coats of Tung Oil. Especialy when applied thin it sets up fast. fast enough I can sometimes get two coats on in ONE day. One before work and one after work. It gives better protection than Lnseend Oil and linseed oil, especially if applied thick can take literally months to set up tack free. Then I very lightly rub with a bit of spit and Rottenstone & Pumice to knock the shine down and get a very rich old gun looking sheen. This method has worked well for me and most of the gun guys I know see my stocks and say they are beautiful.
 
From your picture, it looks as though the wood is "deburred" not "smooth" others on here with way more guns under their belt, or over their shoulder, as it would be, then me have pretty much pointed that out. I have a LOT of experience with wood working (actuall, no manure, died in the wool, 4 years school trained, carpenter and furniture maker), and their advice is spot on. The question you asked about the metal, actually has the same answer. You need to file, sand and smooth the finish, while not destroying it's propper shape. The best way to get started with that is to mount the metal in place on the wood, then work the wood to the metal or vice versa. Be carefull not to work metal filings or cuttings into the wood, but blend them untill you have a smooth transition. Lots of work involved in making a good looking rifle from that kit.


Many on here poo-poo the "easier" kits, from traditions, Lyman and the like, but as far as the metal work, except for the pre drilled holes, the amount of prep to have it look "good" and not just "screwd together" is every bit the same as a "kit" from say, TOW. I compared the condition of the metal parts from my GPR to pictures in the TOW catalog, (a must have BTW) and the difference in starting point was minimal, again, except for the pre drilled holes. I think it is people who don't do the prep, and do just screw them together, who make those kits look so bad. My traditions came out pretty good, except where their inletting is not as close as I would like.. and of course the three different nose caps that were junk and caused me to just pour my own, lol. and the GPR is near to finished...
 
maypo and others-- great advice. I started my blunderbuss 2 months ago and while I may want to get to the next phase, I am just not happy with the metal to wood fit and although it is taking more time than "I wanted" I know this step must be done for the gun to look good. Also, the pictures in the first post show a stock that is not anywhere near sanded smooth enough to go to the next step. I hand sand and use the palm of my hand to keep from getting gouges. And yes I gradual go from coarser paper to very fine finishing off with VERY fine paper. Sure it takes longer but it is indeed a labor of love and the finished finish is best served by showing off all that "love". Yeah, I may spend two hours of total hand sanding time (actual time) on a stock. That is NOT unreasonable and when you think of how long it takes to do the project, it is small potatoes.

Also, the stain you have on there now will help fill the grain. Do not worry that you stained it already and are now being told to sand it smooth. I often apply some stain and sand it smooth and "HAVE TO" do it a few times to get the grain filled: Labor of love that pays off when other gun guys say--"Wow, I love the finish on YOUR gun."
 
I've spent a couple of hours on the stock and I'm getting to the point where I am worried for some of the finer detail areas such as around the lock.

I'm not sure if I should keep sanding to remove all the stain, or finish off with a 320 or 400 grit paper and stain again. I think I have committed myself to stain if I can't sand down the difficult areas and remove all the stain.

While there are different opinions on how exactly to treat the wood, everyone seems to agree water based stains are the best. If I were to stain it again now, could I switch to water based or do I have to stick with oil? -- or can I make a move to BLO or Tung oil?

Thanks again!

IMG_0683-sm.jpg


IMG_0688-sm.jpg


IMG_0687-sm.jpg
 
That is looking much better.

Still a ways to go around the sideplate panel (and I will assume the lock panel).

When sanding the face of the lock panel and the sideplate panel you should always use a flat board to back your sandpaper. This is the one area that a flat sanding board is necessary.
By using this flat board you won't "round over" the edges and they will stay nice and sharp as they should be.

As for the area around these panels I still see some pronounced gouges that will need to be sanded a bit more.

When sanding the area around the panels try to avoid hitting the sharp edges of the panel and concentrate your efforts on the wrist.

As for removing all of the existing oil stains if it were mine, I would.

Again, just looking at the darkness of the freshly sanded wood tells me that this stock probably does not need any stain at all.
Have you taken the stock outside into the sunlight and wetted it with a wet wash rag or a fine sprayer? I think if you do you will see that the wood darkens and the rich walnut color will be very evident. That wet surface will look just like it will if you don't use any stain at all on the wood and simply finish it off with linseed or tung oil.
If you like the color/darkness of the wet unstained wood I would strongly suggest that you sand off all of the existing oil based stain and go from there. :)
 
To get up close and personal to those areas around your lockplate and lock areas, and along the crease in the stock, wrap your sandpaper around various sized dowels and even something small and flat to get along the straight edges area. It's slow work, and make sure you do your best to stay in line with the grain of the wood, those cross grain scratches will sneak up on you at finish time... If you want to get rid of the reamaining stain (oil based) without sanding the wood past what needs to be sanded for proper fit and finish you can....

Take the stock out side, soak it with simple green, place in sun inside a black plastic bag for a day or too, rinse with hot water. You would not belive how well that can work to get oil/oil based stains out of wood. I do it all the time with M1 garands. well ok, not all the time.. but at least 10 times. :grin:

Your progress looks very good at this point, you now are seeing the difference between "deburred" and "smooooth".. again be very carefull around thos raised areas you want to keep raised and sharp.

If we can't convince you NOT to restain that beautiful piece of walnut, keep in mind that a) the finer you sand, the LESS effect your stain will have, and b) water based stains will "raise the grain" and need to be knocked back down again before any final finish can be used. But I can tell you, I would be very surprised if you didn't find that a few coats of BLO didn't make her just as perty as a pearl.
 
Leaving some of that stain in the pores and around the crevices is a-okay. And yes putting water based or even alcohol based over the remnant oil based stain is fine.

I assume you want a darker stock not a blondish colour. So those remnants in the crevices and in fact will lend to character.

The question I have is do you want BROWN/ Deep Red/Brown? What color do you want?

And the end finish? Do you want it to look like a fine smooth finish or do you want some of the pores exposed? Do you want the gun to look brand new or like it hs some age and character like a an old muzzleloader?
 
What in general is the method preferred for early rifles when finishing walnut?

For contemporary as well as most every walnut stocked rifle I've ever finished you have to fill the pores as walnut is an open pore surface. This is how I was taught and carry on with today on all of my custom work.

There are a couple of methods. First being using a commercial pore filler and the second by wet sanding and using the slurry of the sandpaper and tung or BLO to fill the pores. Since I find that staining and then wet sanding generally removes the stain from the surface (you are removing wood after all) I mix my stain with the tung or BLO.

This leaves you with a glass smooth stock with no open pores. I generally start with 400 grit and work my way to 1200 to 1500 grit wet/dry silicon carbide paper. The latter rubbings just work to smooth the surface as the tung or BLO build up. If you finish with a fine steel wool it leaves a nice matte / semi-gloss surface.

At least this is how I've always gone about finishing walnut... Maybe I am off base with this era of rifle. I'll say one thing... This method is labor intensive...You must also take care to keep sharp features sharp.

This GPR has 12 coats of tung oil, hand rubbed applied over a one month period.

P1120452.jpg


P1120449.jpg
 
Zoar,

You ask a good question. I've never seen a Brown Bess or even a flintlock in real life. All I've seen are videos on Youtube.

Obviously my woodworking skills leave a lot to be desired - and that's putting it nicely. I think the best thing for me is to make it look like it has some age and character. I'm assuming that means any mistakes I make and imprefections will be tolerated. It sounds like open pore is more suited to my skill level.

At this point, I'm going to use a block to sand down the face of the lock and lock plate sections. I'll take a shot at sanding down the finer detail around those areas taking care not to round out the straight edges. I'll then buy a Brown water based stain. Should I be sanding between coats of stain with very fine sandpaper - like a 400 grit?

I'll then put a few coats of BLO on it. Again, should I be sanding between BLO coats with very fine paper?

Thanks everyone for all you great comments. I'm learning a lot.

Regards,

MaxGen...
 
I agree that with a rifle made for civilian use that filling the open grain that Walnut has is a good idea.
On the other hand, I rather doubt that the Armories that made the Military guns went to the bother of filling the open grain on a Brown Bess.
It is very clear that Springfield Armory did not fill the grain on my original M1842 musket with anything except linseed oil. The oil sealed the grain but it did not "fill" it.

As Mike Brooks implied, you will need to "whisker" your stock if you are going to use a stain on it.
IMO, even if you are not going to stain it whiskering the surfaces is a good idea before you apply the finishing oils.

If your not familiar with "whiskering" it is a process where the loose ends of the woods grains are made to rise or to stand up like a whisker.
The resulting whisker is lightly sanded off using new sandpaper sanding in a direction that is "against" the whiskers.

To do this, after you have finished all of the sanding, wet the wood with water. Let it stand until the water is completely dry.
If you feel the surface it will feel very rough from all of the wood fibers that are standing up.

If you run your finger in one direction along the grain it will feel rougher than if you run your finger in the opposite direction along the grain.
Sand towards the direction that felt the roughest.
I like to use 220 grit sandpaper to whisker because the finer grit papers will not really cut off the wood fibers, it will just crush them back down against the surface.
A few light strokes will do it. Using a heavy force will just open new wood pores which will make more whiskers.
After doing this once, do it again.

After whiskering, the wood is ready for staining or just finishing with some coats of linseed or tung oil.
 
Thanks Zonie,

I actually didn't have a clue what whiskering was, and was a little embarrassed to ask. I'm guessing I would do this to prevent the grain from rising when I apply the stain and oil? By whiskering, I'm taking care of the problem ahead of time?

I bought some American Walnut water based stain tonight. Is it worthwhile putting a coat of water based conditioner or pre-stain on first?

What about sanding between coats? Is that done to close the pores? Do I need to do it if I plan on an open pore stock?

Again, thanks
 
First, unless you have some blond wood in that walnut stock, I do not recommend Staining it AT ALL! Several others have said the same thing, but it appears you are bound and determined to stain that stock. I don't understand why. With several coats of oil finish on the wood, it will be very dark. As Ultra Violet light hits the finish, it will darken still more.

The benefit of a water or alcohol based stain is that you can put it on in thin( thinned down with water, or alcohol as is the stain)coats, and check how dark the stock is becoming.

There is NO reason to be sanding the stock between coats of stain, unless you failed to properly remove the whiskers from the stock before staining. I prefer to use a scraper, but have also employed an old scout pocket knife to use as a scraper to remove the whiskers from a stock. Do as Jim has described, working Against the grain, but along its length, not across it.

The water used to dampen the wood will cause the whiskers to rise, and stand up. When the stock is dried, then use sandpaper, or scrapers to cut off the whiskers.

I have had ONE stock made of walnut that raised more whiskers after the first coat of stain I put on. I sanded the stock down to remove the whiskers, and to remove the stain, as the stock was too dark with the stain. It had some nice grain to it, and I decided it should be shown off, not hidden under a black or near-black finish.

Someone the other day recommended using One thin, stretched coat of either tung oil, or Boiled Linseed Oil( BLO) on the stock before whiskering, as the oil will begin to fill the pores, and keeps the whiskers standing up so they can be cut off. Then, continue rubbing in coats of oil until the finish has the look you want.

If you are careless and put to thick a coat of oil finish on the wood, it will cause a wet pool of finish on the surface of the wood, which will shine at you in oblique lighting. Then you will need to use sand papers to sand it off the stock, and then go back to rubbing in the next coat of oil finish. Stretch the oil finish, as far as it will go. On a half stock rifle, you should only need a dozens or so drops of oil finish to coat the entire stock.

I use bare fingers to spread the oil on the wood, and stretch it. Then I use the butt of my hand to rub the stock to create heat, and set the oil finish in the wood's pores. Some alcohol is all that is needed to clean my hands when I finish. My stocks generally begin to look pretty good after the 7th coat of finish dries. But, I have put as many as 14 coats on a stock that had very wide open pores that were difficult to fill.

Oh, I recommend using natural light during the daytime to check the finish between each coat, to really see any shiney spots that need to be carded off( steel wool or wet/dry sandpaper)before the next coat is applied.

Do NOT Bear down on the abrasive when carding off shine in finishes. Let the abrasive do the cutting for you using light strokes. There is no need to be sanding down to wood again, or removing all those earlier hand rubbed finish coats off just to get rid of some excess finish from the last coat.
 
"I actually didn't have a clue what whiskering was, and was a little embarrassed to ask."

Don't be. We all start somewhere and you learn by asking the basic questions. And I can almost guarantee you I will take the lead in dumb questions before too long.
 
Back
Top