• Friends, our 2nd Amendment rights are always under attack and the NRA has been a constant for decades in helping fight that fight.

    We have partnered with the NRA to offer you a discount on membership and Muzzleloading Forum gets a small percentage too of each membership, so you are supporting both the NRA and us.

    Use this link to sign up please; https://membership.nra.org/recruiters/join/XR045103

aqua fortis choices

Muzzleloading Forum

Help Support Muzzleloading Forum:

This site may earn a commission from merchant affiliate links, including eBay, Amazon, and others.
Joined
Jan 21, 2021
Messages
378
Reaction score
979
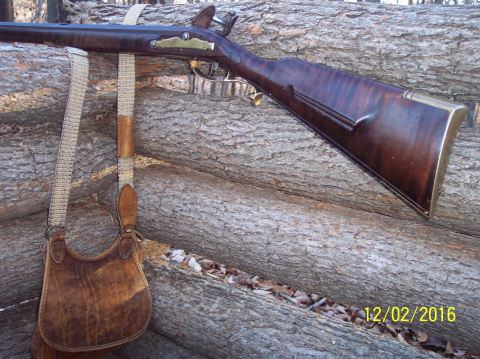
I'm planning on using aqua fortis on my next gun and was wondering If some of you out there have used different brands in the past. Specifically I'm looking to get that orange/red highlight and I wonder if one brand might lean that direction as upposed to others. I understand the wood itself is the 'wild card' in terms of results. 'Just looking for a product that leans toward the color I'm looking for. Your collective thoughts ? Thanks
 
I used Ye Original Aqufortis from Track on several rifles, I found it to be darker and will darken over time even more.

Here it is as first applied (test).

Klein Aqufortis 001.JPG


Here is the same gun 10 years later;

rFT54U0.jpg


I have used Jim Kibler Iron Nitrate as well, it is also dark on the wood I used it on.

squirrel rifle done 005.JPG
 
57% nitric acid (aqua fortis) cut with 5 parts water to 1 part nitric. No iron added and clear as moonshine.
Here is a maple stock (by Jim Hash, can be seen in Three Centuries of Tradition) colored with same over 30 years ago
1400612616585.jpg
 
'Thanks Gents. I like the Kibler's nitric on Eric's gun, and Capt's even better. 'Never heard of the nitric mix with no steel in it. That did come out 'clear'. I was just guessing that the type of steel dissolved probably determined which way the color highlights went. thanks again, especially for the pics !
 
Try using Ferric Nitrate ("FN") crystals you can get from The Science Company. You can mix it in water or alcohol, but I use water because it evaporates more slowly and gets in the stock deeper. The advantage of it is that you can control your portions very precisely, and unlike liquid AF, the crystals never go bad or get questionable after a couple of years.

Like you I was looking for that "orange pop" at the end. I tried neutralizing with household ammonia, and then baking soda. It looked about the same. I tried various stains over the top (of the blushed FN treatment), and before. Nothing seemed to just "be there". Then I tried a very strong solution of lye (as the neutralizing agent). You can make it yourself from wood ash, or just buy a small bottle of crystals from the hardware store. (It only costs a couple of bucks.) That gave me the orange I was looking for. It also seemed to make the curl pop more. Just be careful around that stuff because lye burns can be every bit as serious as acid burns, especially around your eyes. Wear gloves, (and goggles if you want to be super safe). Also, the lye solution will leave an ugly white powder residue on your stock when it dries. That can be a real pain to get out of carving crevices. You can brush it off when it dries, or, just hose off the stock with water while it's wet and the lye has been in there a while. You just have to get rid of it before you put anything else on there.

Why don't you try a few different stains (and finishing concoctions) on your test strip and see how you like them all. (It's best if you have scrap left over from the actual blank you're working with.) I bet I try close to a dozen different stains and finish configurations on each gun. If you run out of wood you're testing on (each piece of wood has 2 sides), run it over the belt sander and. it will be gone in a flash. You won't REALLy know what it's going to look like until you get your top coat of varnish on there, so after the stain dries, put a coat or two on there.

Another thing you can do to enhance the curl is to rub it back with steel wool after it's neutralized. The risk of iron flecks blackening and freckling your stock from the acid has now passed.

One other thing to consider is the light you are looking at your results in. It's best if you can do it during the day time, under normal "mid dayish" outdoor light, sunny or cloudy.

While many feel that finishes are a frustrating ordeal, (mostly because they just want to get it done) I think they pose great opportunities for experimentation. You've spent forever to get it to this point, why rush the last little bit? The finish that's on the gun is one of the first things that somebody notices (or doesn't notice specifically if it's done well), and if it's a bad one, they won't see much of anything else on the gun.
 
Last edited:
Try using Ferric Nitrate ("FN") crystals you can get from The Science Company. You can mix it in water or alcohol, but I use water because it evaporates more slowly and gets in the stock deeper. The advantage of it is that you can control your portions very precisely, and unlike liquid AF, the crystals never go bad or get questionable after a couple of years.

Like you I was looking for that "orange pop" at the end. I tried neutralizing with household ammonia, and then baking soda. It looked about the same. I tried various stains over the top (of the blushed FN treatment), and before. Nothing seemed to just "be there". Then I tried a very strong solution of lye (as the neutralizing agent). You can make it yourself from wood ash, or just buy a small bottle of crystals from the hardware store. (It only costs a couple of bucks.) That gave me the orange I was looking for. It also seemed to make the curl pop more. Just be careful around that stuff because lye burns can be every bit as serious as acid burns, especially around your eyes. Wear gloves, (and goggles if you want to be super safe). Also, the lye solution will leave an ugly white powder residue on your stock when it dries. That can be a real pain to get out of carving crevices. You can brush it off when it dries, or, just hose off the stock with water while it's wet and the lye has been in there a while. You just have to get rid of it before you put anything else on there.

Why don't you try a few different stains (and finishing concoctions) on your test strip and see how you like them all. (It's best if you have scrap left over from the actual blank you're working with.) I bet I try close to a dozen different stains and finish configurations on each gun. If you run out of wood you're testing on (each piece of wood has 2 sides), run it over the belt sander and. it will be gone in a flash. You won't REALLy know what it's going to look like until you get your top coat of varnish on there, so after the stain dries, put a coat or two on there.

Another thing you can do to enhance the curl is to rub it back with steel wool after it's neutralized. The risk of iron flecks blackening and freckling your stock from the acid has now passed.

One other thing to consider is the light you are looking at your results in. It's best if you can do it during the day time, under normal "mid dayish" outdoor light, sunny or cloudy.

While many feel that finishes are a frustrating ordeal, (mostly because they just want to get it done) I think they pose great opportunities for experimentation. You've spent forever to get it to this point, why rush the last little bit? The finish that's on the gun is one of the first things that somebody notices (or doesn't notice specifically if it's done well), and if it's a bad one, they won't see much of anything else on the gun.
Thanks col. BG, I made myself a note of this for future reference. This gets a definite try. What would be a good starting ratio of granules to water (roughly)? I have plenty of off-cut curly maple to experiment on. Thanks!
 
Start with 6:1 for your test strip, (but you could go more dilute too) Just 1/4 tea spoon and 1 1/2 tsp of water. Mix up another at 4:1 right next to it and blush then at the same time and see if you see much of a difference. You won't get very much (of the mixed up solutions), but then you don't NEED very much. Not for a test anyway. Experiment with different neutralizers too; ammonia, lye, baking soda. The important thing is to mark and label things accurately so that you can repeat your formula, and only to change one (or at MOST 2) variables at a time. Once you "get there" you want to make sure you can get BACK there!

You also have to remember that each piece of wood is just a little bit different too. Most will be about the same results, but some might show differently. That's why it's best if you have scrap from your actual blank to work with

I want to say the granules run about $12-$15 or so and 1 bottle of them is enough to do about 15 guns. The primary advantage of the crystals over the AF is that you can totally control the mixture. With dissolved iron going in to nitric acid you don't REALLY know how much is actually dissolved. If you use a store-bought product you don't really know what's in there either. Then there is the gas that's given off during the dissolving of the iron if you are making your own home brew. Very poisonous. If you dump steel wool in there (it's also lightly coated with oil to keep it from rusting so you have to soak it in acetone first) it will react very quickly, and give off a red cloud of poison gas.

I think one of the hardest things to do when you're doing a build is waiting long enough between coats of varnish. I finished one gun in late summer, when the humidity was about 80%, and it took almost 2 weeks to dry between coats (Varnish Oil). The whole finishing process took over 2 months (not counting experimenting time). That's why I finish the wood first, and then go on to the engraving and working on the metal.
 
Last edited:
Try using Ferric Nitrate ("FN") crystals you can get from The Science Company. You can mix it in water or alcohol, but I use water because it evaporates more slowly and gets in the stock deeper. The advantage of it is that you can control your portions very precisely, and unlike liquid AF, the crystals never go bad or get questionable after a couple of years.

Like you I was looking for that "orange pop" at the end. I tried neutralizing with household ammonia, and then baking soda. It looked about the same. I tried various stains over the top (of the blushed FN treatment), and before. Nothing seemed to just "be there". Then I tried a very strong solution of lye (as the neutralizing agent). You can make it yourself from wood ash, or just buy a small bottle of crystals from the hardware store. (It only costs a couple of bucks.) That gave me the orange I was looking for. It also seemed to make the curl pop more. Just be careful around that stuff because lye burns can be every bit as serious as acid burns, especially around your eyes. Wear gloves, (and goggles if you want to be super safe). Also, the lye solution will leave an ugly white powder residue on your stock when it dries. That can be a real pain to get out of carving crevices. You can brush it off when it dries, or, just hose off the stock with water while it's wet and the lye has been in there a while. You just have to get rid of it before you put anything else on there.

Why don't you try a few different stains (and finishing concoctions) on your test strip and see how you like them all. (It's best if you have scrap left over from the actual blank you're working with.) I bet I try close to a dozen different stains and finish configurations on each gun. If you run out of wood you're testing on (each piece of wood has 2 sides), run it over the belt sander and. it will be gone in a flash. You won't REALLy know what it's going to look like until you get your top coat of varnish on there, so after the stain dries, put a coat or two on there.

Another thing you can do to enhance the curl is to rub it back with steel wool after it's neutralized. The risk of iron flecks blackening and freckling your stock from the acid has now passed.

One other thing to consider is the light you are looking at your results in. It's best if you can do it during the day time, under normal "mid dayish" outdoor light, sunny or cloudy.

While many feel that finishes are a frustrating ordeal, (mostly because they just want to get it done) I think they pose great opportunities for experimentation. You've spent forever to get it to this point, why rush the last little bit? The finish that's on the gun is one of the first things that somebody notices (or doesn't notice specifically if it's done well), and if it's a bad one, they won't see much of anything else on the gun.
Great info. Have you ever tried extracting the lye from grey wood ash? I've seen a process using gravel and straw to filter out the lye with water.
 
No I never have. I'd be interested to know the process though. I've only used the pure product as a neutralizing agent for the gun finishing, but I guess just a cap full is great for unclogging drains. A lot of people make home made soap so I guess they start with the ash? Don't know. It's interesting to me though.
 
There are a couple of things that come to mind in this thread. First, Col. BG is correct about finishes taking a long time to cure. I cut through a lot of polyurethane finishes before I figured out that I'd better wait for at least a month before I use any pumice or rottenstone. The second thing is that anyone who has done any checkering figures out right away that stains and finishes are not "deep penetrating" like they are advertised to be.
 
Staining and finishing are one of my favorite parts of building a gun. Watching the color change and figure pop after heating FN seems almost magical and then running your first coat of finish!!! Oh man, that's where it comes alive!
 
It's also one of the great; "Ok here we go. No turning back now"moments, because all the mistakes in the raw gun are memorialized forever. It's almost like a graduation ceremony for your gun!

When I build an English gun it changes colours on me.
 
Staining and finishing are one of my favorite parts of building a gun. Watching the color change and figure pop after heating FN seems almost magical and then running your first coat of finish!!! Oh man, that's where it comes alive!
Amen ! All the drudge work is forgotten right then.
 
It's also one of the great; "Ok here we go. No turning back now"moments, because all the mistakes in the raw gun are memorialized forever. It's almost like a graduation ceremony for your gun!

When I build an English gun it changes colours on me.
Ain't that the truth! It's one of those 'OK, here we go' moments. By the way....., 'colours'....., 'love it! Every time I think I'm being witty like that, I'm only half right.
 
Start with 6:1 for your test strip, (but you could go more dilute too) Just 1/4 tea spoon and 1 1/2 tsp of water. Mix up another at 4:1 right next to it and blush then at the same time and see if you see much of a difference. You won't get very much (of the mixed up solutions), but then you don't NEED very much. Not for a test anyway. Experiment with different neutralizers too; ammonia, lye, baking soda. The important thing is to mark and label things accurately so that you can repeat your formula, and only to change one (or at MOST 2) variables at a time. Once you "get there" you want to make sure you can get BACK there!

You also have to remember that each piece of wood is just a little bit different too. Most will be about the same results, but some might show differently. That's why it's best if you have scrap from your actual blank to work with

I want to say the granules run about $12-$15 or so and 1 bottle of them is enough to do about 15 guns. The primary advantage of the crystals over the AF is that you can totally control the mixture. With dissolved iron going in to nitric acid you don't REALLY know how much is actually dissolved. If you use a store-bought product you don't really know what's in there either. Then there is the gas that's given off during the dissolving of the iron if you are making your own home brew. Very poisonous. If you dump steel wool in there (it's also lightly coated with oil to keep it from rusting so you have to soak it in acetone first) it will react very quickly, and give off a red cloud of poison gas.

I think one of the hardest things to do when you're doing a build is waiting long enough between coats of varnish. I finished one gun in late summer, when the humidity was about 80%, and it took almost 2 weeks to dry between coats (Varnish Oil). The whole finishing process took over 2 months (not counting experimenting time). That's why I finish the wood first, and then go on to the engraving and working on the metal.
So, I tried this preliminary mix with the lye rinse and it put me immediatly in in the ballpark. Nice! I have plenty of materials left to play around some more, and I will. But suffice to say, so far I'm getting a warm fuzzy feeling about this process. Many thanks!
 
The lye definitely adds some color and depth to it that you don't get with either ammonia or baking soda doesn't it?

I actually enjoy the experimentation process. Try putting a stain over the heat blushed and neutralized finish and then rubbing it back some with steel wool to see if you like that effect too. Steel wooling your raised carving will lighten the tops and convex surfaces and leave the bases and concave areas darker which will add to the illusion of depth. try it with a simple carved couple of volutes in your test piece to see how you like it. Carving just a couple of them for the purposes of testing shouldn't take more than 10-15 minutes.
 
Back
Top