attaching antler handle

Muzzleloading Forum

Help Support Muzzleloading Forum:

This site may earn a commission from merchant affiliate links, including eBay, Amazon, and others.

bwhoffman

62 Cal.
Joined
Sep 23, 2005
Messages
2,926
Reaction score
7
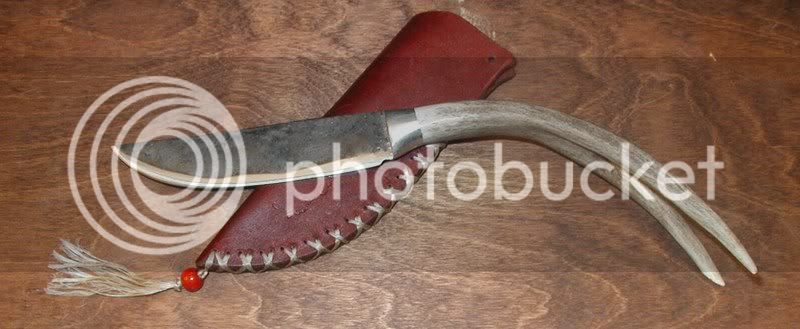
Made a nice little blade todayfrom a sawzall blade. came out pretty decent. I have what has to be the smallest 3 point shed horn I have ever seen.
I cut it for all I could get out of it and sawed a notch in the cut end about 1 1/4 inch. Blade fits good and has good working angle.
Question...What would be the best way to afix this to the blade? I was thinking clear epoxy as oppossed to drilling and pinning.
Your thoughts? horn will be lucky to make 3/4 inchin diameter!
 
If your can drill the blade you can put a pin it , then sew wet rawhide around the handle,that is my thoughts good luck
 
don't know what's best, but, am very interested in how it turns out..

a picture would be nice..

..ttfn..grampa..
 
You'll know it will stay put if you use epoxy. You could do both, epoxy it for strength and pin it for looks...
Scott
 
I would pin it, by drilling the tang, and then epoxy it so that the hole in the antler is filled and the antler supported. Antler is brittle, and you risk a failure if that hole is not filled with something.

If the blade AND tang have been hardened, just clamp the knife in a vise, with the jaws bare, and or covered with a metal material " soft jaw " of your own creation, and clamp at the back of the blade. The vise acts as a heat sink, so that your blade does not get hot. Then heat the tange with a torch to red hot, and then drill the hole, The drill will cut through like the tang is made of butter, rather than hardened steel. When you punch through the hold, simply put all the tools down, and remove the blade from the vise, and douse it in a pail or can or water quickly. Locate and drill the hole through the antler first. Then set the tang into the hole in the antler, align it properly, and then mark the location for the hole in the tang by using the holes through the antler as your guide. Depending on the size and shape of the blade, you might want to make a hilt , or cast one on the blade and front end of the antler after pinning and glueing the handle to the blade. YOu can use a low temperature product called cerrobend, that you can buy from Brownells, or TOTW. They really dress up a knife.
 
I would put a pin it or two. The hard part is drilling the hole in blade. I have drilled hacksaw blades this way, I put a small cutting stone in my drill and where I want the hole I cut a small grove in blade, this makes a place to start to drill with out jumping around and it must take out some of the hardness so drill will go throu. Worked for me. I made some small saws to carry for cutting the deer bones when gutting. These were the big type blades. Dilly
 
Cutler's resin is the authentic way to "epoxy" it in and is reversible with moderate heat.

Get "brewers pitch" from Jas. Townshend or refine your own pine pitch and add 1/4 volume beeswax and some ground charcoal. Heat it all together and mix thouroughly. Don't catch yourself on fire.

I made my own. Took lumps of pine pitch and heated over a cast iron plate on a fire, in a tin can. Added more. Picked out the twigs and bugs and lumps. Strained it by puring through another heated tin can with holes punched in the bottom. Collected it in can #3. Let it set up and noted the depth. Used that to estimate the volume. Cut beeswax and added. Went to the fireplace and got some wood that was not completely burned. Scraped off the charcoal. Ground it with a spoon in a cup.

This mix melts together and becomes runny as maple syrup, then when it cools a little, can be gathered up on a popsicle stick, etc. Save several sticks with solidified globs on them.

When you want to glue anything up on the trail or in the shop, whip out a stick, heat over a flame, smear it on both surfaces to be glued as the glob melts, put them together, add heat, position things, then let it set up.

If you do not want the black color use sawdust, very fine, as filler instead of charcoal.
 
I've have been told (by those who should know) on one I am building, that it needs to be pinned and glued both .. the glue alone will not hold it .. :hmm: :hatsoff:

Davy
 
I agree with gluing and pinning the blade. Use 20 minute epoxy. File a couple notches in the pin then clean all parts with acetone before gluing. The pin prevents the handle from shearing off the blade when pressure is applied. When you glue it up keep a couple of paper towles wet with acetone close by. You can wipe off the epoxy that seeps out and keep everything nice and neat.
 
I have made some small knives and use strong fast dry epoxy on the tang and they are there to stay, you should file a notch or two on the tang and make sure there is a lot of epoxy in the handle hole then wipe off the excess as the tang is inserted.
 
On several occasions, I've pinned and bolstered at the same time using pewter. Today's epoxy's are super strong and fairly fast - if I do use this method, I will put the antler powder/shavings from drilling over the epoxy. Then when I do my final shaping and polishing, it helps kind of hide the epoxy.
hope this helps,
 
Well thanx for all the input everyone. since I was playing with a really small antler, usable length is 3 5/8 inch and 11/16 dia max, I cut a notch 1 inch and epoxied and 2 1/8inch brass pins, peened to swell somewhat, all glued in place. It looks purt good to me! will get it dressed up andan edge on it and get a pic up here at some point!

TG, you ever get out to the flying M shoots at all? 3rd sat every month.

Brett
 
"TG, you ever get out to the flying M shoots at all? 3rd sat every month.'

They shoot the same weekend our bunch does (Oregon Territorial Freetrappers)
so it is a conflict, though I do try to get to the Memorial day Vous every year, I know a lot of the members of that club,I have not made it one of our shoots for quite a while, it is long overdo guess I better be thinking about doing that this month.
 
The old way to fix a handle is to simply soak the antler in water and tap/press the tang of the knife into the soft mush in the center of the antler. When it dries the antler holds the knife securely. This really works nicely by the way. Now that I'm starting to make knives, I like to add a pewter bolster. I skip the soaking part and drill a main hole in the antler that will hold the knife. I then drill small holes in an angle into the end of the antler that act like fingers that will hold the blade secure to the antler when the pewter hardens.
I use an old ladle to melt the pewter and a camp stove to heat it up. I make a dam around the area with paper tape and a piece of manila folder. Very simple set up. I hold the knife in a vise to keep it steady. Here's an example...
Regards
Loyd Shindelbower
Loveland Colorado
4340fastjob.jpg
 
Drilling a hole through hardened and tempered saw blades are a pain. If you think of doing some more of these you can buy yourself a solid carbide drill 1/8" ($12.00) it's what i've used and these will drill through or you can get carbide tipped mason bits. These will work and are cheaper may not last as long, your mileage may vary Joe
 
Epoxys will work some are better then others the golfclub epoxy for grips seems to get high ratings over the reg 5 min and 20 min types. Clean all your metal off and rough it a bit, wipe down with alcohol to degrease. There was some testing done in the dishwasher and the later also was found to fail after some heavy washing 6 or so
 
I got to see Bretts knife and I must say he did a great job. You really need to post a picture of it Brett! :thumbsup:
 
I used a dewalt bullet point bit with the built in lead/pilot. worked like a charm! that was with the full temper still in the blade.
 
Back
Top