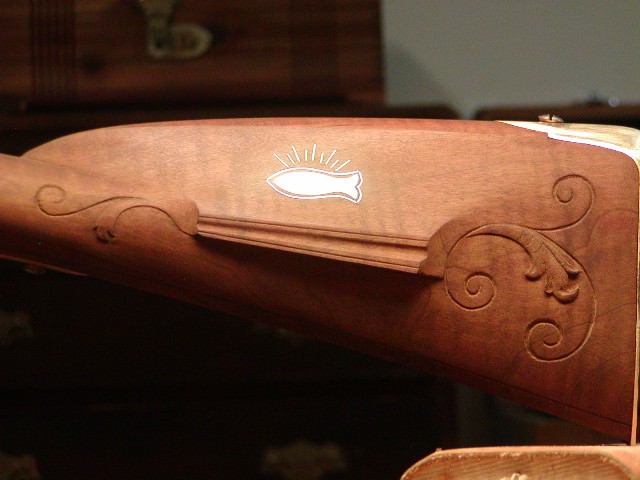
Exquisite. And I love the fish. Getting exciteder and exciteder. 
-
Friends, our 2nd Amendment rights are always under attack and the NRA has been a constant for decades in helping fight that fight.
We have partnered with the NRA to offer you a discount on membership and Muzzleloading Forum gets a small percentage too of each membership, so you are supporting both the NRA and us.
Use this link to sign up please; https://membership.nra.org/recruiters/join/XR045103
You are using an out of date browser. It may not display this or other websites correctly.
You should upgrade or use an alternative browser.
You should upgrade or use an alternative browser.
Building a Chambers Little Fella's Rifle
- Thread starter dave_person
- Start date

Help Support Muzzleloading Forum:
This site may earn a commission from merchant affiliate
links, including eBay, Amazon, and others.
- Joined
- Mar 23, 2015
- Messages
- 5,010
- Reaction score
- 3,585
Dave, I'll echo Cowboy's words.
Beautiful build, well done.
- Joined
- Nov 26, 2005
- Messages
- 5,225
- Reaction score
- 10,887
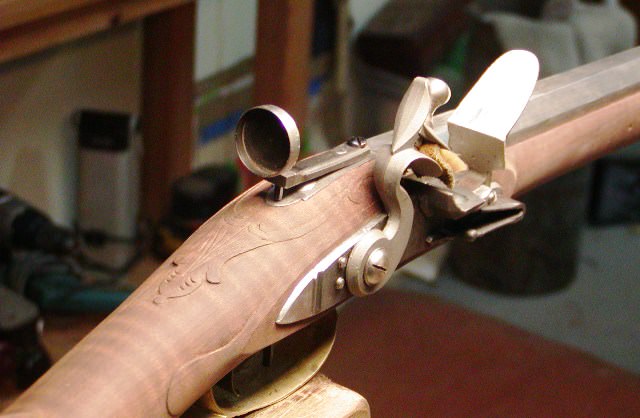
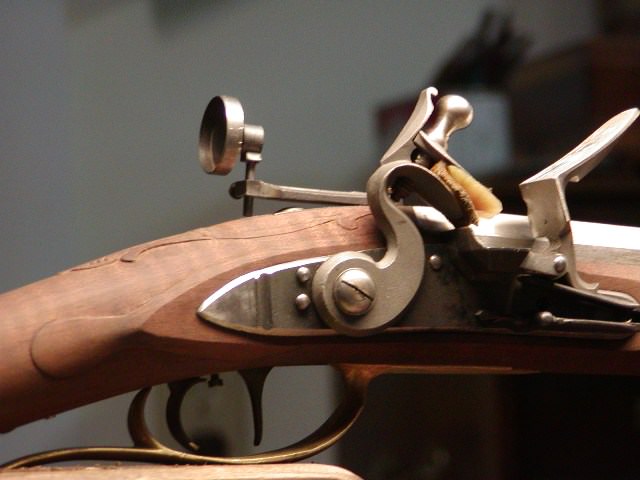
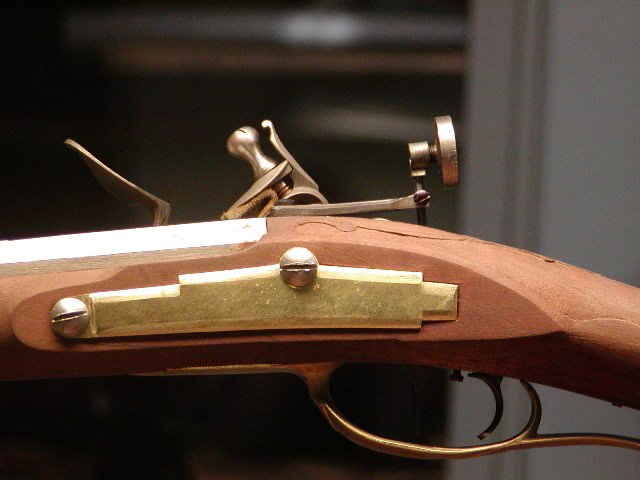
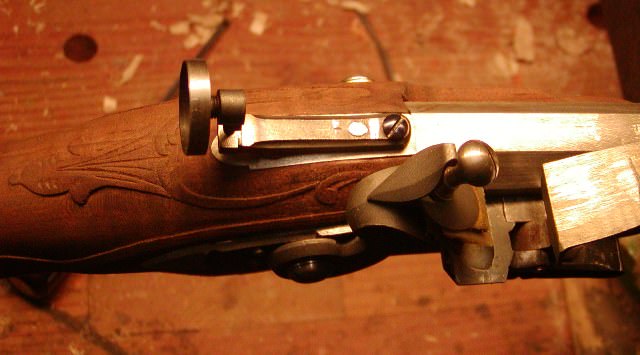
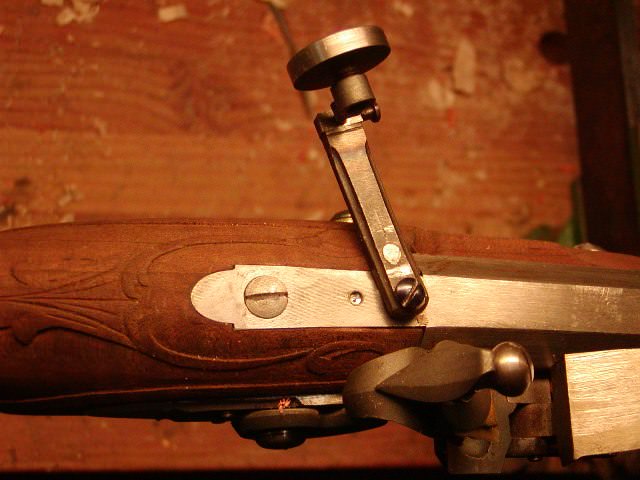
Thanks everyone for looking and kind comments. I appreciate those. Well, I stained the stock using ferric nitrate crystals dissolved in water but I also added a small amount of 10% nitric acid solution. With Frank's stock, that seemed to bring out the best figure and keep the color lighter. I always test the wood. I finished deliberating about the sights and got them done. Rifleman1776 asked me to install a peep rear sight and hooded front sight. He sent me a Johnson rear peep and a Lyman globe front sight. I figured out a way to use them effectively. It seemed to me that he needed some elevation adjustment to make the Johnson sight work with the globe front sight. So I cut apart the Johnson and remade as you see in the photos. He has elevation adjustment and can swing the rear sight off to the side after loosening the screw to access the tang bolt. I installed a detent that snaps into a hole in the tang so when he swings the sight back and tightens the screw, the sight is automatically centered on the tang. The rear sight looks authentic for the period and I think he will be deadly with this gun. I also include a photo of the finished cheek piece carving. I will be adding finish and browning the barrel during this next week.
dave

dave


Dave, I've read and looked completely through this string and I am absolutely struck by your work and grateful to you for the showing and telling. Thank you. The rifle thus far is just gorgeous and I eagerly await the final result.
ed
ed
I'm awestruck. The next couple weeks will be exciting. I have a feeling I'll do the best shooting of my life with that rifle.
CommodoreHull
32 Cal.
Wow. There are no words.
I got to visit Chambers' shop last month and it was the trip of a lifetime. You are definitely doing justice to the kit. Very impressive and exciting for this newbie to watch. Wish more builders would take the time to do detailed step-by-step blogs like this.
I got to visit Chambers' shop last month and it was the trip of a lifetime. You are definitely doing justice to the kit. Very impressive and exciting for this newbie to watch. Wish more builders would take the time to do detailed step-by-step blogs like this.
jrmflintlock
45 Cal.
WOW!
- Joined
- Nov 26, 2005
- Messages
- 5,225
- Reaction score
- 10,887
Hi,
Thanks folks. I was without power since Monday and just got it back today. We had a wet heavy snowfall that brought trees and limbs down on power lines all over the state. Anyway, I got little work done in the shop this week because of the power outage or the previous week because I was visiting my family down south over the holidays. I am back at it and will post photos soon. I need to polish and tune the lock, polish and tune the set triggers, case harden the frizzen, lock plate, and flint ****, file and polish the brass, complete the finish on the stock, and brown the barrel. I also need to shoot the rifle and make sure everything works.
Thanks folks. I was without power since Monday and just got it back today. We had a wet heavy snowfall that brought trees and limbs down on power lines all over the state. Anyway, I got little work done in the shop this week because of the power outage or the previous week because I was visiting my family down south over the holidays. I am back at it and will post photos soon. I need to polish and tune the lock, polish and tune the set triggers, case harden the frizzen, lock plate, and flint ****, file and polish the brass, complete the finish on the stock, and brown the barrel. I also need to shoot the rifle and make sure everything works.
SingleMalt
36 Cl.
Everything looks good, Dave. Definitely up to your usual standards.
- Joined
- Nov 26, 2005
- Messages
- 5,225
- Reaction score
- 10,887
Hi,
I had 2 frustrating weeks of multiple power outages lasting days so got little done since just before Thanksgiving. I am putting finish on 2 guns and it is a real problem if the power goes out because I lose heat in my shop. The finishes will cloud over before curing if too cold so I had to wait until I was confident that new power outages were not imminent. Anyway, I prepared the barrel for browning. The Rice barrel does not need much clean up, just a few strokes on each flat with a medium cut file, and then wet sanding with 80 and 220 grit sandpaper. I round off the corners of the flats a little to reduce that modern crisp machine-made look. I engraved "Braintree Hill" on the top of the barrel and my maker's mark, which Frank requested.
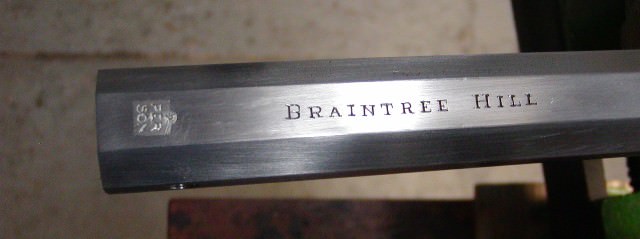
It is not a simple stamp because I cannot deeply stamp in a mark on modern steel barrels. It requires too much pressure. Instead, I engrave the outline of the "tombstone" mark on the barrel and cut a mortice using the die sinker's chisel shown.
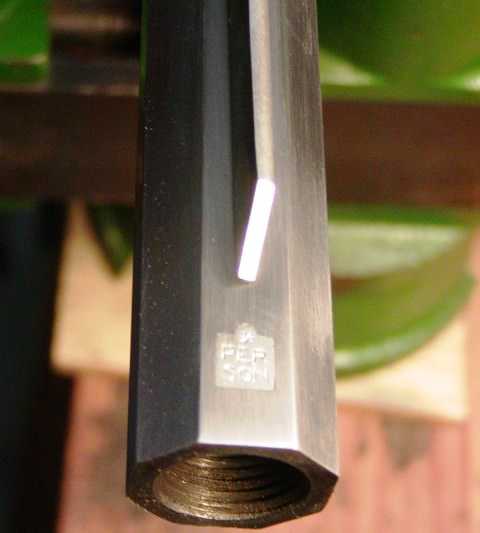
Then I have a small flat chisel on which the bottom is a little wider than the top. I use that to cut around the edge of the mortice to create a shallow dovetail. Then I cut a random pattern of little teeth on the bottom of the mortice and place in it silver sheet cut a little smaller than mortice. Using a punch and hammer, I peen the silver so it fills in the mortice and dovetails. If the mortice is deep so the silver is below the surface of the barrel, I use a stamp to make my mark on the silver. In this case, the silver is flush and I have no edges to securely guide the stamp so I just engraved the markings. It came out pretty well and will look nice after the barrel is browned.
I've started polishing and tuning the lock. It needed some work and is not the best product I've experienced from Chambers. The assembly left something to be desired. I polish surfaces with stones dipped in mineral oil. I pay particular attention to any bearing surfaces.
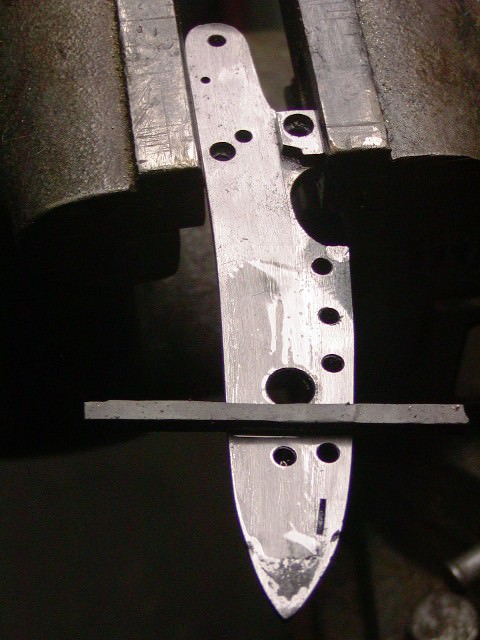
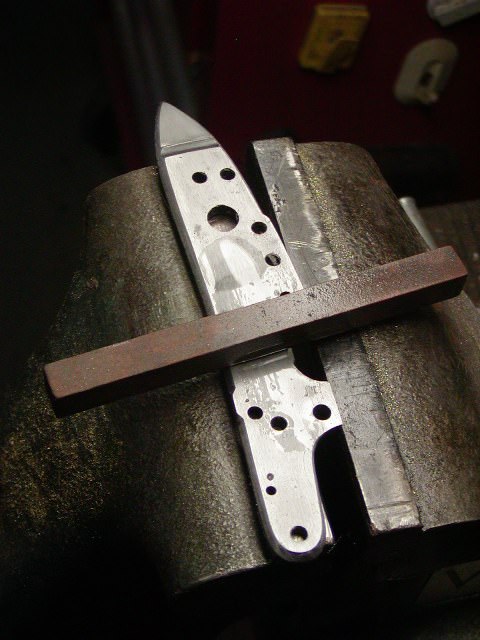
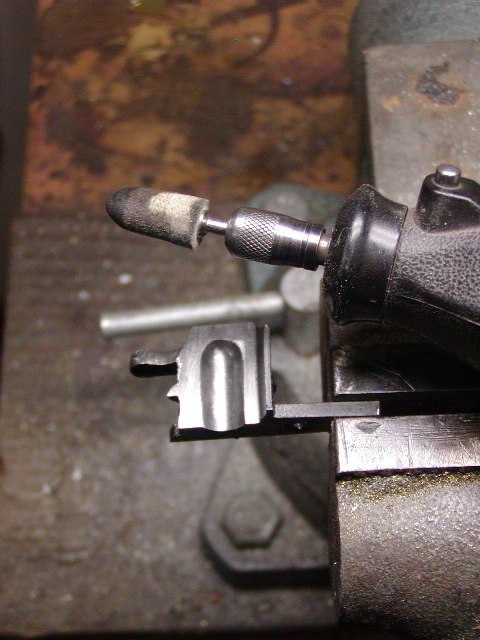
I polished the shoulder on the tumbler but it still was a rough fit in the plate. Therefore, I squirted oil in the hole, dabbed aluminum oxide powder around it, inserted the tumbler and turned it until the powder lapped the fit in the plate. It is now silky smooth.
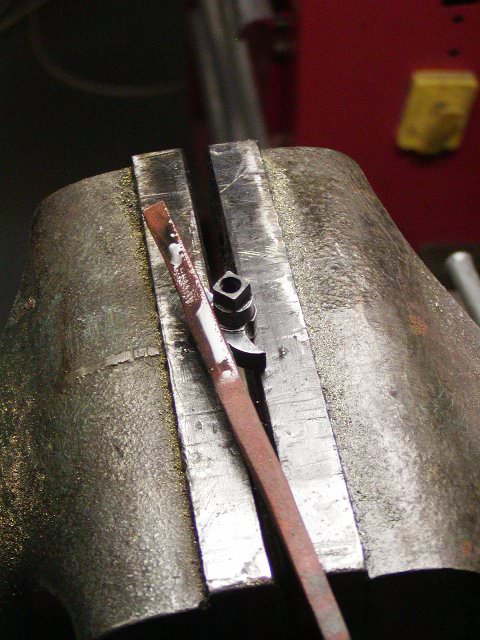
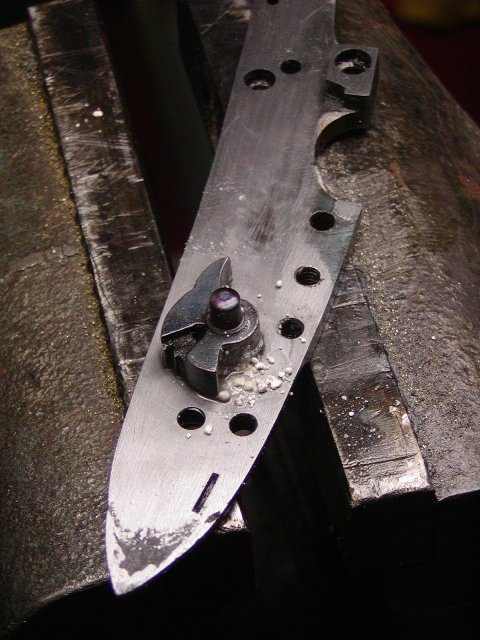
The bridle pinches the sear when the sear screw is snugged all the way down so I polished the inside of the bridle and the sides of the sear. I may have to make a new sear screw with proper amount of threads if the polishing does not cure the problem.
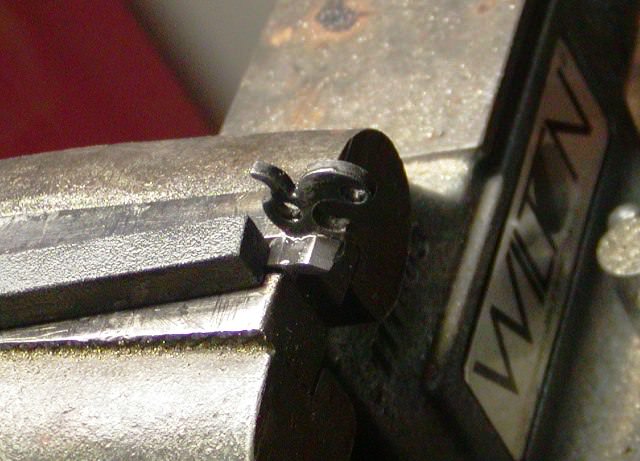
If much metal needs to be removed particularly casting seams, I often use diamond files if the part is hardened.
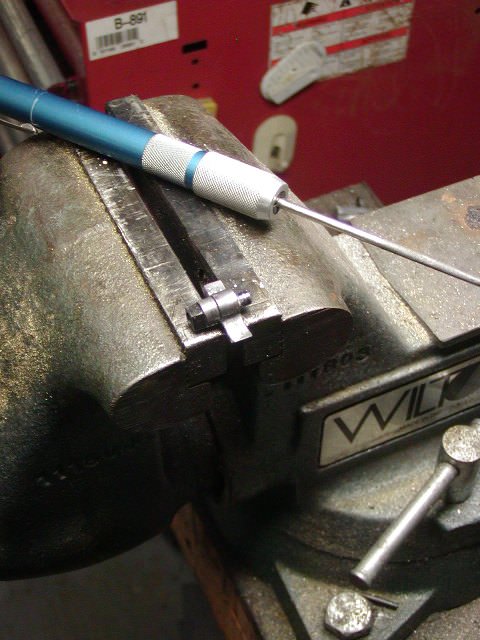
That is where I am at for now. More to come.
dave
I had 2 frustrating weeks of multiple power outages lasting days so got little done since just before Thanksgiving. I am putting finish on 2 guns and it is a real problem if the power goes out because I lose heat in my shop. The finishes will cloud over before curing if too cold so I had to wait until I was confident that new power outages were not imminent. Anyway, I prepared the barrel for browning. The Rice barrel does not need much clean up, just a few strokes on each flat with a medium cut file, and then wet sanding with 80 and 220 grit sandpaper. I round off the corners of the flats a little to reduce that modern crisp machine-made look. I engraved "Braintree Hill" on the top of the barrel and my maker's mark, which Frank requested.

It is not a simple stamp because I cannot deeply stamp in a mark on modern steel barrels. It requires too much pressure. Instead, I engrave the outline of the "tombstone" mark on the barrel and cut a mortice using the die sinker's chisel shown.

Then I have a small flat chisel on which the bottom is a little wider than the top. I use that to cut around the edge of the mortice to create a shallow dovetail. Then I cut a random pattern of little teeth on the bottom of the mortice and place in it silver sheet cut a little smaller than mortice. Using a punch and hammer, I peen the silver so it fills in the mortice and dovetails. If the mortice is deep so the silver is below the surface of the barrel, I use a stamp to make my mark on the silver. In this case, the silver is flush and I have no edges to securely guide the stamp so I just engraved the markings. It came out pretty well and will look nice after the barrel is browned.
I've started polishing and tuning the lock. It needed some work and is not the best product I've experienced from Chambers. The assembly left something to be desired. I polish surfaces with stones dipped in mineral oil. I pay particular attention to any bearing surfaces.


I polished the shoulder on the tumbler but it still was a rough fit in the plate. Therefore, I squirted oil in the hole, dabbed aluminum oxide powder around it, inserted the tumbler and turned it until the powder lapped the fit in the plate. It is now silky smooth.


The bridle pinches the sear when the sear screw is snugged all the way down so I polished the inside of the bridle and the sides of the sear. I may have to make a new sear screw with proper amount of threads if the polishing does not cure the problem.

If much metal needs to be removed particularly casting seams, I often use diamond files if the part is hardened.

That is where I am at for now. More to come.
dave
CommodoreHull
32 Cal.
Looks amazing as always. Are you going to brown the lock too?
- Joined
- Nov 26, 2005
- Messages
- 5,225
- Reaction score
- 10,887
Hi,Looks amazing as always. Are you going to brown the lock too?
No. The lock plate, flint ****, and frizzen will be polished bright, then case hardened using bone and wood charcoal. After hardening, the plate and flint **** will be tempered to 490 degrees, which will create a nice metallic bronze-brown color. I will leave them that color. The frizzen gets tempered to 375-385, a pale yellow, with the toe heated to 550+ (blue color). I'll just leave the resulting colors. All exposed screw heads will be hardened and tempered to blue and springs polished bright. The hardened steel resists rust very well.
dave
CommodoreHull
32 Cal.
Hi,
No. The lock plate, flint ****, and frizzen will be polished bright, then case hardened using bone and wood charcoal. After hardening, the plate and flint **** will be tempered to 490 degrees, which will create a nice metallic bronze-brown color. I will leave them that color. The frizzen gets tempered to 375-385, a pale yellow, with the toe heated to 550+ (blue color). I'll just leave the resulting colors. All exposed screw heads will be hardened and tempered to blue and springs polished bright. The hardened steel resists rust very well.
dave
Looking forward to seeing that!
(I'm taking notes for my future builds. Really appreciate folks like you sharing your processes and results.)
- Joined
- Nov 26, 2005
- Messages
- 5,225
- Reaction score
- 10,887
Hi,
A little more lock work as I am applying finish to the stock and letting it dry. My half-round needle file is my "go to" file for detail work on locks. It is extremely versatile for doing flat and concave areas. I show the frizzen with the file.
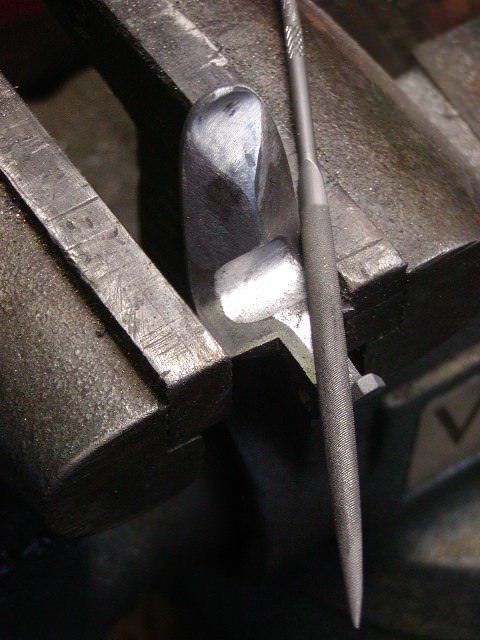
I annealed the frizzen by heating it with a MAPP gas torch to bright red and letting it cool slowly. I will case harden it later and it will produce frightening showers of sparks when I am done. If you don't anneal the frizzen, diamond files and stone and oil are your best method for polishing it and getting rid of the sand blasted finish. Don't be fooled into thinking that textured finish either left bright or browned somehow looks like an antique pitted lock. It doesn't and it looks very modern and contrived. In my opinion, browning that sandblasted finish and leaving seams and casting marks are red flags of amateur modern work. Another useful tool is a Dremel with 3-M bristle burrs. The little burrs polish metal efficiently on flat, convex, and concave surfaces without cutting too quickly and rounding off sharp corners. I typically use 100, 220, and 400 grit burrs.
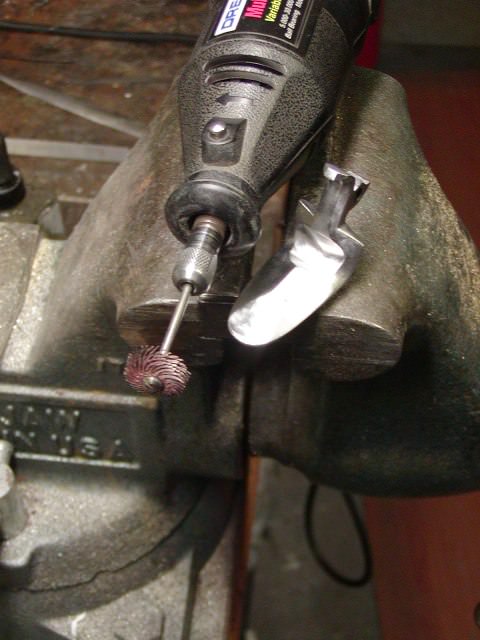
The frizzen has a small notch on the bottom of the pan cover. I am not sure how many of you know what that is for but it is so the pan cover does not compress the priming powder right in front of the touch hole. At the size that it is, it is likely useless so I use my half-round file to deepen and widen it like you find on original English locks of the period.
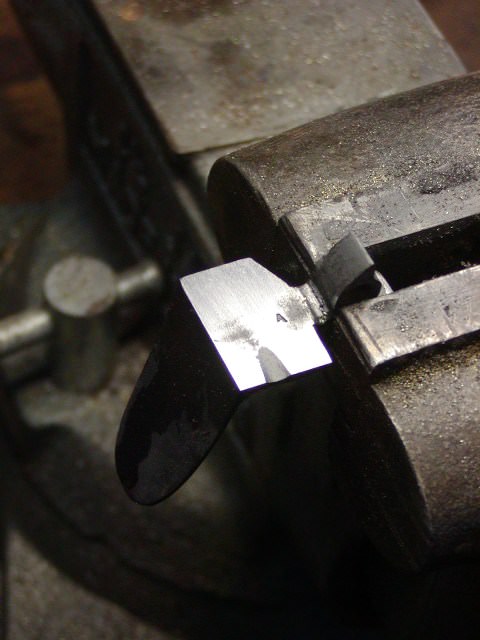
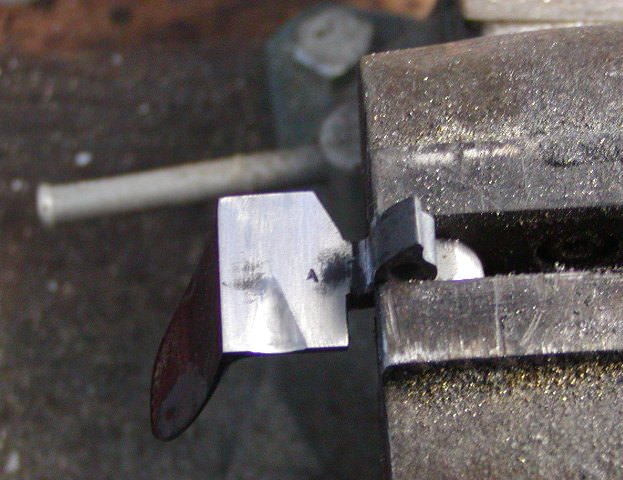
Another little detail are the teeth in the flintcock jaws. All modern commercially produced locks have flat jaws or useless little ridges. The jaws should have teeth cut into them to hold the leather-wrapped flint securely. I cut those teeth using a small round-bottomed die sinker's chisel. They are cut into both the lower and top jaws.
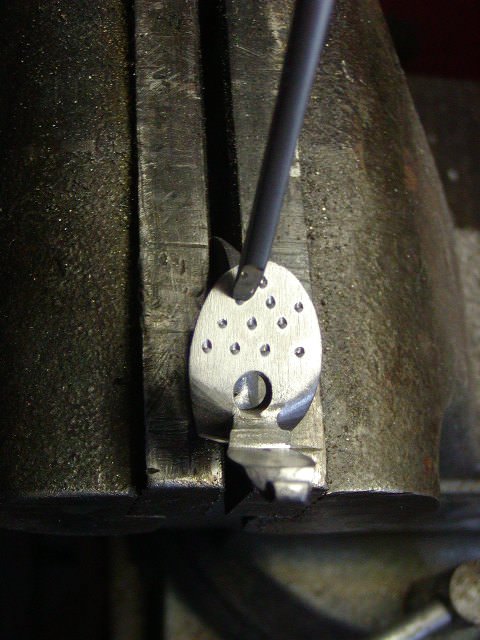
The Siler flintlock used on this kit rifle is pretty good but all Silers need work to make them really good locks. One of the first things to do is grind down the frizzen spring to make it weaker.
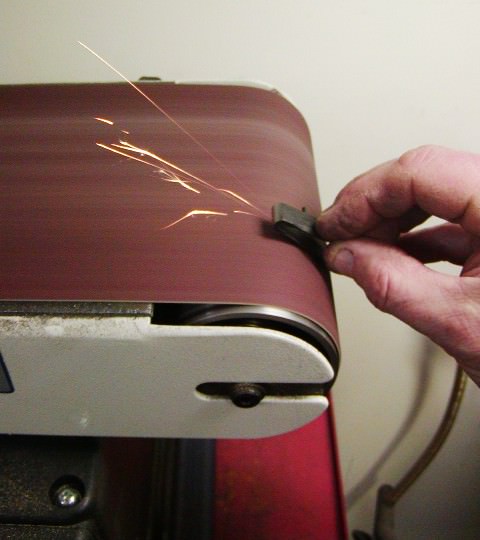
On a lock without a roller frizzen, you do not need a heavy frizzen spring. You want it to have enough resistance to produce sparks but weak enough to allow the frizzen to get out of the way quickly. With a roller frizzen, you want substantial resistance until the cam rocks over the roller, then almost no resistance. Without a roller, you have to compromise because you cannot duplicate the peak resistance and then break to none. Without a roller, I prefer the force needed to open the frizzen to be 1/4 to 1/3 of the force required to **** the flintcock. That is enough to provide resistance to the flint and also prevent bounce back by the frizzen where it rebounds and hits the flint again. I have a little spring scale with which I measure those forces. They don't have to be exact just within the ballpark.
he Siler also needs the angle of the toe on the frizzen to be adjusted so the frizzen kicks over quickly. The photo shows the polished outside of the lock with the frizzen open just to the point at which the spring will kick it over.
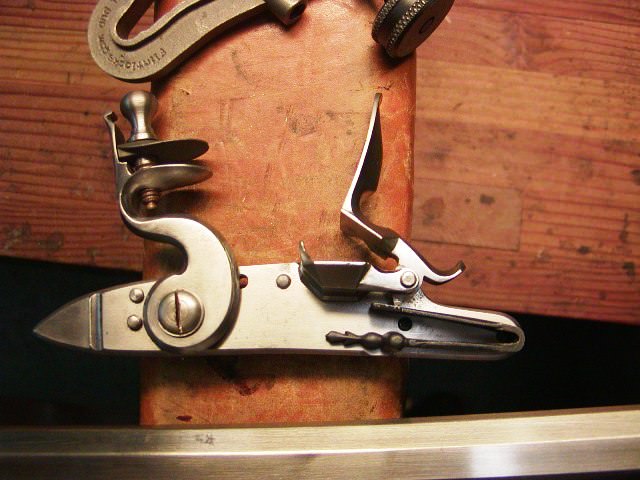
I should be able to reduce the angle with the top of the pan by 5-10 degrees by reshaping the toe of the frizzen. I'll show that later. That is it for tonight. More to come.
dave
A little more lock work as I am applying finish to the stock and letting it dry. My half-round needle file is my "go to" file for detail work on locks. It is extremely versatile for doing flat and concave areas. I show the frizzen with the file.

I annealed the frizzen by heating it with a MAPP gas torch to bright red and letting it cool slowly. I will case harden it later and it will produce frightening showers of sparks when I am done. If you don't anneal the frizzen, diamond files and stone and oil are your best method for polishing it and getting rid of the sand blasted finish. Don't be fooled into thinking that textured finish either left bright or browned somehow looks like an antique pitted lock. It doesn't and it looks very modern and contrived. In my opinion, browning that sandblasted finish and leaving seams and casting marks are red flags of amateur modern work. Another useful tool is a Dremel with 3-M bristle burrs. The little burrs polish metal efficiently on flat, convex, and concave surfaces without cutting too quickly and rounding off sharp corners. I typically use 100, 220, and 400 grit burrs.

The frizzen has a small notch on the bottom of the pan cover. I am not sure how many of you know what that is for but it is so the pan cover does not compress the priming powder right in front of the touch hole. At the size that it is, it is likely useless so I use my half-round file to deepen and widen it like you find on original English locks of the period.


Another little detail are the teeth in the flintcock jaws. All modern commercially produced locks have flat jaws or useless little ridges. The jaws should have teeth cut into them to hold the leather-wrapped flint securely. I cut those teeth using a small round-bottomed die sinker's chisel. They are cut into both the lower and top jaws.

The Siler flintlock used on this kit rifle is pretty good but all Silers need work to make them really good locks. One of the first things to do is grind down the frizzen spring to make it weaker.

On a lock without a roller frizzen, you do not need a heavy frizzen spring. You want it to have enough resistance to produce sparks but weak enough to allow the frizzen to get out of the way quickly. With a roller frizzen, you want substantial resistance until the cam rocks over the roller, then almost no resistance. Without a roller, you have to compromise because you cannot duplicate the peak resistance and then break to none. Without a roller, I prefer the force needed to open the frizzen to be 1/4 to 1/3 of the force required to **** the flintcock. That is enough to provide resistance to the flint and also prevent bounce back by the frizzen where it rebounds and hits the flint again. I have a little spring scale with which I measure those forces. They don't have to be exact just within the ballpark.
he Siler also needs the angle of the toe on the frizzen to be adjusted so the frizzen kicks over quickly. The photo shows the polished outside of the lock with the frizzen open just to the point at which the spring will kick it over.

I should be able to reduce the angle with the top of the pan by 5-10 degrees by reshaping the toe of the frizzen. I'll show that later. That is it for tonight. More to come.
dave
Looking forward to seeing that!
Hey! That's my line. ;-) Even if I were not anticipating getting this rifle at all the tutorial has been an amazing journey.
- Joined
- Nov 26, 2005
- Messages
- 5,225
- Reaction score
- 10,887
Good Evening Friends,
I finished the lock today and am well on the way with barrel browning. The first photo shows the inside of the lock before I finished polishing and tuning.
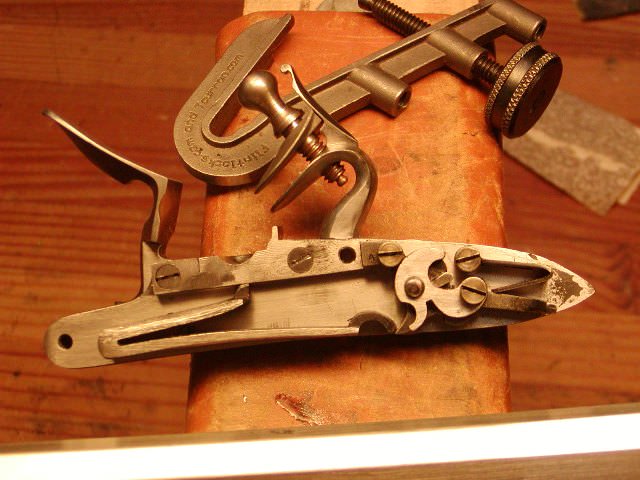
I polished all the lock parts and ground and polished the frizzen spring to reduce its force by about 30%. Much is also accomplished by good polishing. I also cleaned up the mainspring, polished it a bit but made sure the toe of the hook was highly polished where it contacts the tumbler. The inside and outside of the lock were polished with stones and then maroon and gray Scotch Bright pads dipped in water. Then the frizzen, pan, flintcock, and plate were ready for case hardening. I block the plate with another bar of steel and spacers so it does not warp when quenched. Then everything gets packed in my pan with 50% bone and wood charcoal. Keep in mind that I am NOT case hardening for colors but to create a hard rust resistant surface and harden the frizzen. The pan and pack go into the oven and heated to 1550 degrees for 1 hour and then I lower the temp to 1375 degrees 20 minutes before quenching to reduce the risk of surface cracking and warping. I quench in room temperature water.
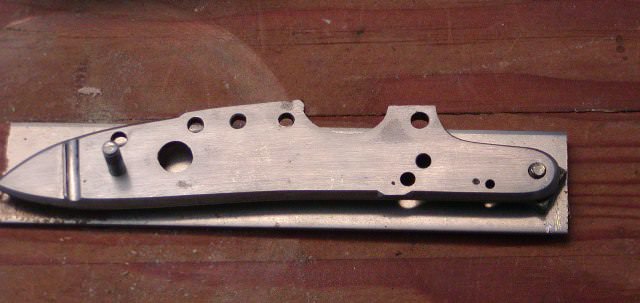
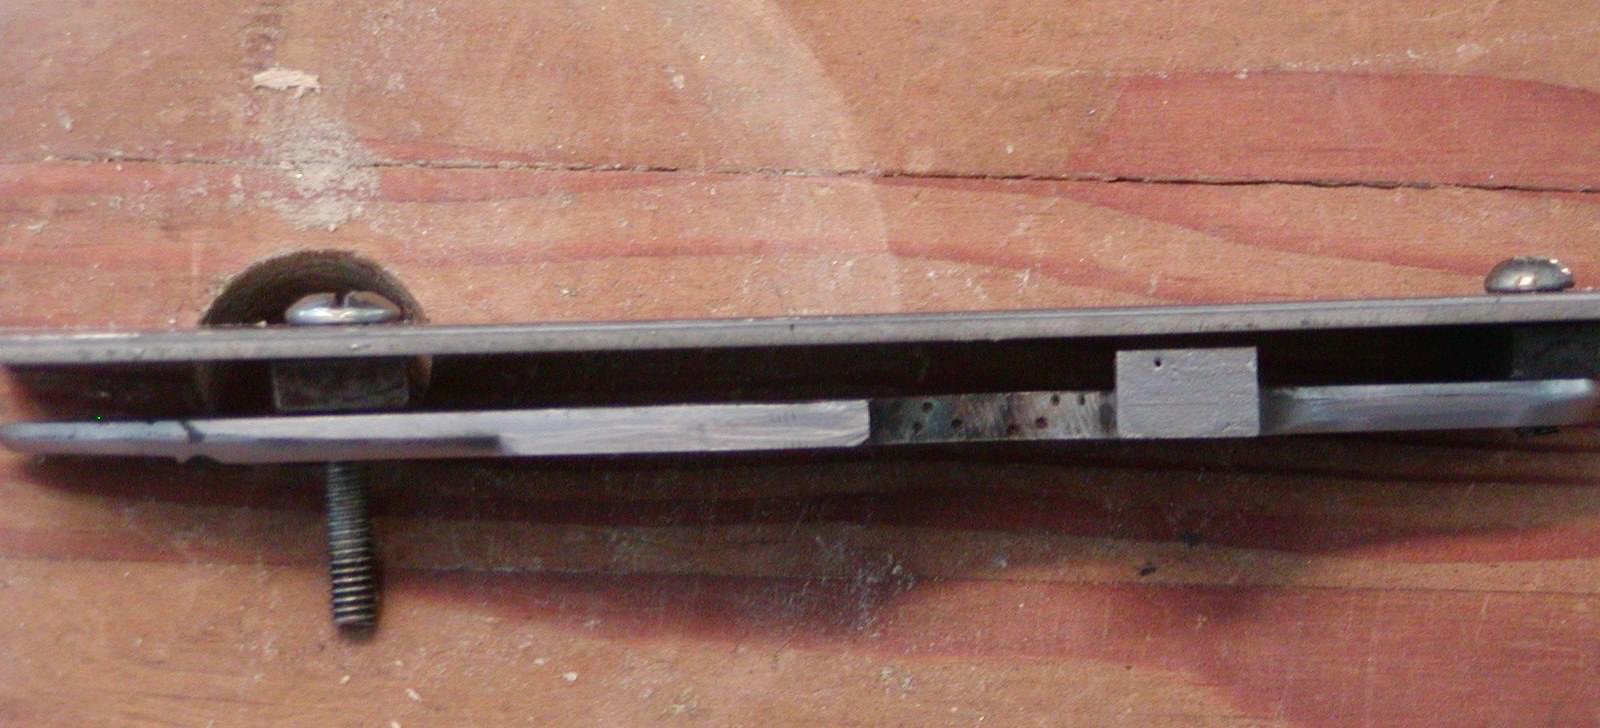
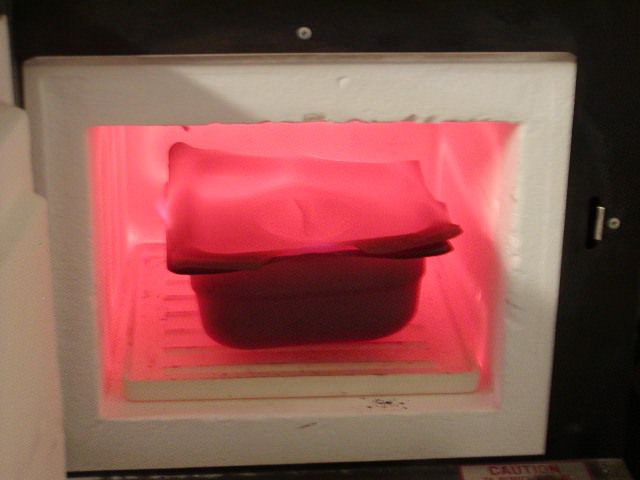
The parts came out nicely and then I polish off the color with Scotch Bright pads and place them in the oven to temper for 1 hour.
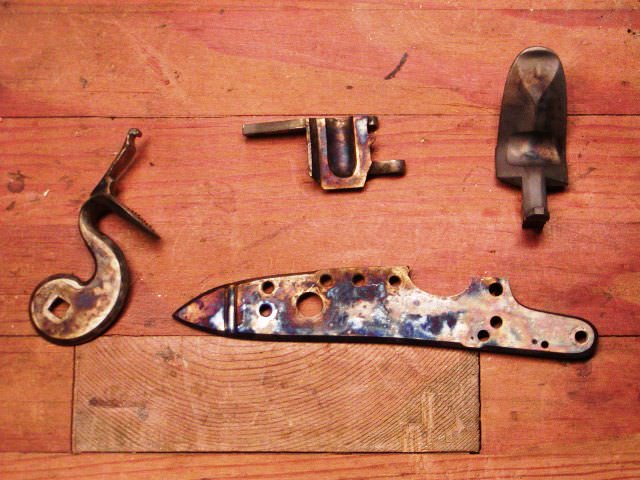
I tempered the plate, pan, and flintcock to 550 degrees which creates a blue color. I tempered the frizzen to about 380 and then heated the toe with a mini torch to 550 or blue. After tempering, I rub back the color with Scotch Bright pads and then coat them with medicated vaseline (vaseline with carbolic acid, which I get from Ron's Apothecary in Juneau, AK). I heat the parts until the vaseline starts to smoke and let air cool. The process of hardening and the vaseline treatment creates a very rust resistant surface on the metal. I learned this while living and making guns in Ketchikan, Alaska where my guns were exposed to rain, humidity, sea spray, and salt air.
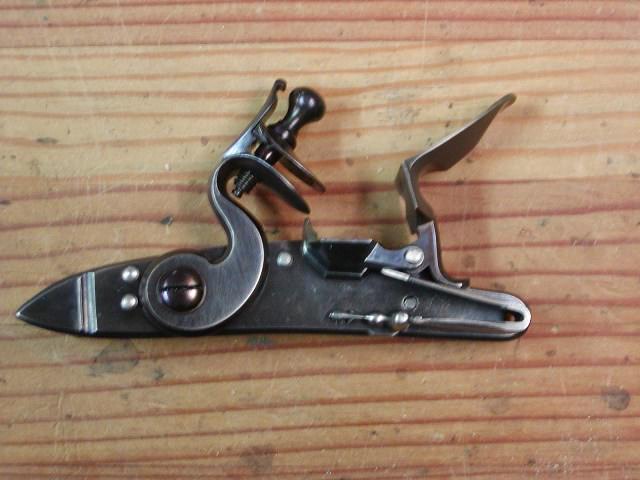
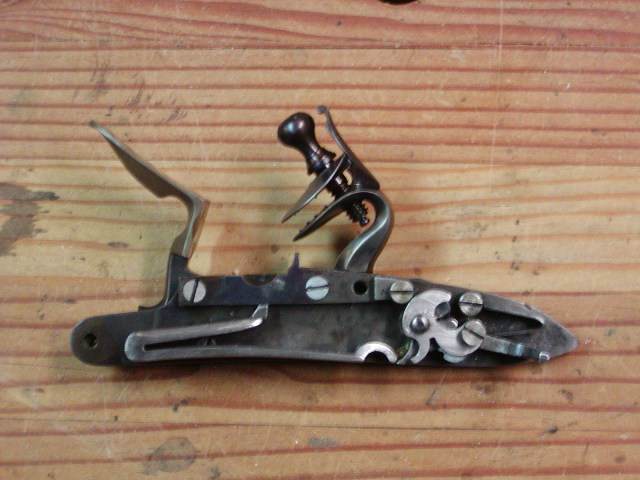
The temper blue colors will fade to a blue gray over time and eventually have the tarnished look of a well-cared for original. The last two photos show how I changed the angle at which the frizzen kicks over.

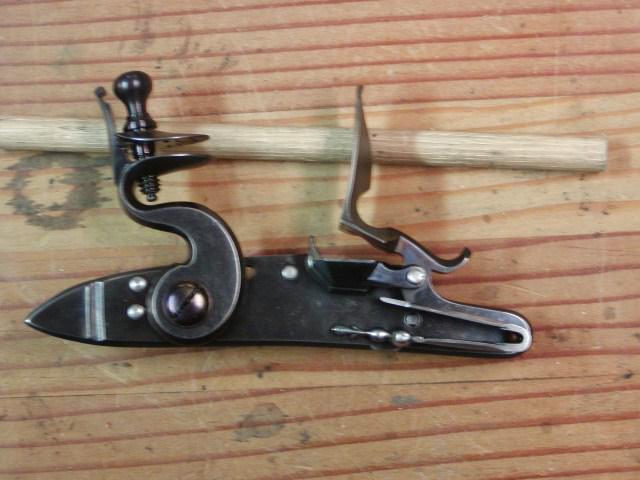
This lock produces scary sparks and is now well tuned and a very good lock.
dave
I finished the lock today and am well on the way with barrel browning. The first photo shows the inside of the lock before I finished polishing and tuning.

I polished all the lock parts and ground and polished the frizzen spring to reduce its force by about 30%. Much is also accomplished by good polishing. I also cleaned up the mainspring, polished it a bit but made sure the toe of the hook was highly polished where it contacts the tumbler. The inside and outside of the lock were polished with stones and then maroon and gray Scotch Bright pads dipped in water. Then the frizzen, pan, flintcock, and plate were ready for case hardening. I block the plate with another bar of steel and spacers so it does not warp when quenched. Then everything gets packed in my pan with 50% bone and wood charcoal. Keep in mind that I am NOT case hardening for colors but to create a hard rust resistant surface and harden the frizzen. The pan and pack go into the oven and heated to 1550 degrees for 1 hour and then I lower the temp to 1375 degrees 20 minutes before quenching to reduce the risk of surface cracking and warping. I quench in room temperature water.


The parts came out nicely and then I polish off the color with Scotch Bright pads and place them in the oven to temper for 1 hour.

I tempered the plate, pan, and flintcock to 550 degrees which creates a blue color. I tempered the frizzen to about 380 and then heated the toe with a mini torch to 550 or blue. After tempering, I rub back the color with Scotch Bright pads and then coat them with medicated vaseline (vaseline with carbolic acid, which I get from Ron's Apothecary in Juneau, AK). I heat the parts until the vaseline starts to smoke and let air cool. The process of hardening and the vaseline treatment creates a very rust resistant surface on the metal. I learned this while living and making guns in Ketchikan, Alaska where my guns were exposed to rain, humidity, sea spray, and salt air.


The temper blue colors will fade to a blue gray over time and eventually have the tarnished look of a well-cared for original. The last two photos show how I changed the angle at which the frizzen kicks over.


This lock produces scary sparks and is now well tuned and a very good lock.
dave
Dave, now ye gotta make a second lock just like that. I'm going to wear one like a jewel. I'm a wordy guy but you have run me completely out of adjectives and superlatives. "awe" is the one that keeps coming to my mind. You have elevated a good lock to something masterful. Do you think I'm itching to shoot it? Ye betcha I am. 
Love seeing your work progress Dave, certainly gives me something to strive for!
Buckskinn
45 Cal.
Looks great! And very helpful tutorial, I've read through it twice and will likely do again and again... I have a Chambers Edward Marshall coming next week and was wondering if the lock part you described need to be annealed,case hardened and tempered. Polishing and tuning, I can do. High temp stuff, not so much... Unless I invest a hell of a lot more in this project than I've already done.
Looking forward to more updates!
Looking forward to more updates!
Similar threads
- Replies
- 47
- Views
- 2K
- Replies
- 7
- Views
- 816
- Replies
- 4
- Views
- 405


