• Friends, our 2nd Amendment rights are always under attack and the NRA has been a constant for decades in helping fight that fight.

    We have partnered with the NRA to offer you a discount on membership and Muzzleloading Forum gets a small percentage too of each membership, so you are supporting both the NRA and us.

    Use this link to sign up please; https://membership.nra.org/recruiters/join/XR045103

Center Seam Sheath Help needed

Muzzleloading Forum

Help Support Muzzleloading Forum:

This site may earn a commission from merchant affiliate links, including eBay, Amazon, and others.

flattail

40 Cal.
Joined
Apr 6, 2010
Messages
129
Reaction score
0
Hello all,
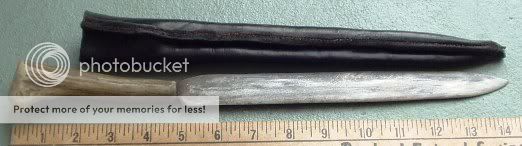
I've been enjoying seeing all the fine work presented here. I am hoping to get information about center seam knife sheaths. I know how to make a folded sheath with a welt, Plains style tacked or riveted sheaths, modern sheaths...but can't figure out the center seams. Any help with weight of leather, how to work it, etc would be greatly appreciated. By the way, how do you keep from slicing the sheath without a welt?
Thanks in advance, Ed.
 
I have made one and it was easier than expected. I made a model of cloth and tried it out, laying the knife on it and snugging up the cloth to the middle of the blade. I allowed a 3/8" wide overlap. I thoroughly soaked a thick piece of leather cut to size. Maybe .100" thick.

I prepared a pair of stiff wooden slats about 3/16" thick and less than half the width of the blade, and used these to clamp the wet leather to the blade, and to make the center seam purse up. I really hauled on the leather to get rid of all slack. On the handle area I snugged it up and clamped the "lips" together.

I let it dry some to shape around the waxed knife blade and handle.

Then I sewed it close down to the body of the sheath and cut the lips down later.

stickerandsheath.jpg


sideseamsheath1.jpg
 
There are different ways to do it, and different stitch methods. To do my type you need 5oz to 7oz max. vegetan leather. You make a pattern as though it would be a side seam, but leave just a little tad more than 1/8" of clearance at the edge for your first one. Skive the edges to about half thick and tapering inward about 3/4" wide. Saddle stitch 1/8" in from edge. cut this stitched edge down to about 1/16" short of the stitching. Tape your blade up with duct tape and wax it. Saturate the sheath with rubbing alcohol. Give it a few minutes then turn the seam center. Hammer the seam somewhat flat, then more alcohol. Force the knife in while aligning the seam center. Sandwich the blade portion between two very smooth faced boards or thick scrap from a formica covered counter top, or use a smooth faced wood workers vise if large enough. My plates are maple with 1/4" micarta facing. Put the sandwiched blade in a vise, and crank it down tight. Let sit over night then remove. The sheath is now fitted so that the edge will not cut the sides going in or out, or at the most may barely touch the sides. There is no room for it to slip around inside. If you noticed, I put a spacer in with the grip to give the blade clearance as it enters. I have a few more photos if you want to see them, but these are the critical ones. PS. If your blade happens to be loose, remove the knife and heat it well with a hairdryer. This causes the front and back to draw to the center making the blade fit tighter.

pennyknife640_640x480.jpg

pennyknife645_640x480.jpg

pennyknife647_640x480.jpg

pennyknife650_640x480.jpg

pennyknife633_640x480.jpg
 
Along with the above many (if not most?) of the originals were lined and then covered - here's a basic how-to: http://www.picturetrail.com/sfx/album/view/829129

When I make them I at times line with leather rather than wood, easier for me to work with these days and no problems with the wood breaking later, whihc can and does happen.
During the early to mid-19th century, the majority of the Sheffield Bowie sheaths had a liner formed out of papier-mache and then covered with leather, sometimes with a velvet liner added.

When using Wicks method you can also increase the stiffness and the ability to not be cut by using the cuir bouilli method. While acetone or other chemicals do stiffen the sheath they do it by removing the oils, whereas cuir bouilli does it by actually changing the leather on the molecular level which is non-reversible without ruining the sheath.
Here is one of the best treatises on the subject I know - the process is an ancient one and is still used today even in commercial applications: http://www.personal.utulsa.edu/~marc-carlson/leather/hl.html
 
Last edited by a moderator:
There is a pair of 18th c. Pistol holsters on the Contemporary Makers' Blog that is sewn like Wick's sheaths. Stitched close to the edge, and mashed down.

Finding examples of 18th century knife sheaths is even harder than finding examples of 18th century knives...
 
Thanks to Rick, Wick, and LaBonte!!
This was just the type of info I need. I have never tried to mold leather, never realized the need to use these techniques :redface:
Hopefully, I can make a sheath worth posting. Then you guys can critique my technique :wink:
thanks again, now off to the workshop!!
Ed
 
flattail, FWIW I asked Wick about his method a couple years ago, tried it and it worked well! It took me twice to get it right.

The first one I realized my pattern was too small. By try #2 it worked. :wink:
 
Glad it worked for you Goldhunter. I got one too small yesterday myself. Sometimes the fit can depend on how stretchy the leather is when wet.
 
Wick Ellerbe said:
Glad it worked for you Goldhunter. I got one too small yesterday myself. Sometimes the fit can depend on how stretchy the leather is when wet.

And of course how much it will shrink when drying..
 
I seem to get less shrinkage with the rubbing alcohol than with water on this type of sheath.

That's also one of the reasons why Wick recommended using duct tape on the blade. Makes it a bit thicker to account for shrinking (at least that's my thought).
 
I use the duct tape to keep the leather from gluing itself to the blade, which can happen when using alcohol. I also wax the tape. I like the stiffness the alcohol gives the leather, but it does mix with the natural oils in the leather and form a sort of hide glue.
 
Well, I was wrong. :rotf:

Doesn't water react/leach/whatever and make a kind of glue that can stick to a pressed blade also? Or am I thinking incorrectly?
 
Yes, but not as bad as alcohol. I like the alcohol because it hardens the leather more than water, and makes the leather retain its shaping better and longer. I use the 91% generic rubbing type from where ever. I have also used acetone which does about the same as alcohol, maybe a tad more, but I avoid over using acetone because of the health hazard, and the unbelievable price of it around here.
 
Man this is the best bit of info I have run across in some time! Wick once tried to explain his technique to me in writhing but I guess it’s true what they say about a picture being worth a thousand words, cause I finally get it! :doh:
Thanks to all contributors of this thread!!! :bow:
 
Thanks for the excellent tutorial.

What era and location do these center seam sheaths appear?

Are they for belt knives or also for smaller neck knives?

Are they hung from a sash/belt by a cord, or do some have a folded piece that a belt goes through?
 
Greywolf would have better answers than me. I do know the CS sheaths go way back in history, but take many different forms. Many have the seam in back. Some in front. Some will have a belt loop tab attached from the top of the sheath, some will have an attached loop on the back. All or most of the originals I've seen were professionaly made, seemingly of hardened leather and form shaped, but the hardness may have been due to age. The type I make are largely conjecture, and designed for simplicity. I don't know that I've seen an original just like mine. Mine have thongs tied on the back, and are intended to be worn slipped into a belt or sash, then tied for security.
 

Latest posts

Back
Top