• Friends, our 2nd Amendment rights are always under attack and the NRA has been a constant for decades in helping fight that fight.

    We have partnered with the NRA to offer you a discount on membership and Muzzleloading Forum gets a small percentage too of each membership, so you are supporting both the NRA and us.

    Use this link to sign up please; https://membership.nra.org/recruiters/join/XR045103

early virginia update

Muzzleloading Forum

Help Support Muzzleloading Forum:

This site may earn a commission from merchant affiliate links, including eBay, Amazon, and others.

mike garner

40 Cal.
Joined
Jul 14, 2013
Messages
177
Reaction score
0
RkfWTUr.jpg
hhuDX0f.jpg
M6YmGvK.jpg
OqXxikk.jpg
ZnyxXIs.jpg


well I took a lot more wood off. if I go much more I will be able to see through it. I cut the shine off the metal also. no slab sides either. it is hard to get good photos of a long thin rifle. what do ya'll think?
 
Looking good with nice clean lines...you get an "atta boy" so far! :wink: :haha: :thumbsup:
 
aqua Fortis, if that is not enough then maybe a walnut stain on top sealed with tru-oil then buffed back with 0000 wool....
 
black hand do you have any pictures of a stock done with Chamber's Oil Finish ? I am open for suggestions. do you put it on after the aqua Fortis? or just use the chambers oil?
 
dixie cat said:
black hand do you have any pictures of a stock done with Chamber's Oil Finish ? I am open for suggestions. do you put it on after the aqua Fortis? or just use the chambers oil?
After Aquafortis - it has a reddish tinge that makes the curl pop and deepens the background. I liked it better than the Tru-oil I'd used on several guns.
 
Always do all staining or using aqua-fortis before you apply any oils or sealers of any kind.

In order for the coloring agent to work it must have direct contact with bare wood.

After all of the coloring is finished, then you can start the final oil finishing process.

By the way, before that final oil finish is applied, any coloring you have done will look much lighter than it will after the oil is applied.

To get a good idea of what this final color will be, take the wood out into the sunlight or under a bright light.
Then, apply a light coating of water to the stained wood.

The water will darken the color just like the oil will while the wood is still wet.
When it drys, it will again return to the light look it had.

I use this wetting method several times to see what the finished stock will look like before I finally oil it.

Using just water allows me to add more color if it is needed but remember, once oil is applied, all bets are off as far as changing the color is concerned.
 
thanks Jim, I have stained and refinished many gun stocks. I have just never used AF before, but it looks simple to do. I will get the chambers oil. next photos should be of my finished gun,,,,,,,,,,
 
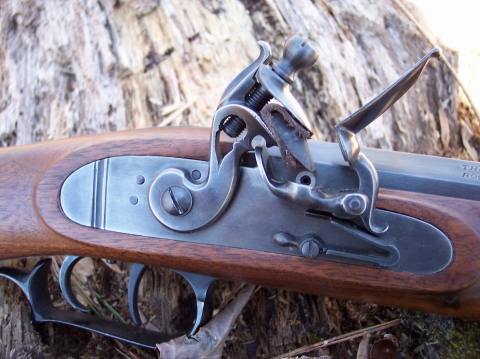
Before we get into finish, you still have a lot of work to do on the belly of the lower forestock, trigger guard area and the lock panel area.
 
Going by the recent photos....
Inlet the guard. If you look at a trigger guard....it....most of the time is inlet down to the bevel line.....like a side plate.

By the shadow it looks like you have a flat belly on the bottom of the lower forestock to the triggerguard area.

Your lock panels help bind all this together. The lock panels are the focal point. The bottom of the lock panel helps define the area between the triggers and lock panel. This area is pretty much flat from the bottom of the lock panel slanting down to the trigger area.
The front of the lock panel...is blended into the rounded forestock. Not only do you have the roundness of the forestock but also the rounded......pointy shape of the lock panel. This is all complex where all this meets.....same on the rear of the lock panels where they meet or meld into the wrist.....

Maybe a Good explanation....

Imagine if the lock panels were separate pieces meeting the rounded forestock.
This area is real tricky....this is definitely the most challenging area to shape on a longrifle and is incredibly hard to describe as far as instruction.
Your best bet is to really study good contemporary or original rifles to grasp what's going on here.

Too

Most new builders will make thier lock panels way to large.

How about posting some photos of your lock panel area. I as well as others will try to help you as best we can.
 
9cFuaDH.jpg
tQYPYQC.jpg
LkZzSVG.jpg


here is a couple of crummy photos I took on my table, it is dark outside so this is all I can do now. I understand about the trigger guard some, but what I need to do with the lock panels are a bit confusing. maybe I can find a photo of some that is done right, that should help,,,
 
I found some good photos on line. I see what you are talking about with the lock panel. mine is raw and way off. so is my lock plate panel on the other side. I will take care of it as well as the flat belly. thanks so much for all the help! any other comments and advice is apprecheated,,,,,,

mike
 
I would do some study....
Here is a link to two Kentucky Rifles made by the Humble brothers.
What is good about this article is that it shows the lock panel area really well, even from the bottom side.
Link Humble Rifles

Here is another
Link Riflemen of the Cumberland

The rifles in these two articles have great architecture especially the Thomas Simpson, Jacob Young and Conrad Humble. The Micheal Humble has some architectural issues that today may be criticized but he pulls it off smartly. He did not know what makes a great rifle....he just built them. :wink:

Study.....look at the relationship of everything. Imagine how they got that shape from block of wood and what you need to do to get similar results.
 
Back
Top