• Friends, our 2nd Amendment rights are always under attack and the NRA has been a constant for decades in helping fight that fight.

    We have partnered with the NRA to offer you a discount on membership and Muzzleloading Forum gets a small percentage too of each membership, so you are supporting both the NRA and us.

    Use this link to sign up please; https://membership.nra.org/recruiters/join/XR045103

I need a fix

Muzzleloading Forum

Help Support Muzzleloading Forum:

This site may earn a commission from merchant affiliate links, including eBay, Amazon, and others.

mark fish

32 Cal.
Joined
Jun 23, 2005
Messages
40
Reaction score
0
Biggest mistake i've made todate. :shake:

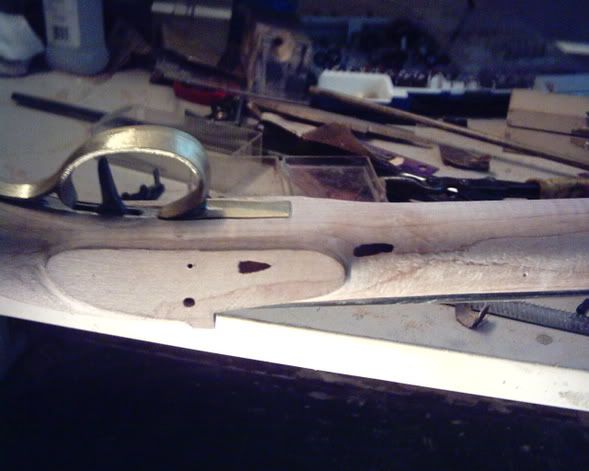
How is this for a screw up?

oops.jpg

I think I pushed a little too hard and my ramrod hole took a left turn the last three inches.
Of course I didn't discover this untill hours of work later.

Anyone have a palatable solution or do I turn this wood into a flute?
:haha:
 
Oop's :hmm: :hmm:
I tell you what, you will probably always see it, but you can turn a maple dowel to 3/8 You will only need about 4". Make sure that it just fits into your ramrod hole. lightly glue and shove it to the back of your drilled hole, this should work since you have a place for the air to escape. After it dries router from inside your barrel channel to redirect your ramrod hole, and cover with a dutchman.

If you do not have a lathe you can start with a square and keep knocking corners off untill its round. Drill a 3/8 hole in a piece of steel for a guide.

Good luck, I would'nt throw it out yet :thumbsup:
 
Ofcourse this may not work, but who knows? I once had a ramrod whole that was diving, thought I'd have to add a wear plate, but I gathered my thoughts stopped before it was too late and did exactly what I mentioned above. But I will say this I didn't have to push my plug the whole distance back as you will have to. I guess we all learn from our mistakes.
 
The sideplate area can be fixed by making a large sideplate that will cover the hole.

This can have curved edges somewhat like regular side plates so it doesn't look like a big slab of metal.
Sketch some ideas working the lockbolt location into the plan.
If your gun is one of the more modern ones that used just one lock plate bolt, you can always use a fillester head wood screw up at the front.
 
What kind of rifle are you building? If it's a Leman with just a washer for a side plate you could put a inlay over the spots where the dowels show through. This could wind up being your fanciest rifle with lots of silver on it. :winking: Just joshing ya some. The inlays may look great though.
 
This rifle was planned as a ealy plains trade rifle that could have been purchased 1850's.

Thanks for the ideas. As of now I haven't decided what fix to use.

I think I'll step back, go for a walk in the woods and smell some blackpowder it seems to help me think clearer.

Maybe when I get back it won't look as bad.
 
I'd make a wear plate to cover that runnout. I had to do that once.....sure is agrivating!
 
OGG,,

THANKS!! I thought I was the only one to do that. :redface:

Used my newer drill with 'more power' and I think it went a lil' faster/deeper, than I thought it would. Made the same wrong turn. :cursing:

Right now, its in the overhead of my shop. I haven't gotten calmed down enough, to get back to it.. although I did do the glued in dowel repair, as previously described. If I'm lucky, I may be able to cover it?

Respect Always
Metalshaper
 
Its just an odd place to cover with exceptions to the side plate. You could inlay silver all over it. If you glue in the dowel, dress it off and maybe with the trickery of stain, fillers and markers it may not be as bad as you think. Atleast from the picture it looks like you have a dark growth ring there at the first place of run out. Good luck.
 
If you look at some of the fancier rifles of that period you'll find some nice inlays forward of the lock paneling that wrap underneath and will cover it up. The ones that come to mind are halfmoon looking inlays.
Don
 
I'm just now doing a repair like this. Glued in a piece of ram rod, same as hole size, from back of entry pipe to end of hole. Work glue into the hole first, and cover the rod. Clamped the thin wood down over the forestock along the hole so it wouldn't bulge out. I'd wet-wipe the glue off around the holes so it won't deny the stain. Then sand the outside smooth when dry. A professional builder (nearly 400 ML firearms) told me to fill the crack with sanding dust and glue, and it would nearly blend in. Next, I in my confidence redrilled the hole. Went crooked again. Now I got two repairs. Repeat. NOW I did what Roy said, drilled a trough under the barrel. Used a drill press and drilled 11/32" (.34") holes evenly spaced on the centerline of the bottom flat, only as deep as the ram rod hole should be (about 5/8"), from back of entry pipe about an inch to end of bbl. Chiseled the holes into a trough and smoothed it out. Now the drill (3/8" steel rod with 25/64" drill (.390" for a 3/8" rod) will run true. Carefully drilled it back to the tang. Then made the top of the trough parallel sided to accept a wooden filler (Roy's "dutchman"). Some shaped stocks come with the rod hole routed like this, so I have fitted these fillers five or six times before. The fillers I always made of maple, but it could be made of pine or some softer wood for ease of fitting. I groove the bottom of it to fit over the ramrod and inlet it down so it sets on the rod. When a good fit, I wax the steel drill rod (The other end without drill) and insert it into the stock. Tap the filler down for a check fit. Liberally glue the thing in, and clamp it down along its length. When the glue has dried, pull the rod out. May need a vise grip twist and pull, or even hammer on the side of the vise grip to pull it out. When really dry, redrill the hole, now true. I also drill mine about an inch longer than you did, within about 1/8" of the tang bolt ahead of the trigger. Next you cut down the top of this filler so the barrel will lay flat like it should. You're lucky with a new stock, mine was finished! Have fit two wear plates to cover a rod hole and a cracked stock. See General Interest Forum, "Belly Plates", Herb, 11/10/04, 11/14/04. And if this repair shows, as my good friend, Neill, says, "It shows the hand of the workman." You guys can do this. Good luck.
 
If you want a fix it right, find a piece of the same type of wood with grain that matches the grain of the stock around the repair. Cut it into a double arch top and bottom, as wide as necessary and 2-3 inches long, with slightly blunted, pointed ends, and long enough to cover the holes.

The inlay can be flat on the sides, if necessary, kinda like , but with longer tapers. However, the arched sides seem to blend into the stock better.

This "inlay" needs to be about 1/8 inch thick, or so. Taper the edges as if you would for preparing any inlay, and inlet as if you were inletting a metal inlay. Properly done, the fix will be virtually invisible.

The book "Lock Stock and Barrel" by R H McCrory illustrates this technique pretty well.

In your case, you may need to glue a dowel into the RR hole to provide enough support for the inlay.

Filling the hole using a dowel of a different type
wood will be VERY obvious if left exposed. The difference in grain and the way the dowel will take the stain will show up like a spotlight is on it.

If your stock is a precarve, it MIGHT be long enough to trim a coupla inches off the end of the forearm to get the matching wood necessary for the repair. If not, scrounge local wood shops, or lumberyards that sell a variety of hardwoods.
Take your stock with you, minus barrel, of course,
to insure the wood you choose will match.

If that is not an option, use a brass, or iron wearplate, though those areas are not normally seen with wearplates.

I have seen originals restored this way, some with several of these inlays overlapped to repair fairly large areas of missing wood. These repairs were only obvious if observed closely, under a good light.

J.D.
 
When fitting wood to wood like that, what do you use for a transfer agent to get a gapless fit?
Thanks,
Don
 
The wood inlay was a common arsenal repair technique on military rifles throughout history. I did the dowel thing on a NW trade gun that the runout came through the forestock and I never liked the results. I wrapped it with rawhide and Indianized it some. Had I thought of the wood inlay that would have been the ticket.
 
The only time I have used this technique, I began with about 1/4 inch thick piece of wood for the plug, and clamped it in place over the damaged area. This was for a shallow inlet. The point of an exacto knife was carefully run around the inlay using the taper on the plug as a guide, and making the cut deep enough to fill the damaged area.

The wood inside the cut removed and the inlay gently tapped in place, and the shiney edges of the cut scraped. The process was repeated until a good fit was made.

There is no need to get a perfect fit on the bottom. The rough bottom of the hole and a rough surface on the bottom of the plug help the glue to hold better.

This was the way Kieth Neubraur explained the process to me over twenty-five years ago.

Keith was a whiz in antique restoration, and this technique works. Gotta have good light to see the shine though.

Keith used this technique to repair an an area in the butt of an original Hawken where someone had inlet a very large coin. The coin was missing so the owner brought the gun to Keith. He inlet several overlapping inlays into the stock, all but removing all trace of the offending damage.

With a slightly thicker inlay, a little wood can be sanded off the bottom to create a slightly wider inlay, if gaps are apparent before the inlay is glued in place.

A little burnt umber pigment mixed with the glue, and the stock stained to match, will help the repair to become invisible.

I have been told, though I haven't tried it, that dampening the stock, and, or the plug before gluing in place, will expand the wood and make an invisible repair. Once the wood is dried and stained, especially with an oil based stain, then sealed, the moisture in the repair is supposed to stablize. I don't know about this last part, as I have never tried it.

This technique is worth experimenting with, as in practicing on scrap wood, since if done properly, the repair is almost invisible....and we all make mistakes.
J.D.
 
oldguardguy said:
Anyone have a palatable solution or do I turn this wood into a flute?
:haha:

Have you cut out the patchbox yet? If not, when you do, save the excess wood. You can make a plug of matching wood to fill in your mistakes, glue them in and once dry, redrill the holes. Yes-siree, it'll make you happier than a flea on a fat dog.
 
J.D. said:
The only time I have used this technique, I began with about 1/4 inch thick piece of wood for the plug, and clamped it in place over the damaged area. This was for a shallow inlet. The point of an exacto knife was carefully run around the inlay using the taper on the plug as a guide, and making the cut deep enough to fill the damaged area.

The wood inside the cut removed and the inlay gently tapped in place, and the shiney edges of the cut scraped. The process was repeated until a good fit was made.

There is no need to get a perfect fit on the bottom. The rough bottom of the hole and a rough surface on the bottom of the plug help the glue to hold better.

This was the way Kieth Neubraur explained the process to me over twenty-five years ago.

Keith was a whiz in antique restoration, and this technique works. Gotta have good light to see the shine though.

Keith used this technique to repair an an area in the butt of an original Hawken where someone had inlet a very large coin. The coin was missing so the owner brought the gun to Keith. He inlet several overlapping inlays into the stock, all but removing all trace of the offending damage.

With a slightly thicker inlay, a little wood can be sanded off the bottom to create a slightly wider inlay, if gaps are apparent before the inlay is glued in place.

A little burnt umber pigment mixed with the glue, and the stock stained to match, will help the repair to become invisible.

I have been told, though I haven't tried it, that dampening the stock, and, or the plug before gluing in place, will expand the wood and make an invisible repair. Once the wood is dried and stained, especially with an oil based stain, then sealed, the moisture in the repair is supposed to stablize. I don't know about this last part, as I have never tried it.

This technique is worth experimenting with, as in practicing on scrap wood, since if done properly, the repair is almost invisible....and we all make mistakes.
J.D.

Would be interesting to see this process photographed and demonstrated!

Davy
 
Reddogge and J.D., many thanks for the info. I certainly will give this a whirl. Old Sadie has a pretty good chip in the top edge of her forearm. Some idiot dropped her on the table with her barrel out. A chunk about the size of a 1/4 of a penny coin. Ain't real big but it's an eyesore. :hatsoff:
 
Unfortunately, I'm technologically challenged and don't have the knowledge or equipment to post that type of tutorial.

Freinds are tyring to drag me into the twenty-first century, but I'm kicking and screaming all the way.
J.D.
 

Latest posts

Back
Top