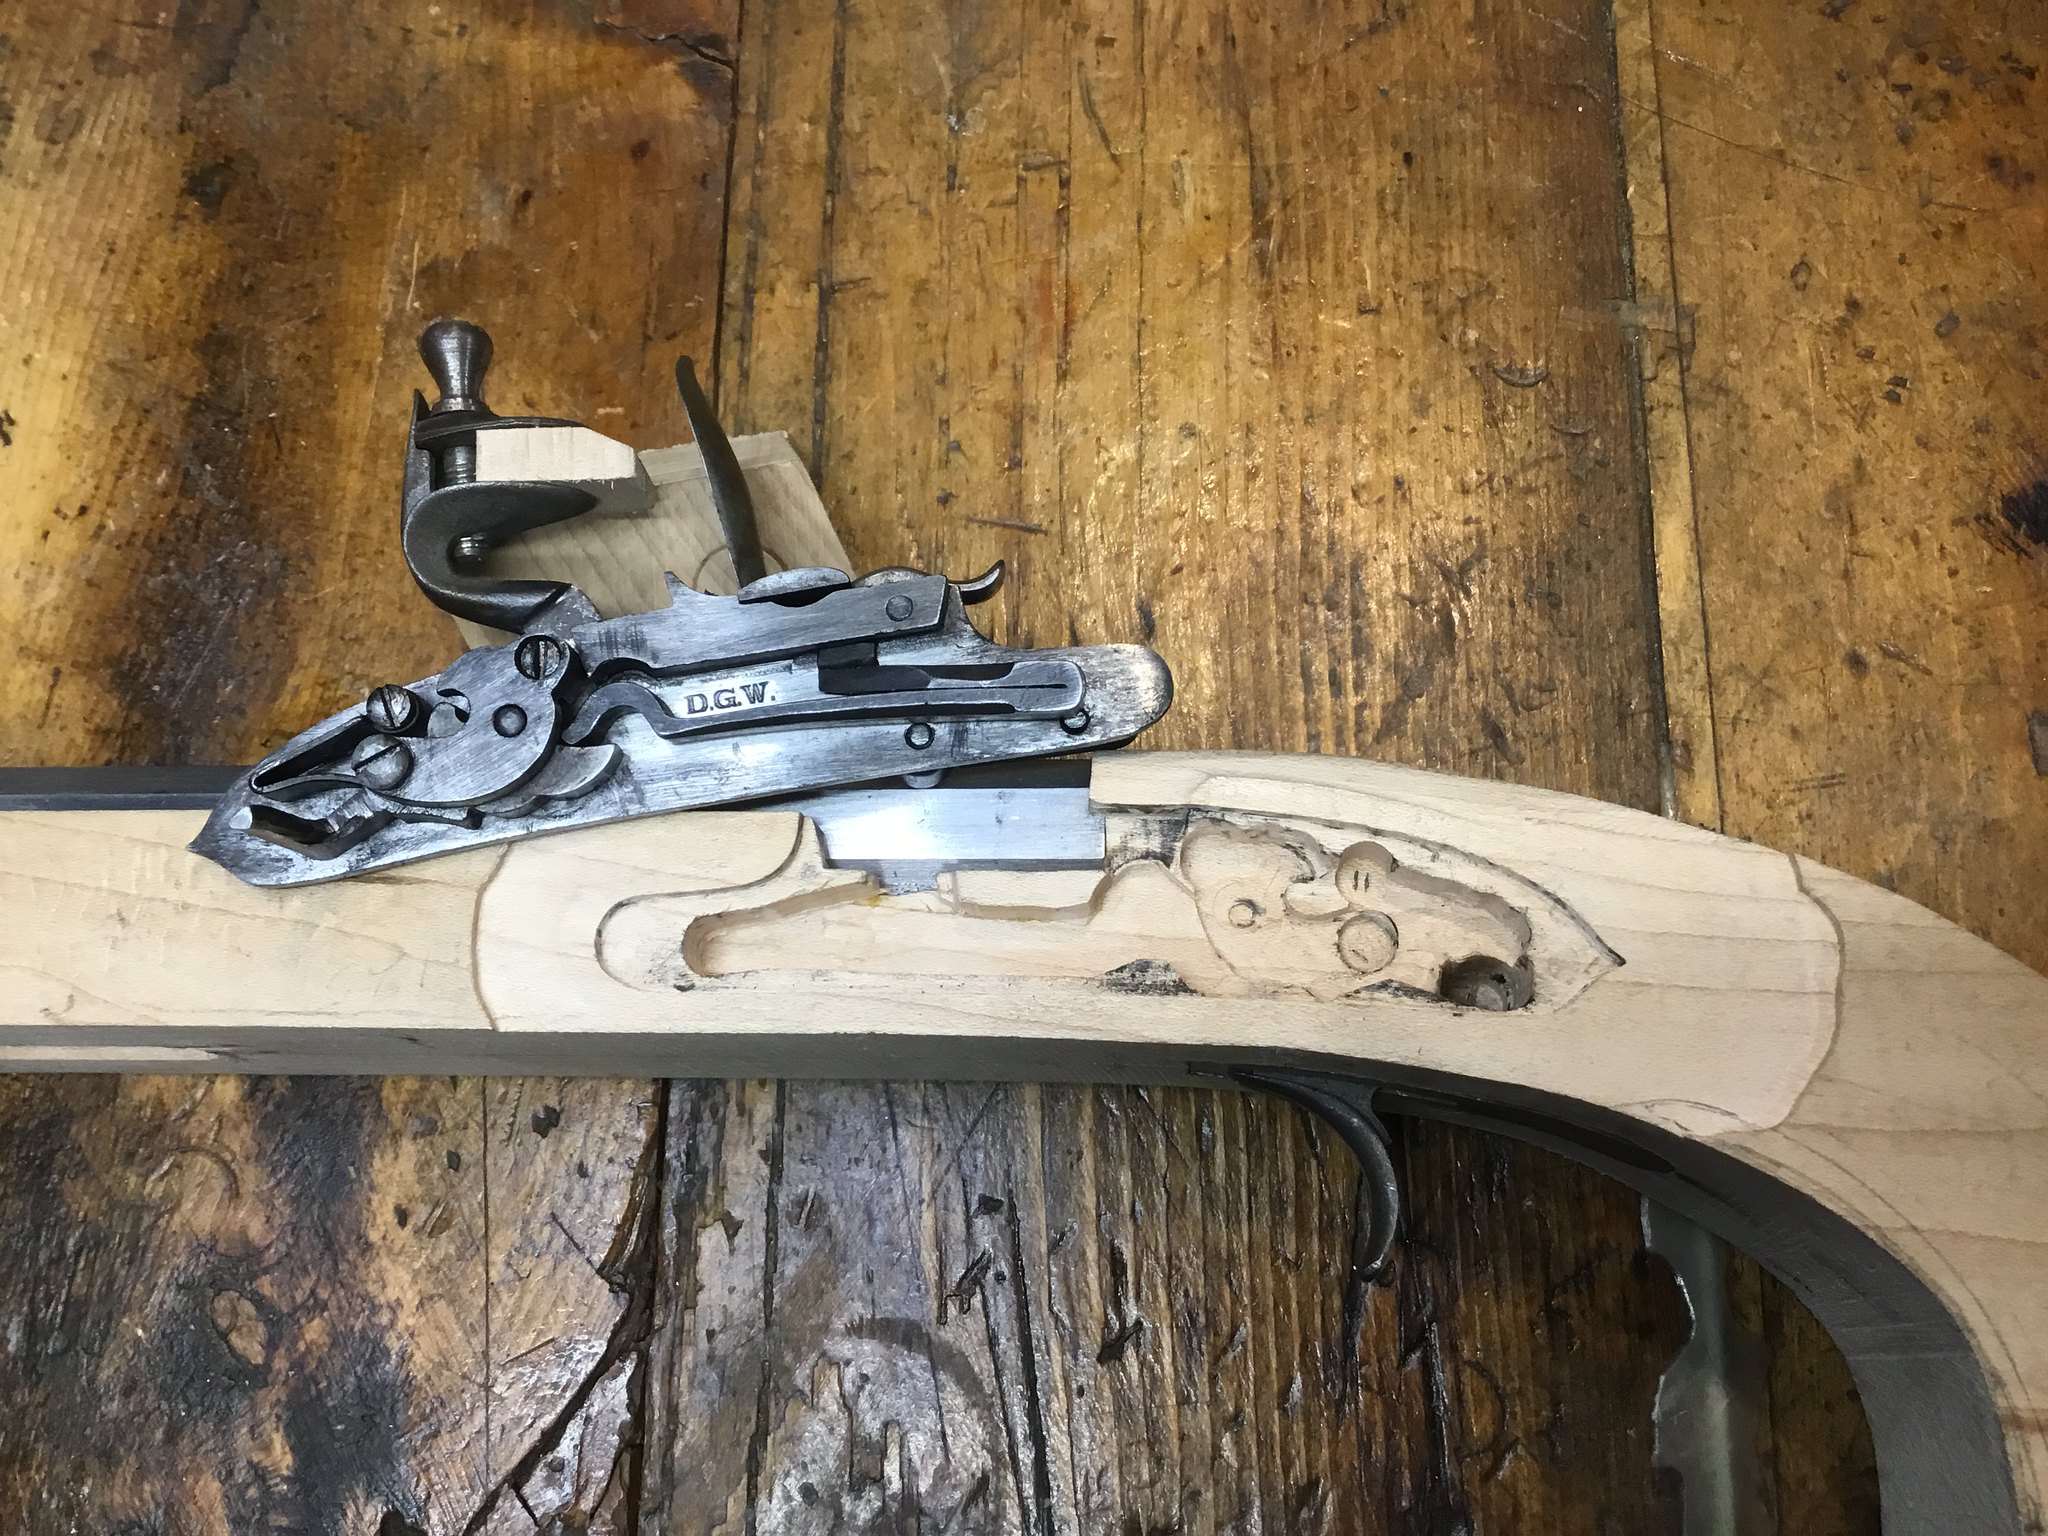
Is this the worst inletting job you've ever seen?

Muzzleloading Forum

Help Support Muzzleloading Forum:

This site may earn a commission from merchant affiliate links, including eBay, Amazon, and others.

Trapper1993

40 Cal
Joined
Nov 17, 2020
Messages
102
Reaction score
68
Used a drill and 2 chisels 1/8 & 1/4 chisel, one is solingen, the other is some czech company. I dont have any tools to add a flat surface except a small gouge and a dremel (yikes, i know) I sharpened the chisels every 30 minutes but the maple is so hard that its difficult to work with. I inlet the plate first then i added everything except the mainspring and trigger sear. Added the sear next and added the mainspring last. As you can see a used a good amount of inletting black. I still have a small gap between the pan and barrel that i may use shims on. I cant seem to lower the lock plate any more. I'm going to use acraglass to fill the gap between the end of the barrel and the wood. This is my first build that wasnt a preinlet, i've done 1 rifle before.
20221031_125448.jpg
20221031_125359.jpg
20221031_125420.jpg
20221031_125539.jpg
 
All of the inletting black on there is from me trying to lower the plate and just lathering it on every surface, usually it looks clean except for a few spots
1667237089964.png
 
What is your intended purpose for the gun?
I ask because, while shimming the gap between the lock plate and barrel flat will keep powder from getting behind the lock plate, it will leave a gap between the side of the frizzen/pan cover allowing the elements into the pan. This would be an issue for a hunting gun.
its going to be a target rifle
 
Used a drill and 2 chisels 1/8 & 1/4 chisel, one is solingen, the other is some czech company. I dont have any tools to add a flat surface except a small gouge and a dremel (yikes, i know) I sharpened the chisels every 30 minutes but the maple is so hard that its difficult to work with. I inlet the plate first then i added everything except the mainspring and trigger sear. Added the sear next and added the mainspring last. As you can see a used a good amount of inletting black. I still have a small gap between the pan and barrel that i may use shims on. I cant seem to lower the lock plate any more. I'm going to use acraglass to fill the gap between the end of the barrel and the wood. This is my first build that wasnt a preinlet, i've done 1 rifle before
All builders will have issues. Congrats for taking on a non pre inlet!! May I ask why you can't inlet the lock deeper? The pan needs to be home against the barrel!! Another poor result from your shimming idea will be that the panel area of the stock will be wider. Don't give up, get that lock pan next to the barrel.
If your chisels are not sharp enough to shave the hair on your arms, they are not sharp. Make sure you fine stone them and strop with a leather strop.
Larry
 
To answer your question, I think it is. You need at least one or two small gouges, a set of Forstner bits and an Exacto knife to scribe around your lock plate to give you a starting point.

You can inlet the lock plate deeper. I would put the lock plate in and glue in shims to fil your gaps. The main thing is you need to slow down.

Here is an example of what you can do with shims.

My nephew inletted a patch box on a GPR without the proper tools, his major tool was a Dremel with an aggressive cutting bit, it was a mess, I messed up and told him I would fix it.

wes patchbox mess.JPG


After a lot of gluing in shims and re-inletting, learning to glue in shims is a skill in itself. I get plenty of practice with the guns that I build.

wes patch box done inletting.JPG


I like to look at the great inletting jobs others do on lock internals, some are so precise as to be amazing art. I make functional, not works of art, my reasoning is no one will ever see it during my lifetime but me.

This is about it for me, notice extensive use of a Forstner bit.;

lock molding done.JPG
 
Used a drill and 2 chisels 1/8 & 1/4 chisel, one is solingen, the other is some czech company. I dont have any tools to add a flat surface except a small gouge and a dremel (yikes, i know) I sharpened the chisels every 30 minutes but the maple is so hard that its difficult to work with. I inlet the plate first then i added everything except the mainspring and trigger sear. Added the sear next and added the mainspring last. As you can see a used a good amount of inletting black. I still have a small gap between the pan and barrel that i may use shims on. I cant seem to lower the lock plate any more. I'm going to use acraglass to fill the gap between the end of the barrel and the wood. This is my first build that wasnt a preinlet, i've done 1 rifle before
All builders will have issues. Congrats for taking on a non pre inlet!! May I ask why you can't inlet the lock deeper? The pan needs to be home against the barrel!! Another poor result from your shimming idea will be that the panel area of the stock will be wider. Don't give up, get that lock pan next to the barrel.
If your chisels are not sharp enough to shave the hair on your arms, they are not sharp. Make sure you fine stone them and strop with a leather strop.
Larry
Some of the walls of the inlet are probably slanted / instead of | straight up and down. When I inlet just the lockplate it only had a hair sized gap, maybe it shifted when i added everything to the lock? I'll go back and look at it again. I'm going to order a better whet stone and some pfeil chisels too
 
To answer your question, I think it is. You need at least one or two small gouges, a set of Forstner bits and an Exacto knife to scribe around your lock plate to give you a starting point.

You can inlet the lock plate deeper. I would put the lock plate in and glue in shims to fil your gaps. The main thing is you need to slow down.

Here is an example of what you can do with shims.

My nephew inletted a patch box on a GPR without the proper tools, his major tool was a Dremel with an aggressive cutting bit, it was a mess, I messed up and told him I would fix it.

View attachment 171986

After a lot of gluing in shims and re-inletting, learning to glue in shims is a skill in itself. I get plenty of practice with the guns that I build.

View attachment 171993

I like to look at the great inletting jobs others do on lock internals, some are so precise as to be amazing art. I make functional, not works of art, my reasoning is no one will ever see it during my lifetime but me.

This is about it for me, notice extensive use of a Forstner bit.;

View attachment 172006
thank you! a lot of the original guns I have have inletting jobs that look pretty rough, like someone took a drill, set a certain depth and just drilled 90% of the mortise like that
 
Cheer up . .. . your internals look worse than your lock mortise or lock plate edges. I think your inlet can be fixed and won't look as bad as you think right now. Experts here will give you good advice.
 
i would remove all the inside parts off your plate and try it to see if the pan snugs up to the barrel. then add one group at a time and see what it does. my GUESS is the mainspring width is the culprit. second GUESS is the sear arm or the trigger bar.
while your inletting looks rough, i applaud you for the attempt.
one more high priced comment, never use the inlet rim as a fulcrum point for your chisel or any tool. that will lead to nothing but heartache.
the main spring can be reduced in width if one is careful, and also the length of the trigger/sear bar can be shortened, or the hole deepened.
if you don't have a scraper a chisel can be used as one by holding the thing vertical and scraping the flat side with the grain.
best of luck and first attempts are wonderful to keep as a gauge of your progress to becoming a master of the art!
 
I think the first one I did looked worse than that. A strop is very helpful in keeping your tools sharp. I probably strop every 5 minuets. I would clean the inletting black off the best you can and the inlet only the plate until it is against the barrel. if I was going to have to use a filler I would prefer it to be around the plate than between the barrel. keep going and keep learning.
 
My 2 cents worth. You might try changing the angle on your chisel for carving. Thirty degrees is fine if you are going to use it as a rough chisel. Twenty degrees will work much better for carving. Once you get it sharp you should only need to buff the edge to keep it sharp unless you damage the edge.
 
Yes it is. Looks like a mouse was chewing on it. But looks correctable with shims and patients and additional chisels, hard to do with just flat chisels. And I'm wondering if the chisels ever got sharp, just because you sharpen them does not mean they got sharp...
 
Back
Top