• Friends, our 2nd Amendment rights are always under attack and the NRA has been a constant for decades in helping fight that fight.

    We have partnered with the NRA to offer you a discount on membership and Muzzleloading Forum gets a small percentage too of each membership, so you are supporting both the NRA and us.

    Use this link to sign up please; https://membership.nra.org/recruiters/join/XR045103

Kentucky rifle build questions

Muzzleloading Forum

Help Support Muzzleloading Forum:

This site may earn a commission from merchant affiliate links, including eBay, Amazon, and others.
Hi Loja,
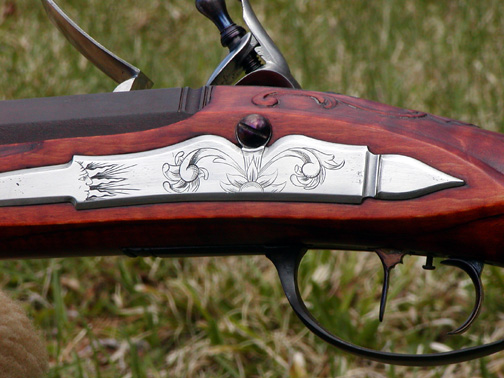
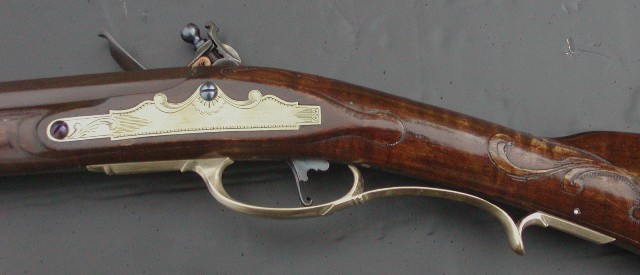
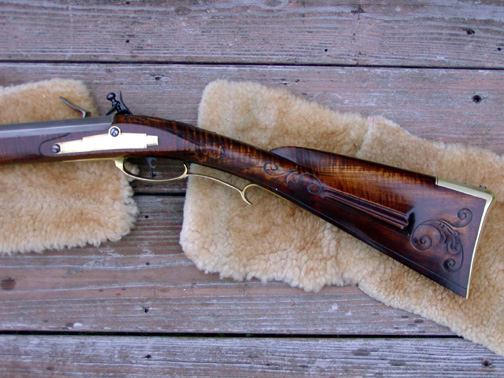
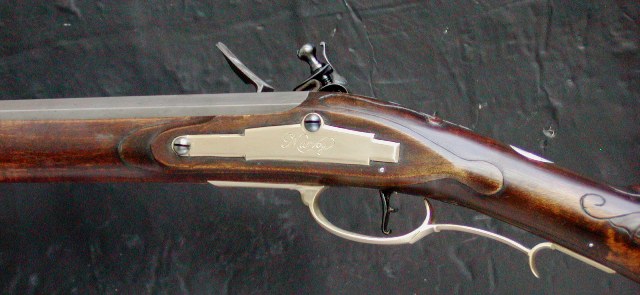
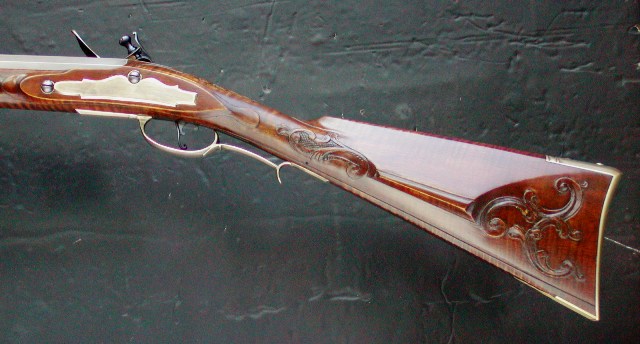
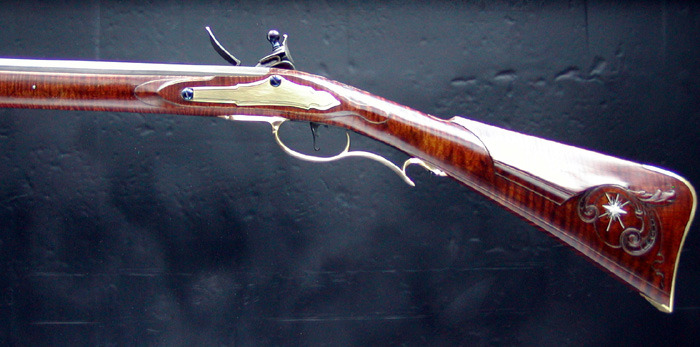
To my eyes, knock back the pointed corners a little so they are not so high, and thin the forward extension just a little. The advantage you have is that they did not pre-inlet your side plate, which means you can make whatever you want. Here are some examples from my work to give you some ideas. They are all based on original designs.
CiPztg5.jpg

Z5hfCW6.jpg

Nf2KqBW.jpg

SehkThP.jpg

BP1GGi3.jpg

ykoKW55.jpg

Side plates should be inlet into the wood not resting on the surface and I would suggest replacing the lock bolts with ones with larger domed heads to look more authentic. It is not hard to do. Track of the Wolf (www.trackofthewolf.com) sells many sizes of bolts. Another thing to think about is the lock panel and side plate panel do not need to be exactly the same. Nobody can see both sides at the same time so you can design your side plate and then shape the panel to best frame that design rather than try to make it the exact same size and shape as the lock panel. It is good to have the length the same, so when you look from the top, they both start and end symmetrically but beyond that, they can be individually shaped.

dave
 
Listen to Dave and you will wind up with a gracefully shaped gun. Don't and you won't.

I suggest that you work on your rear transition zone in concert with your wrist, Don't worry about the front or bottom until your rear is formed. The front part should be done as you are working on your lower forearm. Again this is done this way to make the lock panels appear to "grow" out of the stock rather than simply be "applied". I would further caution you (as Dave did) about using a single tool to cut in the sweeps to the lock panel. That will yield a consistent (and probably too small) radius all the way around rather than one that is "transitioning". While a tool like a half-round file CAN be used to get them STARTED, tools like scrapers will give you a much more satisfying "evolution" in your transitional sweeps' radius'.
 
Thanks Dave, those are some great pics!! I think I like the top 2 the best!
I would like to keep the one I have. My concern is it currently at a visually displeasing angle? I guess my fear is my top screw should of been placed higher. Placing the top screw higher thus lowering the back end of the side plate. Lowering the back end would alow the bottom to follow the lines of the gun better?
I don’t know how I missed this one! I ordered the side plate but have material in hand to make one from scratch. Trying to weight my options.
Is it fine and my eye is off? Or do I need a new one. Or bright ideas on saving this one?
Thanks
 
Thanks Col. B! This was a helpful explanation. “Again this is done this way to make the lock panels appear to "grow" out of the stock rather than simply be "applied".”
I really appreciate Dave taking time to make comments and help guys like me out. His work is phenomenal!
 
Well I have been at it most of the day! I have filed the stock down to meat all of my brass hardware. Worked on thinning stock, lock and side plate panels and reshaped brass nose cap. I lowers my lock plate. My work around was to fill the old hole with a copper plug….not thrilled with it but to cheap to buy another one. Also the piece of brass I was going to make a new one out of was to small.
799C964B-6CCD-4954-B343-592230F1685A.jpeg
434DF020-6D05-4C2A-A2C6-E309A1C96224.jpeg
06A83E50-7AF8-49F0-8DEE-A60FE4C560CB.jpeg
BC1C669D-FCD0-4BDC-BE13-542A7410ADAA.jpeg
EC891EE0-B155-4D4F-B60E-364A7F0BF228.jpeg
Lots left to do but making progress.
 
The forearm needs to be on a diet also. Install the r/r thimbles. Put a metal yardstick 1/16" thick along the r/r thimble edges and draw a line from the entry thimble to the muzzle end. Put a 2nd line running from entry thimble to muzzle about 1/2 " above the line against the r/r thimble line. Rasp off the wood between the lines , making a slight oval shape the length of the forearm to where it ends at the forearm tip. Do both sides of the fore stock the same. This should take the thick look from the fore stock. When you ordered your kit , a $20.00 order to Dixon's M/L shop for their book on how to build a m/L rifle would have been helpful. All the processes needed to complete a rifle are laid out in drawings and text. I hope all this helps to get you a fine rifle..........oldwood
 
Thank you deermanct! I’m going to keep at it! I went ahead and ordered some bigger brass flat stock to make a new side plate from scratch….the copper plug botherd me. What I don’t use now can be used on a knife latter.
 
So I ordered a capbox. I also ordered the spring and screw that were linked to the capbox on the web site( The log Cabin Shop). Here’s my delima. I have never seen one that was assembled. So my question is how dose the spring work on the capbox?

F5E4FD32-C9AD-4E6E-9E8D-5BDC36A6FF92.jpeg
44593FCB-1F56-4D7D-9BC9-384C77EF9B4A.jpeg
 
Make sure the lid is pinned to the body of the patch box. If not , put the lid in place and drill the hinge pin through the two pieces. Pin it with a 1/16" drill bit shank , cut to length. The round post lug on the small end of the patch box , is where the machine screw provided , is drilled and tapped with the appropriate size threads . The tapped hole is not drilled through the patch box , but is called a blind hole and is tapped to the bottom of the drilled hole. If you have no tap to reach the bottom of the hole , once the hole is tapped with a standard tap , just grind the point of first tap and you have a bottoming tap. The bolt provided most likely will be too long , and will need be shortened , so it can attach the flat spring , The spring presses on the cam of the lid , when raised open. Last , the spring might have to be shortened , so it is not visible in the patch box hole , when the lid is camed open , and held open by the flat spring..............oldwood
 
So lifes been busy and it’s been a while since I’ve posted on this build. Had a little bit more time in the last week to work on it. So here’s where I’m at! I went ahead with re-creating a whole new lock plate from scratch. I just couldn’t live with the off angle and off-center hole on the other one. I need to do more sanding around the cap box because I got some the inletting a little too deep. On my way to find some brass screws and nails. So the question is do I add the star to the stock or not?
Thanks
Aaron
25306661-8F47-4F0D-8BBF-5F2C8FEED95E.jpeg
03B0D5C2-6586-4F73-9472-9AFEF72DFF05.jpeg
DBE832F0-25E8-4C02-8EBD-F56420046A4A.jpeg
 
So what the heck!! The tennon pins are #32 or .118 drill bit size! I normally can find things on the web but I’m pulling up nothing!! Do you all substitute another size pin that correlates to standard size drillbit? If so do you use a steel or brass pin?
Thanks
Aaron
 
Back
Top