Incline Angle
Lyman Black Powder Handbook
Page 174
C. Effects of Uphill and Downhill Shooting
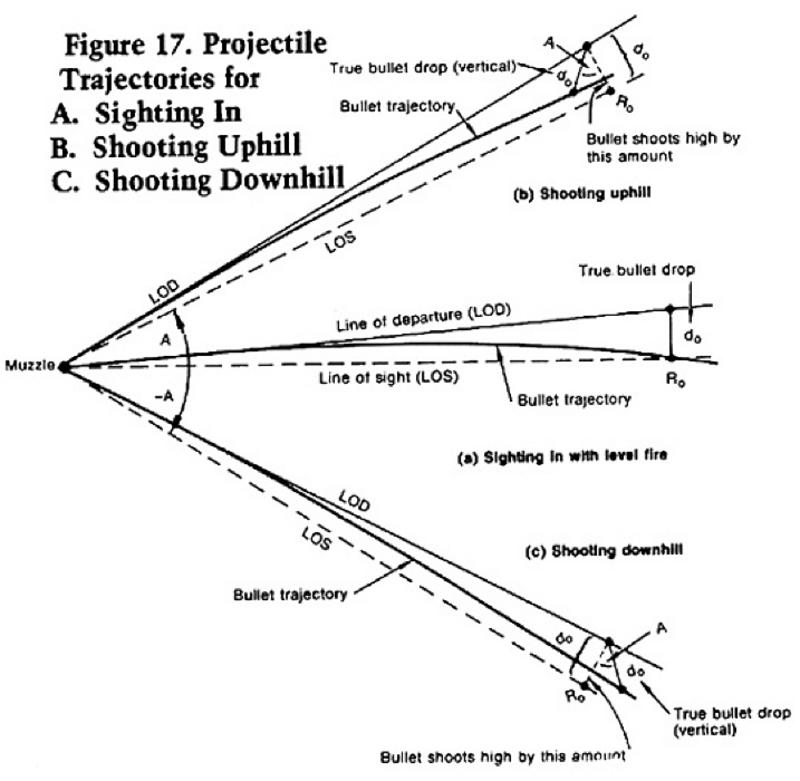
Ordinarily, a shooter will sight in a gun on a range which is nearly level. If he then happens to fire this gun at a steep angle, either uphill or downhill, the gun will shoot high. Figure 17 has been prepared to explain how this happens. It shows three cases, sighting in with level fire (Figure 17 (a)), shooting uphill (Figure 17 (b)), and shooting downhill (Figure 17 (c)).
When sighting in, the shooter adjusts his sights so that the line of sight intersects the bullet trajectory at the range called R0, which is the range where he wants the rifle zeroed in. The distance between line of departure (bore line) and the line of sight at the range R0 is the drop d0. We use this symbol to denote the amount of drop at the range where the rifle is sighted in.
Note that the angle between the bore line and the line of sight is actually very small. This angle is greatly exaggerated in Figure 17 for purposes of illustration. Even for long range shooting, it is less than one degree, and it is typically 10 to 15 minutes of arc for hunting rifles.
It so happens that, when the rifle is fired uphill or downhill, the true drop of the projectile measured at any slant range from the muzzle changes very little from the value at the same range under level fire. This is a key point. Drop, as we use the term here, is always measured in the vertical direction at the target. It is the vertical distance between the line of departure (direction of the rifle bore axis) and the bullet trajectory. Figure 17 shows how true bullet drop is measured for level, uphill, and downhill shooting situations.
It seems to be true in general that at practical ranges for hunting and target shooting the change in vertical drop with firing elevation angle is negligible even for very steep angles. Despite the fact that drop changes very little with elevation angle, the bullet path height (distance of the bullet above or below the shooter’s line of sight) does change a good deal. Consider the situation when the shooter fires a rifle uphill at a steep angle, as shown in Figure 17 (b). Since the true bullet drop changes very little, at a slant range distance of R0 from the shooter the bullet has a vertical drop essentially equal to d0, as shown in the figure. However, the line of sight at R0 still is located a distance d0 in a perpendicular direction away from the line of departure. Because of the firing elevation angle, the bullet trajectory no longer intersects the line of sight at the range R0. In fact, the bullet passes well ABOVE the line of sight at that point, as Figure 17 (b) shows. In other words, the bullet shoots HIGH from the shooter’s viewpoint as he aims the rifle, and at steep angles it may shoot high by a considerable amount, as we will show shortly.
Figure 17 © shows the situation when the shooter fires his rifle downhill. Again, the vertical drop at the slant range distance R0 changes negligibly from the value d0 for level fire, but the line of sight and line of departure still are separated by the perpendicular distance d0. The bullet again passes ABOVE the line of sight instead of intersecting it, at the range R0. Compared to the case of level fire, the bullet again shoots HIGH from the shooter’s viewpoint as he aims the rifle. Furthermore, if the rifle is fired uphill at some elevation angle, and then fired downhill at the same elevation angle, the two bullets will shoot high by almost exactly the same amount.
It is reasonably easy to calculate how much higher a rifle will shoot for any given elevation angle. To do this we need to know the bullet drop versus range for the muzzle velocity used, and we can find this in the Ballistics Tables. Let d be the bullet drop at any range R from the muzzle. The following table shows how much higher the bullet will shoot when aimed either uphill or downhill than it will when fired on a level.
Elevation Angle...Increase in Bullet Path Height
± 5 degrees”¦”¦”¦”¦”¦”¦ .004 d inches
± 10”¦”¦”¦”¦”¦”¦”¦”¦”¦”¦. .015 d
± 15”¦”¦”¦”¦”¦”¦”¦”¦”¦”¦. .034 d
± 20”¦”¦”¦”¦”¦”¦”¦”¦”¦”¦. .060 d
± 25”¦”¦”¦”¦”¦”¦”¦”¦”¦”¦. .094 d
± 30”¦”¦”¦”¦”¦”¦”¦”¦”¦”¦. .134 d
± 35”¦”¦”¦”¦”¦”¦”¦”¦”¦”¦. .181 d
± 40”¦”¦”¦”¦”¦”¦”¦”¦”¦”¦. .234 d
± 45”¦”¦”¦”¦”¦”¦”¦”¦”¦”¦. .293 d
± 50”¦”¦”¦”¦”¦”¦”¦”¦”¦”¦. .357 d
± 55”¦”¦”¦”¦”¦”¦”¦”¦”¦”¦. .426 d
± 60”¦”¦”¦”¦”¦”¦”¦”¦”¦”¦. .500 d
To use this table, we first look up the drop d for each value of range for our load in the Ballistics Tables. Then, we calculate the increase in bullet path height for each elevation angle of interest using the multiplying factors in the table above. This tells us how much higher the bullet will shoot than it will for level fire at each value of range and for each elevation angle we wish to consider.
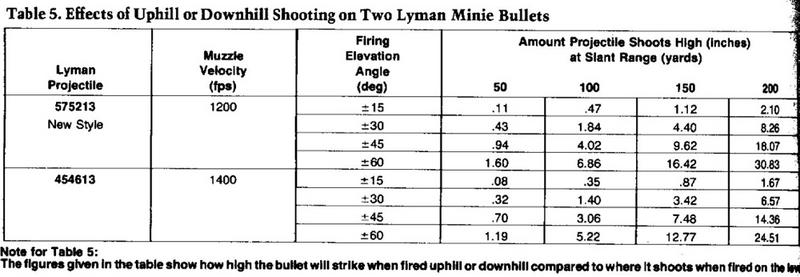
As an example of this procedure, and also to show how large an effect the firing elevation angle can have on typical projectile trajectories, Table 5 has been prepared for the two example Minnie bullets in the proceeding discussions. It is evident that either bullet will shoot several inches high when fired up or down steep inclines. The importance of understanding and compensating for firing elevation angle effects is pretty clear from these figures.


