• Friends, our 2nd Amendment rights are always under attack and the NRA has been a constant for decades in helping fight that fight.

    We have partnered with the NRA to offer you a discount on membership and Muzzleloading Forum gets a small percentage too of each membership, so you are supporting both the NRA and us.

    Use this link to sign up please; https://membership.nra.org/recruiters/join/XR045103

Trigger inletting question

Muzzleloading Forum

Help Support Muzzleloading Forum:

This site may earn a commission from merchant affiliate links, including eBay, Amazon, and others.

talkingamoeba

40 Cal.
Joined
Aug 24, 2010
Messages
125
Reaction score
1
Hello,
The stock is a pre-carve, with the machined trigger mortise. The trigger plate is quite a lot longer than the opening and it looks like the ends of the plate must be cut so that the trigger-guard can be installed later. My guide book leaves me unsure. If I line up the trigger where it needs to be, should I trim the trigger plate to fit the general guide of the roughed out mortise, lengthwise? I have had too many "little" mistakes, hope to get this part right. Thanks.
 
As a general rule, the wood is cut to fit the metal. If you have a kit that represents a certain style, then I'm assuming the trigger plate and guard are already correct for that style, so you don't want to alter their shape.

I'm also guessing that you were given a general, fits-all, cut-out for the trigger, and it's expected that you customized the the mortice to fit whatever trigger you have. I don't have much experience with kits, but this makes sense to me. Some of these other guys with more kit building experience may elaborate on this. Bill
 
The position of the TP is determined by the pinned trigger when it's in the TP slot. Excess TP length to the rear isn't critical {my TPs usually are 2-3/4" lg} but too much length to the front can interfere w/ the TG. Determine where the tang bolt hole is in the TP and then leave a minimum of 1/8" to 1/4" forward from the edge of the tapped hole. Of course you want the TP to fill the entire machined inlet but the above suggestions are some guidelines....Fred
 
The inlets cut for the trigger plate on most of the "pre-carved" kits are generic and intentionally left undersize so that many different triggers can be installed.
Actually, this mortice is intended just to provide some room for whatever is on top of the trigger plate when you start to install it.

You didn't mention what kind of trigger you are going to install but you will need to determine where, fore and aft it needs to be to work properly. This cannot be done until the lock has been installed.

Once the lock has been installed, notice the location of the sear arm that releases the hammer or cock. This arm is the key to determining where the trigger assembly will go.
Once located, make a mark on the lower area of the lock panel on the wood and write "sear" next to it.

If the trigger is a simple single trigger, not a set trigger, the trigger will be pivoting on a pin. This pin needs to be located 5/16 to 3/8 of an inch foreward of the sear arm to give a easy trigger pull. If it is located too far forward the trigger pull will be heavy and there is not much that can be done to correct it.

If the trigger is a double set trigger there will be a integral blade on the front trigger which rises when the front trigger is pulled.
On the rear "set" trigger there will also be a blade that rises when the rear trigger moves forward.
With the rear trigger left "unset" its blade will be sticking upward just a little.
Move the rear trigger forward about 1/8 of an inch and hold it there while you move the front trigger backwards about 1/8 of an inch and hold it there.
The two trigger blades will be forming a "V" where they meet or cross each other. Mark this location on the side of the trigger plate.

Now, locate this mark in line with the sear arm mark on the lock panel.

Hold the trigger plate in this position and mark the front and rear locations on the wood with a pencil or pen.

This position will undoubtedly require that quite a bit of wood is removed to install the trigger plate and the key here is to go slowly.

Remove just enough wood from the pre cut mortice to allow the stuff on top of the trigger plate to fit down into the wood. You can cut this a little oversize (forward and aft) to allow the plate to be moved to the position you've marked on the wood.

When the trigger plate is at the correct fore/aft location, make sure it is roughly centered with the lock panels on the stock and lightly clamp it in position with a C clamp.

Using a pointed Exacto-Knife cut straight down into the wood using the edges of the trigger plate as a guide. This cut should be about 1/16 deep and completely around the outside of the trigger plate. It is a good idea here to repeat this cut several times to make sure it is completely cut.

Remove the C clamp and the trigger plate.
Use your 1/4" wide chisel to cut from the "inside" of the inscribed cuts towards the cut to remove a little wood all around the new home for the trigger plate.
After removing the wood right next to the cuts, use the 1/4" chisel to lower the center area.

Reinstall the trigger plate into its new home and recut straight down with the Exacto-Knife around the edges making sure you don't enlarge the original cut. All cuts around the trigger plate must be straight down into the wood.

Keep this procedure up until the trigger plate is flush with the wood. If it seems to hang up, use some inletting black or lipstick to make sure the upper part of the trigger assembly is not hitting on the wood somewhere. Also, cut a trench for the trigger blade to live in. It must have a clear slot extending to the sear arm.

Have fun. :)
 
Might help if ya told us what you are building & what trigger you are using. Or a photo of them.

However, on most trigger asm, I cut some off BOTH ends. Sometimes it is just a smiggin off the front but I take some off.
Reason I do this is if I would get it in & not like the trigger pull in # or travel, I can just grab another trigger asm & move it fore or aft & trim it a lil & change it to where I want it. Seldom have to change one out, but once in a great while. Sure beats filler & welding on metal to the triggerplate.

Keith Lisle
 
The rifle is an A.Figthorn type with a Davis double-set #4 trigger. Where it looks to need to be trimmed is at the fore-end. The tabs that are on the trigger guard will hit trigger plate metal if the trigger guard ends up where it appears that it will. The lock has been inlet (not without errors) and the sear position marked. I just don't want to inlet the whole trigger plate length only to figure out that the trigger guard won't fit right.
 
IMO, to determine how much you can cut off of the front of the trigger plate, first figure out where you will want the barrels tang screw.

Once this is done, mark the location on the wood and use a small "tri-square" or carpenters square with the blade located at the tang screws future location.
Rock the square back and forth keeping an eye on the angle with the tang at that location and when the square seems to be perpinducular with the tang, draw a line down the side of the stock with a pencil. This line represents the future screws center.
It should intersect the trigger plate ahead of the front trigger.
The trigger plate will need at least 1/8 inch of steel forward of this tang screw. Any extra material can be cut off to make room for the trigger guard.
 
The DST-4 is one I use allot & I always cut them off on both ends. Just a little on the front usually, about 1/8", but some, and depends on the rifle & t/guard I am using..
First you have to figure how you want the triggers to set in the bow of the guard & bend the guard to the shape you need it to to fit on the rifle. Don't wait to bend the t/guard, of you may have issues later on. Get it shaped to the application.

Then put the trigger asm. in the guard, then put it along side the rifle & look at the tang screw placement, like Zonie says above.

Then grind the triggerguard lugs to shape, and fit the trigger asm in how you want it. (At times I have had to cut off the lugs & move them & silver solder or braze them back on)
The rear of the triggerplate is usually not an issue when I use them, but I still take off 1/8" to 1/4" in length. Note: You can't to too far forward on the triggerguard lugs or you will be into the RR hole, so MARK the end of the RR hole on the bottom of the stock so you know For Sure where it is.

On this Jaeger I am working on now, dif trigger than you are using, but I still took of 1/8" on both ends & had to take 3/16" off the triggerguard lug to fit the trigger up in the bow, then reshape the rear trigger to make it all work. I like the front part of the bow on the triggerguard to be right up over the edge of the front of my triggerplate. Not I have it in, I will take a lil of the bow out of the rear trigger & make it fit the bow evenly. Others do it differently, but that is how do some of them.

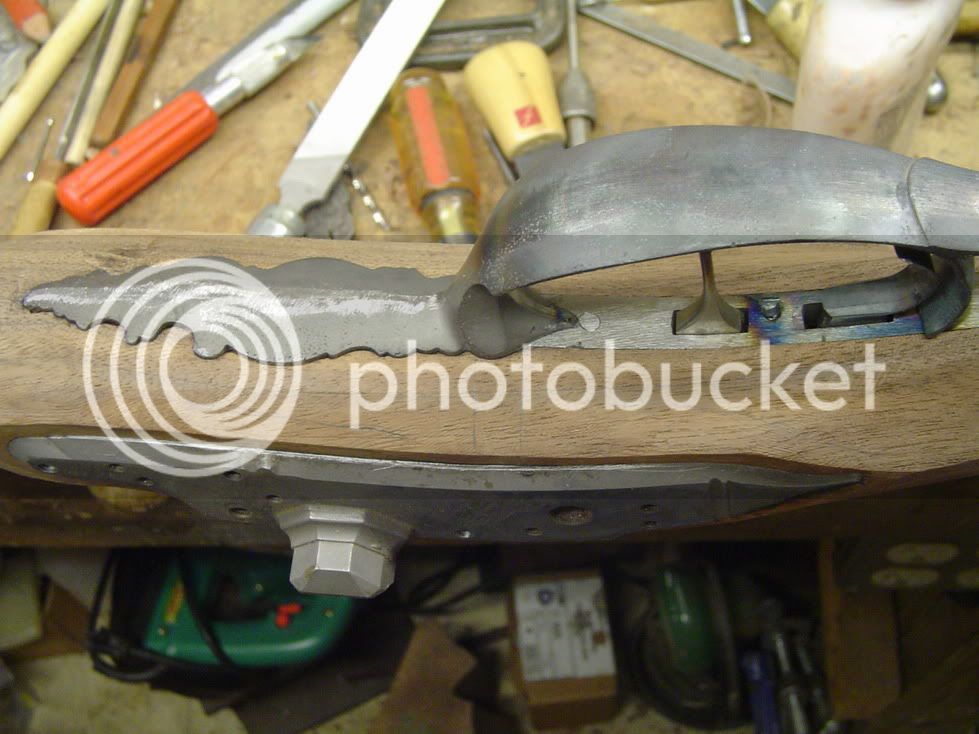
DSC00067.jpg


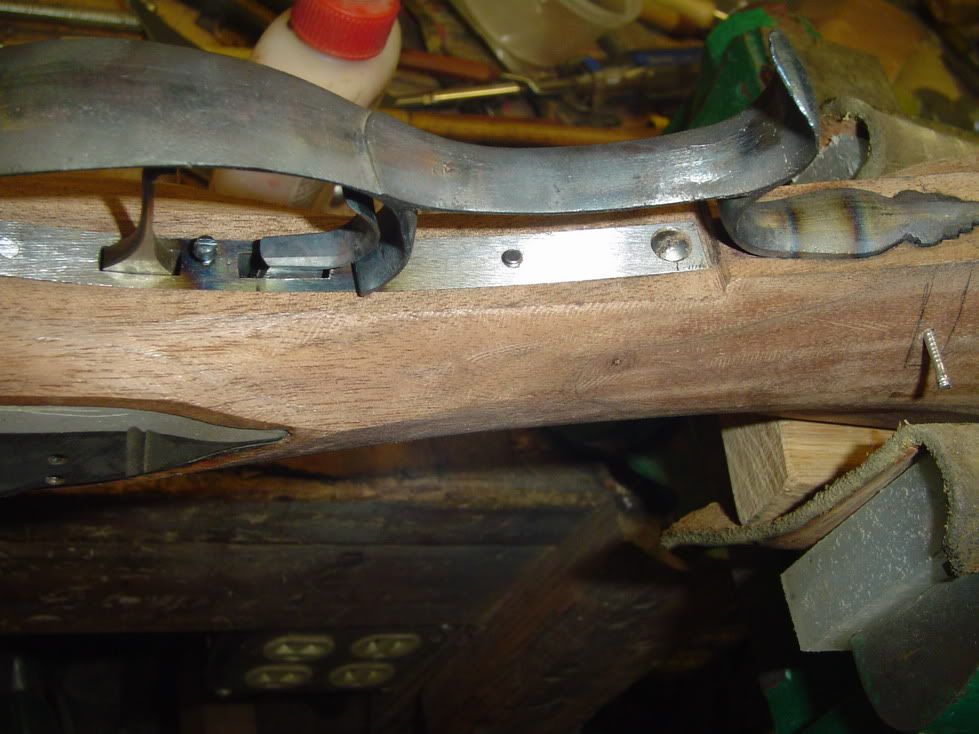
DSC00069.jpg


Note: Front & rear of triggerguard are inlet about 1/2 of the thickness of the edge of the guard. Where the front of the bow of the t/guard is over the triggerplate, that part of the guard is filed out so it will let the guard sit down on the triggerplate, yet let the rest of the front of the guard go down into the inlet.

Keith Lisle
 
On precarves, they usually have a slot of some type so you can see the sear arm, thus know where it is so you can install the trigger to properly engage it. This is another reason you sometimes move a triggerguard lug so you can get the lug to the meat of the wood in front of the triggerplate, yet not into the RR hole. (Another reason you may have to shorten the trigger plate at times)
If by chance they drilled the RR hole too deep, then you have to make a short plug & glue it into the end of the RR hole so give you something solid to inlet the t/guard lug into.

Several things that you must take into consideration when installing the trigger asm, so don't just throw it in & expect it to come out correct. It Does Take Planning.....

Before ya do anything, I would take the lock panels wood down close to where you want them to end up, have them Even on each side (this is Important), find the center in front of the pannels on the bottom of stock & in the wrist on bottom, then draw a straight Centerline down the bottom of the trigger area to keep you in the center of it all.
It is very easy to get it all off center. Also LOOK at the underlugs on the Triggerguard. They seldom are perfectly centered & have to be moved, or ground down. If you go by centering them & they are not centered on the guard, the guard will not be centered. Sometimes the lug holes end up off center under the guard. That is OK cause you cannot see it. The main thing is the Guard is centered & the triggerplate under it is centered.

A trigger & guard are very time consuming & challenging. Don't get discouraged, just take your time. I have done them in a few hours before & others it has taken me LOTS of hours.

Keith Lisle
 
Thanks folks! You'll chuckle at my greenness, did not realize the guard could be bent some. You all have explained so that I get what you are saying. Thank you again.
 
If it is Investment cast or iron, you have to heat it to bend it, or you will break it !! :nono:
If you break it & it is brass or investment cast, you will see the repair after it is repaired, most of the time.

Keith Lisle
 

Latest posts

Back
Top